background image

----------------------------------------------------------------------------------------------------------------------------------------- 


6

 / 

26


Chapter Two—Security Instruction   


I. Safety Matters   


VS+  is  a  high-tech  medical  device,  which  focus  on  circumferential  reduction 

cellulite 

improvement and facial rejuvenation.   

These  who  have  been  trained  on  the  machine,  can  use  the  machine  softly.  No  matter  the 

operator  ,  the  assistor,  or  the  maintainer,  he  need  to  understand  this  chapter  well.  And  the 

operator, the clients personal safety is most important, these has been reflected  in the machine 

design already .   

Below is some detail safety issues:   

1.


When switch on the machine

,

 the machine self-checking system is also switched on and during 

the whole treatment, this system will keep monitoring circuit. 

2.


Safe and environmental protection material, which meets the requirements of medical,  used 

to connect patients’ skin and provide a comfortable treatment.   

3.


Independent  safety  circuit  design,  can  cut  off  the  power  supplier  while  electric  leakage 

happens. 

4.


Red “emergency” button, can cut the power supply immediately in emergency situation.   

5.


Button switch can protect random switch on of the machine.   


All  devices  if  Improper  use  can  cause  body  damage.  The  RF  device,  when  on 

operation can cause high voltage, these who operate the RF device need to pay attention on this 

and have some necessary safeguard   

procedures.  Patients:  The  skilled  operator  and  the  decoration  of  operation  room  will  affect 

patients  safety.  For  patients  themselves,  they  also  need  to  know  more  about  the  treatment 

principle.  During  the  treatment  the  patients  have  the  responsibility  to  feedback  their  feeling  of 

treatment, this can protect their skin been burn due to high energy.   

[Main Warning] 

Summary of Contents for VelaShape Plus

Page 1: ... 1 26 Body contouring multi functional system Model VS USER MANUAL ...

Page 2: ...llation of HP 12 VI Installation of spare parts 12 VII Install the display of the machine screen 13 Chapter Four Operation Instructions 14 I menu instruction 14 II Handpieces introduction 16 Chapter Five Clinic Operation 18 I Parameter recommended 18 II Body Shaping 18 III Face treatment 21 IV Suggest session and course 21 V Requirements of operation 22 VI Prepare for operation 22 VII Skin reactio...

Page 3: ...or full body treatment What s more the short treatment time and instant treatment effect make you feel comfortable and relax like doing a massage during the whole treatment The unique streamlined fashion design makes machine movement convenient and helps saving salon space So it is the ideal multifunction device for salons II Application Circumferential reduction Cellulite improvement Temporary im...

Page 4: ... Laser power 20W Max LCD screen on machine 10 4inch color touch screen Out power 2000W Screen on handpiece a 2 4inch b 1 9inch RF frequency 20MHz CRF Diode laser 635nm Japan imported laser Vacuum pressure a Absolute pressure 10kPa 80kPa 7 6cmHg 60 8cmHg b Relative pressure 20kPa 90kPa 15 2cmHg 68 4cmHg Infrared 0 20W Pulse 0 10s Interval 0 5s Infrared 940nm N W 40kg Voltage 220V 110V Packing Alumi...

Page 5: ...gent software controls the output power and and rate of release High security and easy to treat 9 perdurability after 1 3 treatment can see the result it will keep 1 2 years V Taboos People who have Pacemaker or shock eliminator in body 1 Who have metal on the surface of the treatment area or other prosthesis or fillers 2 People who have skin disease such as vitiligo psoriasis herpes and skin canc...

Page 6: ...h meets the requirements of medical used to connect patients skin and provide a comfortable treatment 3 Independent safety circuit design can cut off the power supplier while electric leakage happens 4 Red emergency button can cut the power supply immediately in emergency situation 5 Button switch can protect random switch on of the machine All devices if Improper use can cause body damage The RF ...

Page 7: ...ed state If move the machine incorrectly may cause personal injury The machine is well balanced and is movable but only move slowly and carefully the machine via three wire power cord grounding the earth good ground is essential for safe operation Fire prevention 1 Preoperative skin treatment implementation must not use alcohol or acetone flammable to clean skin if necessary use soap and water 2 I...

Page 8: ... before the next step Device Level 1 Electric shock protection 1 BF grade 2 Anti corrosive liquids General 3 Must not use the machine in the presence of flammable anesthetic mixture with air nitric oxide environment 4 The operation mode Continuous ...

Page 9: ...tion I how to open the packing Box Picture1 Picture 2 The way to open the exterior packing box a Turn the lever in picture 1 to the position show as picture 2 b Switch the lever then we can open the packing box Picture 1 Picture 2 ...

Page 10: ... 10 26 II Accessories ...

Page 11: ...lder step 1 1 Insert metal pole into socket 3 Fix the plastic object on metal pole 2 Tighten 2 pcs of screws 4 Step one finished IV Installation of holder step 2 1 Tighten 2 pcs of screws 2 fix holder on left 3 fix holder on right ...

Page 12: ...nection part directly HP1 HP2 HP3 HP4 no need to press yellow button 3 All HP comes with label HPX 4 press yellow button and then match with each number take off VI Installation of spare parts Located in lower part of the machine with labels Insert spare parts to connection part as below ...

Page 13: ...machine connecting the screen 2 Picture 2 The connector between the machine and the screen 3 Picture 3 the cable are connected well with the connector 4 Picture 4 the screen is installed in the machine please tighten the screws inside the red circle 5 Picture 5 6 put the magnetic cap ...

Page 14: ...een Second page treatment menu Treatment menu for HP1 Treatment menu for HP2 Vacuum range 1 5 Infrared range 0 20 RF range 0 100 Kpa 1 100KPA Pulse range 1 10 Kpa 1 100KPA Pulse range 1 10 Vacuum range 0 5 Rev range 0 39 Infrared range 0 20 RF range 0 100 Kpa 1 100KPA Pulse range 1 10 ...

Page 15: ...n 28KHZ 1 5 level Cavitation 40 5khz 1 5 level Kpa 1 100KPA Pulse range 1 10 Vacuum range 1 5 Infrared range 0 20 RF range 0 100 Kpa 1 100KPA Pulse range 1 10 Kpa 1 100KPA Pulse range 1 10 The small screen on HP is synchronous with main screen There is a small screen on HP1 HP2 HP4 ...

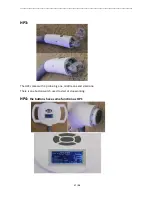
Page 16: ...tton changes to system among infrared RF vacuum Rev time and pulse The button adjust energy level The button firstly press ready on main software and then press to start to treat Press again to stop working So do the HP 2 which is shown below HP2 ...

Page 17: ... 17 26 HP3 The HP3 comes with 3 probe big one middle one and small one There is one button switch used to start or stop working HP4 the buttons have same function as HP1 ...

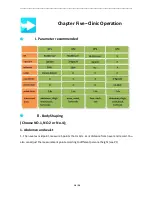
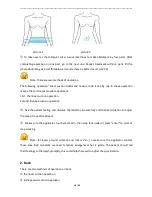
Page 18: ... recommended II Body Shaping Choose NO 1 NO 2 or No 4 1 Abdomen and waist 1 The navel as midpoint measure 5 points that is 3cm 6cm distance from navel and record You also can adjust the measurement point according to different personal height see P1 ...

Page 19: ...linear suction operation Second 8 shape suction operation Ask the patient feeling and observe the reddish skin carefully and thermal situation to adjust the area of repeat treatment Makes sure the applicator touch whole skin then step foot pedal or press enter to start or stop working Note fat layers around stomach and ribs is thin so make sure the applicator contact those area fully Generally we ...

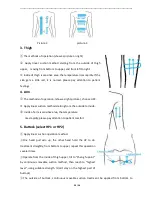
Page 20: ... suction method starting from the outside to inside Inside of arm is sensitive area the temperature rises rapidly please pay attention to patient comfort 5 Buttock select HP1 or HP2 Apply linear suction operation method One hand pull skin up the other hand hold the HP to do treatment straightly from bottom to upper repeat this operation several times Operate from the inside of thigh upper till to ...

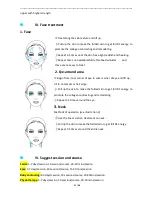
Page 21: ...to on temple or hair edge Pull up the skin to make the folded skin to get full RF energy to promote the collagen contracting and remodeling Repeat 3 4 times around the eye 3 Neck Methods of operation see illustration 3 Use the linear suction treatment on neck Pull up the skin to make the folded skin to get full RF energy Repeat 2 3 times around the entire neck IV Suggest session and course Facial ...

Page 22: ... burning A High RF energy result in thermal accumulations more and more with times Reduce 1 3 level as response B It is forbid to repeat operation on the one part of face or body in order to avoid the burning C Such as olive oil or massage oil molecule is large and cannot be absorbed easily through the skin that energy is collected on skin surface Recommend to use strong moisturizing massage cream...

Page 23: ...e back Individual people have skin redness and slight thermal sensation after application that lasts15 to 30 minutes which is normal situation b Abdomen Thighs legs arms the individual who have reddish thermal sensation side waist will appear the points like done by scrapping 2 The face Individual people have skin redness and slight thermal sensation the skin immediately becomes tight pores closin...

Page 24: ...sn t work Possible reasons and solutions Close the power switch re open the machine if it still doesn t work please contact the after service person 3 The screen doesn t act or act wrong Possible reasons and solutions a Loose the screws that fix the screen to check if it is too tightened b High voltage interference check if there is big power device around your location c The software is out of co...

Page 25: ...iled steps as follows a One hand press the lock release bottom on the both sides of probe the other hand hold and plug the middle of handle s borde part and then put back the dismantled handle to the right holder b Clear the treating probe in the warm water towel with cleaning cream wash its front and back sides carefully Then wash it in clean water again dry it by Kleenex If some position miss wa...

Page 26: ... 26 26 IV Air circuit diagram ...

Reviews: