background image


CAUTION: To  prevent  possible  damage,  lift the jogger  by  the  base  only.  Lifting by  the  bin  or  top  cover 

may cause damage. 
 
Locate the jogger on a solid support. The support must not vibrate while the jogger is operating. The bin or top 
cover must not be in contact with any rigid object or adjacent surface; it must be free to vibrate. 
 
OPERATION 
 
Place the jogger in its operating location and plug it into a self-grounding electrical receptacle. The power 
supply voltage and frequency must be as specified on the nameplate. 
 
The vibratory amplitude of the unit is changed by a rheostat located on the control. Various deck configurations 
are available. See Syntron Material Handling, LLC. Syntron product literature for further details, capacities, etc. 
 
For maximum efficiency, Syntron Material Handling, LLC. recommends a maximum load of 10 pounds for the 
J-1-D Jogger. 
 
MAINTENANCE 
 
Adjusting the Air Gap 
 

 WARNING: The air gap must be adjusted while the jogger is in  operation.  Exercise  caution  to  pre-  vent 

electrical shock to personnel or damage to the jogger. A striking condition (indicated by a loud rapping noise) is 

caused by "too close" of an air gap. An excessive current draw (indicated by excessive heat) is caused by "too 

wide" of an air gap. 


 Caution: Do not operate the jogger when either condition exists. An adjustment of the air gap is required. 

 
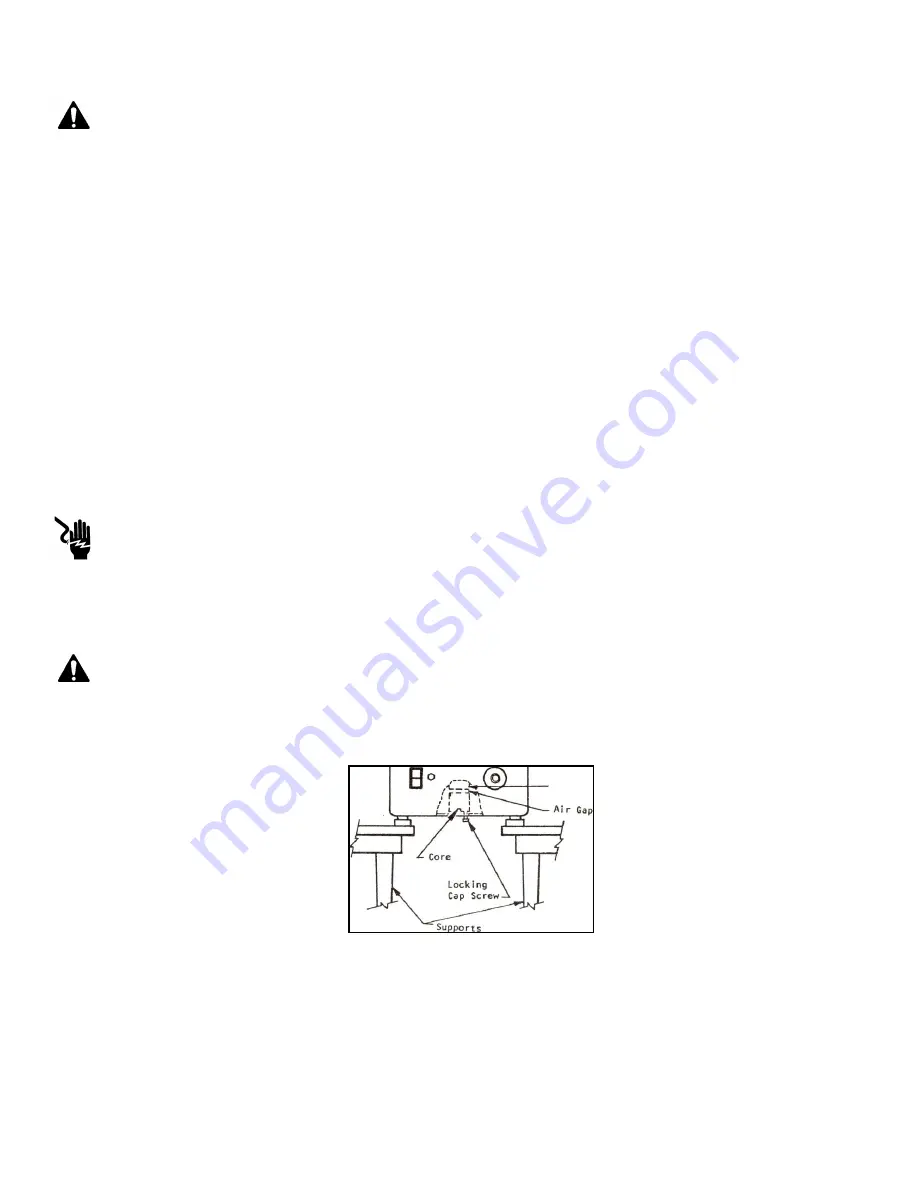
Place the jogger in a position to gain access to the adjustment screw on the bottom. As suggested in Figure 1, 
place the jogger between two tables. Supporting the jogger by the bin or cover, or hand-holding the jogger will 
affect the adjustment of the air gap. The unit must be supported at the rubber feet.


              Armature 


Fig. 1 - Air Gap Adjustment 


Plug the electrical cord into a receptacle and operate the jogger at "100" dial setting. On the bottom of the 
jogger, loosen the socket head cap screw, which locks the core in position. Adjust the air gap using a 
screwdriver in the slot adjacent to the locking cap screw. 
 
Note:  Turning  the  screwdriver  clockwise  will  lessen  the  air  gap  (to  lessen  the  current  draw).  Turning  the 

Summary of Contents for J-1-D

Page 1: ...Service Instructions Syntron Jogger Model J 1 D ...

Page 2: ...for jogging and packing of materials A magnet assembly produces a vibrating action which is transmitted to the deck or rack through a system of leaf springs Refer to these service instructions prior to installing adjusting or performing maintenance on this jogger WARNING Failure to follow these instructions could result in unsatisfactory jogger performance damage or shortened service life or perso...

Page 3: ...adjusted while the jogger is in operation Exercise caution to pre vent electrical shock to personnel or damage to the jogger A striking condition indicated by a loud rapping noise is caused by too close of an air gap An excessive current draw indicated by excessive heat is caused by too wide of an air gap Caution Do not operate the jogger when either condition exists An adjustment of the air gap i...

Page 4: ...raw of 1 0 amps When the proper air gap has been achieved indicated by the current draw lock the core in place by turning the socket head cap screw on the bottom of the jogger The jogger is now ready for further operation TROUBLE SHOOTING PROBLEM CAUSE CORRECTION Unit does not operate Defective control board Replace Shorted wiring loose Repair connection no power to unit Unit operates will not Def...

Page 5: ...1812 L CORE 1 91811 HEX HD CAP SCRW 10 32 X 1 2 1 H0419600 M GROUND STRAP 2 164473 A ROUND HD MACH SCREW 10 32 X 3 8 2 H0203102 NUT 10 32 1 H0101003 10 LOCKWASHER 1 H0112305 N POWER CORD USA 1 ONLY 0063X019 POWER CORD UNITED KINGDOM 0063X022 POWER CORD EUROPEAN 0063X023 POWER CORD AUSTRALIAN 0063X024 P AC POWER ENTRY MODULE IEC 320 C 14 1 0202X224 M3 X 8MM SCREW 2 6515 083 001 M3 NUT 2 6515 083 00...

Page 6: ...6601 B COVER SUPPORT ALUMINUM 1 114795 SCREW HX HD 5 16 18 X 1 1 2 1 H0354624 SCREW HX HD 5 16 18 X 1 1 8 8 H354524 C1 CENTER SPACER THICK STEEL 2 091818 002 C2 CENTER SPACER THIN ALUMINUM 4 91819 E1 END SPRING SPACER THICK STEEL 2 097983 002 E2 END SPRING SPACER THIN ALUMINUM 8 91817 F LEAF SPRING 9 PLY 091815 C01 LEAF SPRING 11 PLY 2 091815 A01 SINGLE BIN RACK A SINGLE BIN DECK ASSEMBLY 1 195726...

Page 7: ...EW 1 4 20 X 5 8 4 H0457902 B COVER SUPPORT STEEL 1 91814 SCREW HX HD 5 16 18 X 1 1 2 1 H0354624 SCREW HX HD 5 16 18 X 1 1 8 8 H354524 C1 CENTER SPACER THICK STEEL 2 091818 002 C2 CENTER SPACER THIN ALUMINUM 4 91819 E1 END SPRING SPACER THICK STEEL 2 097983 002 E2 END SPRING SPACER THIN ALUMINUM 8 91817 F LEAF SPRING 9 PLY 2 091815 C01 LEAF SPRING 11 PLY 091815 A01 Important Syntron Material Handli...

Reviews: