background image

Instructions of Use and Maintenance LEX Plus 10 Connect Water Softener

6

3. How the system works

The water becomes „soft“. However, the ion exchanger resin absorbs only a limited amount 
of hardness particles. Depending on the water hardness, the absorbing capacity of the resin 
becomes depleted sooner or later and has to be regenerated.  

Regeneration with this system means removing the hardness particles from the ion exchanger 
resin.

The diluted salt brine that flows through the resin bed removes the hardness particles, which 
are then directed to the sewer. 

The regeneration process requires only a small amount of salt and complies with EN 14743 and 
DIN 19636-100. 

The water softening system undergoes automatic disinfection on a regular basis in order to 
prevent microbial growth. The small amount of chlorine required for that process is generated 
electrolytically from the brine sucked in during regeneration.  

The regeneration is carried out automatically. 

A water meter integrated in the device records the quantity of produced soft water, which is 
summed up in the electronic system. When the value set for the raw water hardness is reached, 
the electronic system triggers the required regeneration process. 

Summary of Contents for LEX Plus 10 Connect

Page 1: ...Instructions for Use and Maintenance LEX Plus 10 Connect Water Softener M A N U A L Innovative solutions for smart people ...

Page 2: ... 61 05 20 E Mail info syr de www syr de Hans Sasserath GmbH Co KG The company Hans Sasserath GmbH Co KG remains the owner of the copyright of the present instructions manual No part of this publication may be reproduced transmitted in any form or by any means or used for competitive ends without prior permission of the author SYR 24 hour service 0800 61 05 000 Competent assistance for all technica...

Page 3: ...2 Menu tree Menu level 1 9 5 3 Menu level 2 10 5 4 Menu tree Menu level 2 11 6 Service Service interruption 12 6 1 Service 12 6 2 Service interruption 12 7 Maintenance Inspection 13 7 1 Maintenance Intervals 13 7 1 1 Check Replacement Seal Kit 14 7 1 2 Check Replacement Chlorinator Cell 15 7 1 3 Check Replacement Solenoid Valve 16 7 1 4 Cleaning Salt Tank 17 7 1 5 Restart 18 8 Malfunctions 19 8 1 ...

Page 4: ... and current form a lethal mixture Only qualified installers are authorized to install the device Ensure that the socket is always readily accessible If the cable of the device is damaged replace it in order to avoid any risk Unplug the device prior to changing any setting in the electronic system The apparatus is deliver ed with a mains adapter 1 4 Safety instructions Salt The residual regenerati...

Page 5: ...ent corrosion Galvanized or copper tubes can also be used in case of partial softening approximately 8 dH This stabilizes the remaining carbonate hardness particles and forms the prerequisite for building up a homogenous protective coating in the downstream piping system Some particular cases require an additional dosage of minerals mineral solutions The functional parts are made of high quality m...

Page 6: ...dness particles which are then directed to the sewer The regeneration process requires only a small amount of salt and complies with EN 14743 and DIN 19636 100 The water softening system undergoes automatic disinfection on a regular basis in order to prevent microbial growth The small amount of chlorine required for that process is generated electrolytically from the brine sucked in during regener...

Page 7: ... huge damage on the installation site due to a leaking device or supply line for instance in an office medical practice etc it has to be ensured that during the personnel s absence the water and power supply are interrupted upstream of the system We recommend our leakage detector Safe T Connect with an integrated floor sensor serial number 2421 00 010 Do not disconnect during the regeneration proc...

Page 8: ...art up Touch the display again to go to the next submenu Use the following symbols in the lower section of the display when navigating Home directs you immediately to the start screen Menu directs you to the main menu Help offers help and gives explanations regarding the settings Back goes back to the previous menu Save saves the setting Start screen LEX Plus Connect Menu key 5 1 Menu level 1 The ...

Page 9: ...ions for Use and Maintenance LEX Plus 10 Connect Water Softener 5 2 Menu structure Menu level 1 Touch the start screen to activate the main menu Start up cf Instructions for instal lation and start up 9 1500 27 ...

Page 10: ...lowing password 41352 This will give you access to the overview of menu level 2 Make the required settings for an immediate or time delayed regeneration or for additional parameters Press any menu point to access the next submenu Press Exit to confirm settings you possibly changed and quit the menu In case of submenus including several pages press the arrow keys to navigate through these menus 5 3...

Page 11: ...Instructions for Use and Maintenance LEX Plus 10 Connect Water Softener 5 4 Menu structure Menu level 2 ...

Page 12: ... App or the web interface of a PC the SYR Connect control will indicate in due time that the salt level is too low When no softened water or just a little quantity of softe ned water is drawn off the water softener will automatically carry out a forced regeneration after 4 days at the latest to ensure perfect hygiene in compliance with EN 14743 and DIN 19636 100 DVGW test guideline When restarting...

Page 13: ...the device prior to maintenance works Put the bypass and blending valve in the bypass position Maintenance Interval Check Hardness setting Every 3 months Operator Check Sealing kit once per year Installer Exchange Sealing kit every 2 years Installer Cleaning Salt tank once per year Installer Cleaning Chlorinator cell once per year Installer Exchange Chlorinator cell every 2 years Installer Functio...

Page 14: ... Remove the mount of the seal kit Replace the seal if necessary Remove the mount and clean especially the strainer surfaces with clear and cold water Replace the second seal if required Make sure that the second seal is in correct position the small strap must be visible on the right side at the top Re assemble in reversed order Strainer surfaces ...

Page 15: ...move the John Guest angle by pushing in the angle s grey ring with two fingers and using the other hand to remove the angle Remove the chlorinator cell Cleanthechlorinatorcellwithcoldandclearwaterorreplaceifnecessary Re assemble in reversed order Remove the push in connections 7 1 2 Check Replacement Chlorinator Cell ...

Page 16: ...ther hand to remove the angle Remove the second John Guest angle which leads into the salt con tainer in the same way We recommend to pull the cabinet slightly forward Remove the connections Remove both screws of the solenoid valve s fixing bracket Remove two further screws from the fixing bracket Once the solenoid valve is unscrewed from the fixing bracket it can be replaced Re assemble in revers...

Page 17: ...e the connectors of the salt tank s LED 7 2 4 Cleaning Salt Tank Remove the brine line by pushing in the John Guest angle s grey ring with two fingers and removing the angle with the other hand Remove both captive nuts Remove the four connectors of the electrodes The positions of the connectors are marked with colored dots and correspond to the cable s colors ...

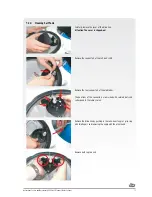
Page 18: ... required Record the maintenance works in the maintenance report chapter 14 Montage und Inbetriebnahme LEX Plus 10 Connect Einzelenthärtungsanlage A N L E I T U N G 7 2 5 Restart Remove the filling level unit Verifythefloatandthecheckvalveofthebrineline clean ifnecessary Clean the salt tank and remove any incrustations or residues Remove the remaining salt from the salt tank and store it temporari...

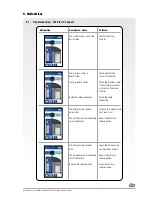
Page 19: ...Check the pressure sensor clean or replace if neces sary contact the manu facturer Defective cable connection Check the cable connection The inlet pressure remains Increase the inlet pressure below 2 bar to at least 2 bar The upstream pressure reducing Repair the pressure valve is defective reducing valve The inlet pressure exceeds Lower the inlet pressure 8 bar to a maximum of 8 bar The upstream ...

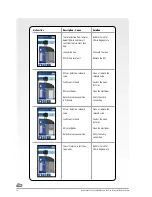
Page 20: ...e dirt Dirty or defective solenoid Clean or replace the valve solenoid valve Faulty control head Contact the manu facturer Dirty electrodes Clean the electrodes Defective cable connection Verify the cable in Ordnung connection Dirty or defective solenoid Clean or replace the valve solenoid valve Faulty control head Contact the manu facturer Dirty electrodes Clean the electrodes Defective cable con...

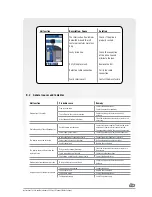
Page 21: ...hardness Contact your water supplier Check the raw water hardness at regular intervals and adjust the corresponding setting in the control if necessary Power supply out of order Check the power supply switchable socket etc The display cannot be activated Mains adapter not connected or faulty Connect the mains adapter or replace it Power supply socket out of order Ask an electrician to verify the s...

Page 22: ...omer service regularly carry out maintenance works and provide the necessary consumables or wear out parts etc The warranty period lasts 24 months as of the date of installation Wecommitourselvestorepairorreplaceasquicklyaspossibleallpartsthatbecomeunserviceable during the warranty period as a result of verifiably bad materials a defective construction or a faulty model Our highest objective is to...

Page 23: ...tion of a pressure reducing valve is compulsory when the static pressure is 5 0 bar Operating temperature min 5 C max 30 C Ambient temperature min 5 C max 40 C Pressure loss at nominal flow rate 1 0 bar Salt stock LEX 10 25 kg Power supply 230V 50Hz 6W Unit voltage 12V DC Salt consumption per regeneration about 0 8 kg Flushing water quantity about 31 l value measured at 3 bar upstream pressure may...

Page 24: ... harness control head 1500 01 912 Cable harness blending 1500 01 913 Mains adapter control unit 1500 01 915 Tundish 0214 00 908 1 2 3 4 5 6 7 1 Control unit 1500 01 906 2 Cover of cabinet 1500 01 907 3 Bypass and blending valve 1500 01 916 4 Control head 1500 01 901 5 Fill level unit 1500 01 905 6 Cabinet 1500 01 908 7 Resin bottle 1500 01 904 ...

Page 25: ...oftener 1 Seal kit 2 Piston 3 Chlorinator cell 1500 01 921 1500 01 902 1500 01 920 4 Solenoid valve 5 Drive unit 6 Board control head 1500 01 922 1500 01 903 1500 01 914 1 Turbine 1500 01 919 2 Reed contact 1500 01 918 3 Pressure sensor 1500 01 917 1 2 4 5 6 3 1 3 2 ...

Page 26: ... LEX Plus 10 Connect Water Softener 26 Connection flange DN 20 32 not included in delivery Dimensions mm LEX 10 t 105 b 164 H 615 h 492 H1 415 h1 200 h2 155 T 570 B 352 Safety overflow S1 390 Flushing water overflow S2 541 12 Dimensions ...

Page 27: ... Maintenance LEX Plus 10 Connect Water Softener 13 Overview 1 2 3 4 5 6 9 7 8 1 Blending valve 6 Lid salt tank 2 Bypass and blending valve 7 Cover cabinet 3 Bypass valve 8 Salt tank 4 Connection hoses 9 Cabinet 5 Control unit ...

Page 28: ...H Water meter m3 Cleaning water tank Check Exchange strainer Check Exchange optical eye Cleaning Exchange chlorinator cell Cleaning Check injector Hans Sasserath GmbH Co KG Muehlenstr 62 D 41352 Korschenbroich Tel 49 2161 6105 0 Fax 49 2161 6105 20 info syr de www syr de 9 1500 XX 1605 Subject to technical changes and errors ...

Reviews: