38/70 |
FDS...EX
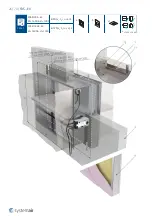
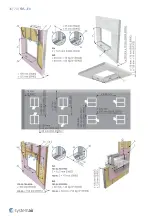
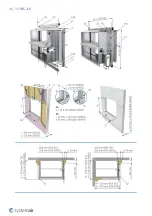
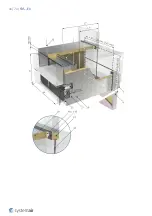
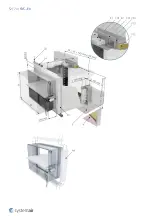
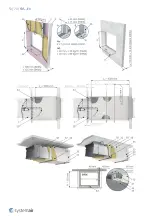
Installation 3H - Hilti
Filling made only from Hilti foam
With this installation, we recommend using flexible connections (see accessory FCR) due to thermal expansion of
connected ducts during fire. Install the compensator so, that the flexible part has a minimum distance of 50 mm from
the edge of a damper‘s blade in the open position.
Tip: Excess material can be reused as the filling for this installation. It can be inserted into the cavity before you add
new foam from the gun.
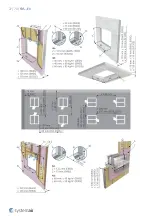
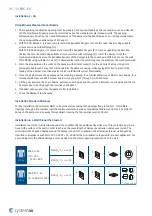
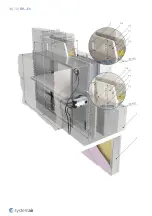
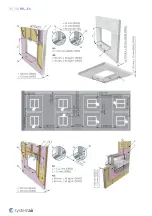
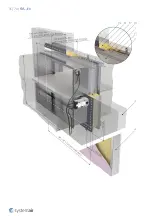
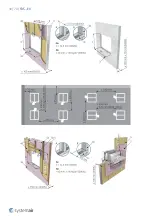
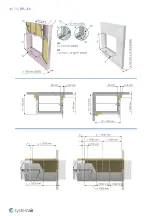
1. The supporting construction opening must be prepared as depicted. Opening surfaces must be even and cleaned
off. The flexible wall opening must be reinforced as per the standards for plasterboard walls. The opening
dimensions are driven by the nominal dimensions of the damper with added clearance. For rectangular dampers,
the opening will have the dimensions of W1 and H1.
2. Insert the damper into the opening concentric and fixing it with the opening using the bendable hangers and
suitable screws (F1).
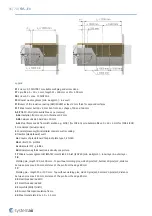
3. Wear protective gloves when handling foam. Insert the barrel of the foam gun into the middle of the cavity
between damper and opening and fill it completely with foam (F17). Pushed out foam can be quickly hand-pushed
back into the cavity.
4. After the filling (F17) is solidified, though it will always remain partly flexible, you can cut the excess foam that
stands out from the wall.
5. If needed, uncover and clean the damper after installation.
6. Check the damper’s functionality
Installation - Standard Distances
According to standard EN 1366-2, the minimum distance from the wall or ceiling to the damper body is 75 mm. For
multiple crossings through a fire-resistive wall the minimum distance between two damper bodies is 200 mm. This
applies for distances between the damper and a nearby foreign object crossing the fire-resistive wall.
Installation - Smaller Distances
The distance between 2 individual fire dampers can be reduced to 60 mm, measured from surface to surface of the
housing and the distance between the surface of the damper installed in the duct and the adjacent supporting
construction (wall/floor) can be reduced to 40 mm.
Installation in a Wall thinner than tested
Installation in a thinner wall is allowed under the condition that an additional layer/layers of fire protective board are
fixed to the surface of the wall in order to achieve the same length of damper penetration seal as was tested. The
minimum width of added boards around the damper is 200 mm. In addition, the alternative thinner wall should be
classified in accordance with EN 13501-2:2007 + A1: 2009 for the fire-resistance required for product application. For
a protruding wall, the additional layers must be fixed on the steel supporting construction of the wall.
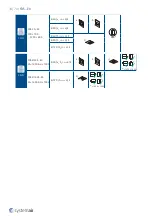
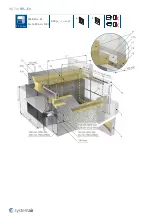
3H Hilti
FDS-3G...EX
100 × 100 ...
... 1200 × 800
EI 60 (v
e
- i ↔ o) S
a)
b)
360°
Summary of Contents for FDS-3G EX Series
Page 1: ...FDS EX Atex Fire Damper ...
Page 8: ...8 70 FDS EX Product parts ...
Page 27: ...27 70 FDS EX ...
Page 30: ...30 70 FDS EX ...
Page 31: ...31 70 FDS EX ...
Page 35: ...35 70 FDS EX ...
Page 36: ...36 70 FDS EX ...
Page 39: ...39 70 FDS EX ...
Page 40: ...40 70 FDS EX ...
Page 43: ...43 70 FDS EX 5 1 On Out FDS EI90S EX W 1600 H 1000 EI 90 ve i o S a b ...
Page 44: ...44 70 FDS EX ...
Page 48: ...48 70 FDS EX ...
Page 49: ...49 70 FDS EX ...
Page 52: ...52 70 FDS EX ...
Page 53: ...53 70 FDS EX ...
Page 57: ...57 70 FDS EX 5 4 On Out FDS 3G EX 100 100 1200 800 EI 60 ve i o S a b ...
Page 58: ...58 70 FDS EX ...
Page 59: ...59 70 FDS EX ...
Page 63: ...63 70 FDS EX 7 Multi FDS EI90S EX W 1600 H 1000 EI 90 ve i o S b ...
Page 70: ...Systemair DESIGN 2021 04 27 Handbook_FDS_EX_en GB ...

