background image

1

3

7

9

6

5

2

4

8

7

10. Network LAN (T568B)

RJ45 connection for network this must be used for control via your S7 App.

11. USB 

These are for future use only.

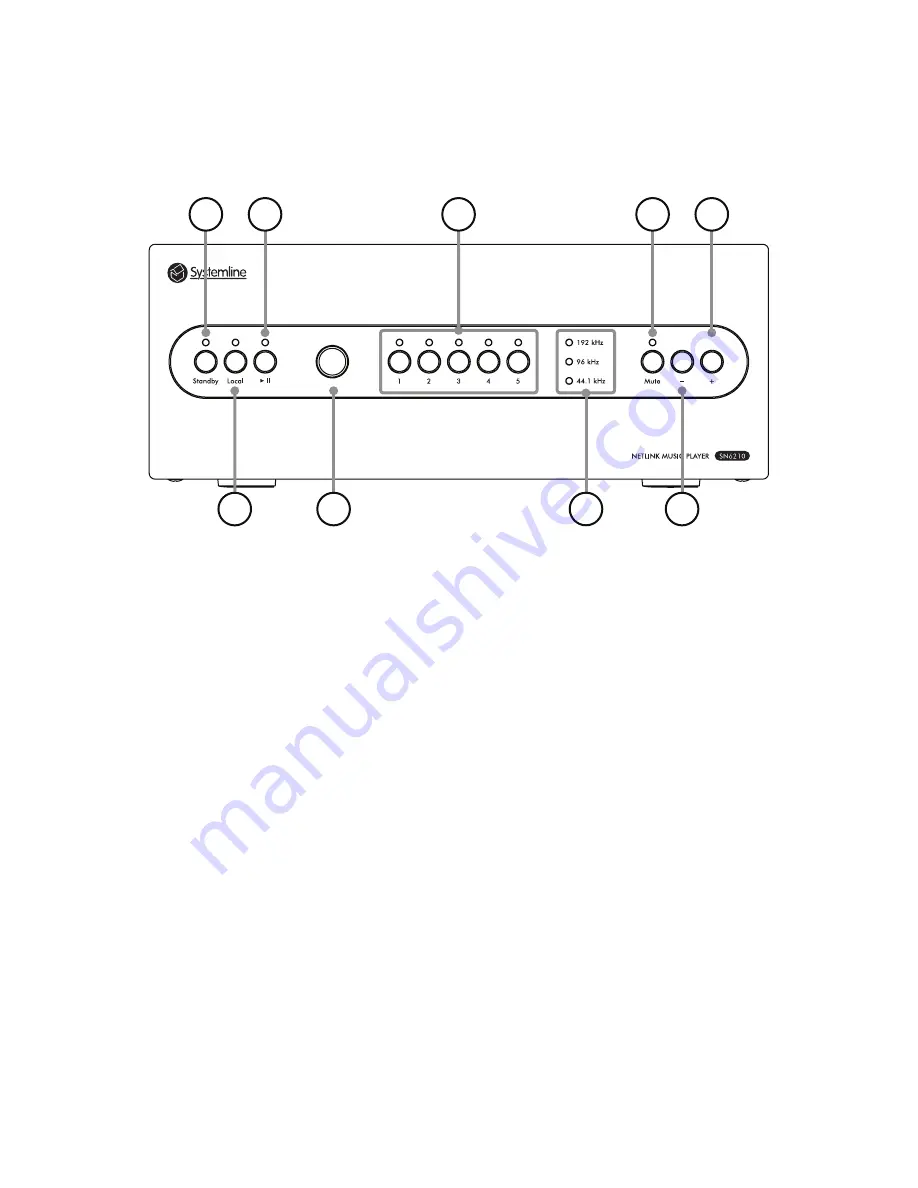
5.0 NetLink Front Panel

1. Standby

Pressing will turn NetLink in and out of standby, and will also control a compatible AVR’s standby 

state via IP or RS232. Holding down the standby button for 3 seconds will put NetLink into deep 

sleep mode, and can only be reactivated by pressing standby as network and keypad control is 

disabled in this state.  Whilst the wake up process is occurring the red light will flash.

2. Local

Pressing local will select either the optical or RCA analogue inputs on the rear, and will illuminate 

a green LED

3. Play/Pause

Will pause/play currently selected track.

4. IR Sensor

NetLink can be used with a learning or RC5 code infra-red remote control. By default the IR 

receiver is switched off, it can be enabled by checking the box in the ‘Zone Setup’ web page. The 

RC5 IR control code specification can be found in section 11.0

5. Pre-sets/Favourites

These will select favourites stored on the S7 server. By default these buttons select favourites 

1-5 but can be configured to select any favourite number by editing then on the ‘Zone Setup’ 

webpage. 

6. Input sample rate

Shows the sample rate that it being played from the S7 NetServer – The NetLink will automatically 

upgrade all sample rates to 192kHz even if the input sample rate is 44.1kHz.

7. Mute

Puts the zone volume to 0.

Summary of Contents for SN6210 S7

Page 1: ...NetLink Music Player Systemline 7 Music Player Instruction manual SN6210...

Page 2: ...nd the point where they exit from the apparatus 11 Only use attachments accessories specified by the manufacturer 12 Use only with the cart stand tripod bracket or table specified by the manufacturer...

Page 3: ...10 Evitez de marcher sur le cordon d alimentation ou de le pincer en particulier a l extremite du cordon de la prise et a la sortie de l appareil 11 Utilisez uniquement des accessoires specifies par l...

Page 4: ...ps Connections 9 8 0 NetLink Configuration Quick Start 10 8 1 Source Setup 10 8 2 Server Setup 10 8 3 Connected Amplifier 11 8 4 Zone Setup 12 9 0 NetLink Further Configuration Options 12 9 1 Factory...

Page 5: ...the S7 NetServer over the network however it is highly recommend that a DigiLink SN1300 is used for prefect reliability as this does not use the network at all to stream audio DigiLink is a USB CAT6...

Page 6: ...ower integrated amplifier 5 Digital Audio Out upto 192 24 Used when connecting a home cinema or digital integrated amplifier 6 RS232 Connection Used when integrating a Home Cinema or digital integrate...

Page 7: ...A analogue inputs on the rear and will illuminate a green LED 3 Play Pause Will pause play currently selected track 4 IR Sensor NetLink can be used with a learning or RC5 code infra red remote control...

Page 8: ...o stream directly and not via the network Alternatively NetLink can be used with only one CAT5 6 cable connected to the network and it will receive the audio stream and control all via Ethernet NetLin...

Page 9: ...work switch router 2 Insert audio connection to AV amplifier Digital coax preferred make a note of which input you have used on the AV Receiver requires a digital audio cable not supplied 3 Connect RS...

Page 10: ...rom the left menu you will be prompted for a username and password Username admin Password password These can be changed in Factory setup if needed 8 2 Server Setup 1 Select the server connection type...

Page 11: ...variable digital outputs are fixed 2 Select the audio amplifier input that you have plugged NetLink into on your AV Amplifier This might need to be configured in your AV Amplifier setup 3 Select the c...

Page 12: ...ther Configuration Options Overview 1 Serial Number Displays the NetLink serial number also found on the back of the NetLink 2 Firmware Version Displays the current hardware and firmware version 0011...

Page 13: ...his will reset the NetLink to all default settings and reboot 8 Reboot Will reboot the NetLink 9 2 Network Setup 1 DHCP Enabled If checked NetLink will obtain an IP address automatically from the DHCP...

Page 14: ...is MAC address automatically when DigiLink is plugged in 7 USB Serial This displays the unique USB serial number of a connected DigiLink 9 4 Connected Amplifier 1 Amplifier Type You can select the AVR...

Page 15: ...d amplifier type but you can change this if required 9 5 Zone Setup 1 Zone Name Insert the desired name of the Netlilnk zone Live Control 2 Live control Used to control NetLink over the Network Standb...

Page 16: ...the volume at which the local input will switch onto 15 Source Volume mode Check this box if the local source has its own adjustable volume and you wish NetLink to switch to maximum volume to make us...

Page 17: ...e Down 16 017 Source Up 16 070 Source Down 16 001 Source 1 16 002 Source 2 16 003 Source 3 16 004 Local 16 005 Off 16 006 1 27 001 2 27 002 3 27 003 4 27 004 5 27 005 6 27 006 7 27 007 8 27 008 9 27 0...

Page 18: ...1 5 amp Audio Signal Noise ratio A weighted ref 60k 104 6dB Jitter 96kHz 20psec 108 8dB Total Harmonic Distortion 1000Hz 0 00035 Channel Separation 1000Hz 101 62dB Frequency response 96kHz 12 45000Hz...

Page 19: ...19 11 3 Product Dimensions...

Page 20: ...0 Tested AVR 850 AV860 SR250 Denon RS232 or IP Straight through RS232 AVR X Series AVR X3200W Tested Marantz RS232 or IP Straight through RS232 SR Series SR5009 Tested SR5010 Tested NAD RS232 or IP St...

Page 21: ...21...

Page 22: ...22...

Page 23: ...23...

Page 24: ...4 Armour Home Electrioncs All rights reserved Our policy is one of continuous product improvement We reserve the right to change the design and specifications without notice All information is given i...

Reviews: