background image

27

Setting up, wiring


Carefully  unpack  the 

G 1260 R

  and  store  the  original  packing  materials

carefully. The carton and packing are specially designed for this unit and will be
needed again if you wish to move the equipment at any time.


Please be sure to read the safety notes in these instructions.


If the unit gets very cold (e. g. when being transported), condensation may form
inside it. Please do not switch it on until it has had plenty of time to warm up to
room temperature, so that any condensation evaporates completely.


Before placing the unit on a delicate surface, please check the compatibility of
the lacquer and the unit’s feet at a non-visible point.


The  turntable  should  be  placed  on  a  rigid,  level  base  which  is  not  subject  to
vibration. The feet are fitted with metal de-coupling elements, and are therefore
not rigid. If you are setting up the unit on resonance absorbers  or  de-coupling
components make sure that they do not compromise its stability.


The unit should be set up in a dry, well-ventilated location, out of direct sunlight
and away from radiators.


It  must  not  be  located  close  to  heat-producing  objects  or  devices,  or  anything
which is heat-sensitive or highly inflammable.


When installing the unit on a shelf or in a cupboard it is essential to provide an
adequate  flow  of  cooling  air,  to  ensure  that  the  heat  produced  by  the  unit  is
dissipated  effectively.  Any  heat  build-up  will  shorten  the  life  of  the  unit  and
could be a source of danger.

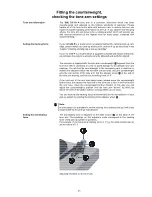
Deploy  all  mains  cables,  loudspeaker  cables  and  the  remote  control  cable  as
far as possible from low-level cables  (inter-connects)  and  aerial  cables.  Never
route them over or under the receiver.

 Notes on wiring the system:

 Be  sure  to  push  all  plugs  firmly  into  their  sockets.  Loose  connections  can

cause hum and other unwanted noises.

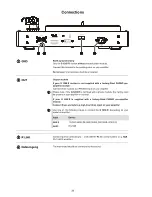
 To  achieve  the  maximum  signal  :  noise  ratio  the  mains  plug  should  be

connected  to  the  wall  socket  in  such  a  way  that  phase  is  connected  to  the
mains input socket contact which is marked with a dot (

). If you do not know

the phase of your mains socket, a special device can be used to determine it;
your local dealer will be able to help you here.

 We  recommend  the  use  of   

'POWER


LINE'

  ready-made  mains  cables  in

conjunction with a 

'POWER BAR'

 mains distribution panel, which features an

integral phase indicator.

 When the wiring of the system is complete, please set the volume control to a

very low level before switching the system on.

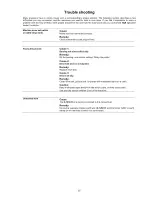
If you encounter problems when setting up and using the turntable for the first
time,  please  remember  that  the  cause  is  often  simple,  and  may  be  equally
simple  to  eliminate.  Please  refer  to  the  section  of  these  instructions  entitled

'

Trouble-shooting

'

.

Summary of Contents for G 1260 R

Page 1: ...V 1 0 Bestellnr Order No 9103 0425 DE UK BETRIEBSANLEITUNG USER MANUAL G 1260 R...

Page 2: ...2...

Page 3: ...3 Seite Page Deutsch 4 English 22 Anhang Appendix Technische Daten Technical specifications 39...

Page 4: ...Konstruktionselement Statt dessen wird auf Metalle oder andere unbedenkliche Materialien zur ckgegriffen die einerseits gut recyclebar sind und andererseits eine sehr gute elektrische Abschirmung erge...

Page 5: ...der R ckseite 8 Aufstellung und Verkabelung 9 Montage des Plattentellers 11 Montage des Gegengewichts und Kontrolle der Tonarmeinstellung 13 Einbau und Ausrichtung eines Tonabnehmersystems 14 Sicherhe...

Page 6: ...er dem Taster Sobald die Sollgeschwindigkeit erreicht ist leuchtet die LED dauerhaft Zum Umschalten der Geschwindikeit tippen Sie einfach auf den anderen der beiden Taster Stoppen des Tellermotors Tip...

Page 7: ...esem Kapitel werden alle Dinge von grunds tzlicher Bedeutung f r die Aufstellung und Inbetriebnahme beschrie ben die nicht f r den t glichen Umgang mit dem Ger t relevant sind die aber trotzdem vor de...

Page 8: ...s Bitte beachten Sie dass wenn im G 1260 R kein Phonomodul eingebaut ist dieses im Verst rker Receiver vorhanden sein muss Bei im G 1260 R eingebautem PHONO Vorverst rkermodul Verbinden Sie diese Buch...

Page 9: ...st nden bzw Ger ten aufgestellt werden Sorgen Sie beim Einbau in Regale oder Schr nke deshalb unbedingt f r ausreichende Luftzufuhr und sorgen Sie daf r dass die W rme des Ger tes abgef hrt werden kan...

Page 10: ...fassend und unverbindlich Gern senden wir Ihnen auch unser umfangreiches Informationsmaterial zu diesem Thema Mechanische Entkopplung Die Standfl che und der Untergrund auf dem hochwertige HiFi Ger te...

Page 11: ...lspritze gut ein 4 Setzen Sie die Plattentellerachse unter leichtem Drehen mit leichtem Druck wieder in die Lagerbuchse ein Dabei beachten Sie bitte dass sich die Achse im Lager nicht verkantet Die Ac...

Page 12: ...ch die Scheibe leicht von Hand drehen l sst 7 Legen Sie den Treibriemen wie in der Abbildung gezeigt um das Tellerantriebsrad und die Riemenscheibe 8 Setzen Sie den Plattenteller vorsichtig und senkre...

Page 13: ...r und muss vor Inbetriebnahme installiert und eingestellt werden Stecken Sie dazu das Tonarmgewicht auf das hintere Ende des Tonarms auf Stellen Sie das seitlich am Lager des Arms befindliche Einstel...

Page 14: ...ker Kanal Gr n Masse rechter Kanal Rot Signal rechter Kanal Ausrichtung Tonabnehmersystem Legen Sie die im Zubeh r des G1260R befindliche Schablone so auf den Plattenteller auf dass die Plattentellera...

Page 15: ...etzstecker darf keine berm ige Krafteinwirkung ausge bt werden Sch tzen Sie das Ger t vor Tropf und Spritzwasser und stellen Sie keine Blumenvasen oder andere Gef e mit Fl ssigkeiten auf das Ger t Auf...

Page 16: ...rt die Konformit t mit den EG Richtlinien 2006 95 EG und 2004 108 EG und den daraus abgeleiteten nationalen Gesetzen Die unver nderte unverf lschte Werksseriennummer muss au en am Ger t vorhanden und...

Page 17: ...d kann der Vorverst rker ber Codierschalter die ber ffnungen im Bodenblech zu g nglich sind an das jeweilige System angepasst werden Die Lage der Codierschalter geht aus der nachfolgenden Abbildung he...

Page 18: ...F 291 pF 340 pF 1 1 5 mV ON OFF OFF ON 341 pF 360 pF ON OFF ON OFF 361 pF 380 pF ON OFF ON ON 381 pF 400 pF ON ON OFF OFF 401 pF 440 pF ON ON OFF ON 441 pF 460 pF ON ON ON OFF 461 pF 480 pF ON ON ON O...

Page 19: ...en Ursache 1 Lager nicht ausreichend ge lt Hilfe Lager len siehe Kapitel Montage des Plattentellers Ursache 2 Treibriemen verbraucht oder verschlissen Hilfe Treibriemen ersetzen Wiedergabe hat Tonschw...

Page 20: ...20...

Page 21: ...21 English...

Page 22: ...h are easily recycled and which also provide effective electrical shielding The heavy all metal case of the G 1260 R eliminates the danger of adverse effects on reproduction quality caused by external...

Page 23: ...onnections 26 Setting up wiring 27 Fitting the base platter 29 Fitting the counterweight checking the tone arm settings 31 Installing and aligning a pick up cartridge 32 Safety notes 33 FCC Informatio...

Page 24: ...above the button flashes while the motor runs up to speed The LED glows constantly as soon as the nominal speed is reached Simply press the other of the two buttons to change the disc speed Stopping t...

Page 25: ...ribes all those aspects which are of fundamental importance when setting up and using the turntable initially This information is not required when the unit is in normal daily use but should neverthel...

Page 26: ...if the G 1260 R is not fitted with a phono module this facility must be present in your amplifier or receiver If your G 1260 R is supplied with a factory fitted PHONO pre amplifier module Connect the...

Page 27: ...in a cupboard it is essential to provide an adequate flow of cooling air to ensure that the heat produced by the unit is dissipated effectively Any heat build up will shorten the life of the unit and...

Page 28: ...l dealer in the first instance as he will be able to offer competent comprehensive and impartial advice We will also be glad to send you a copy of our complete information pack on this subject Mechani...

Page 29: ...e supplied 4 Replace the platter spindle in the bush turning it and lightly pressing it down at the same time Please take care to keep the spindle exactly vertical the spindle should slide smoothly in...

Page 30: ...by hand to ensure that it revolves smoothly 7 Place the drive belt round the platter drive wheel and the belt pulley as shown in the drawing 8 Hold the disc platter exactly level and carefully lower i...

Page 31: ...arm bearings You will find the counterweight in the accessory pack it must be in stalled and adjusted before the turntable can be used plug the counterweight onto the rear section of the tone arm Set...

Page 32: ...t hand channel White Signal left hand channel Green Earth right hand channel Red Signal right hand channel Aligning the pick up cartridge Locate the template in the G 1260 R accessory pack and lay it...

Page 33: ...he turntable from drips and splashes of water Never place flower vases or other liquid filled containers on the unit Supervision of device operation As with all electrical equipment this device should...

Page 34: ...nd approval and the unit may not be operated within the EC Improper use of the equipment makes the user liable to penalty under current EC and national laws Any modifications or repairs to the unit or...

Page 35: ...ge is fitted the pre amplifier can be adjusted to suit the system by means of coding switches which are accessible through openings in the metal base plate The position of these switches is shown in t...

Page 36: ...1 5 mV ON OFF OFF ON 341 pF 360 pF ON OFF ON OFF 361 pF 380 pF ON OFF ON ON 381 pF 400 pF ON ON OFF OFF 401 pF 440 pF ON ON OFF ON 441 pF 460 pF ON ON ON OFF 461 pF 480 pF ON ON ON ON 481 pF 500 pF r...

Page 37: ...medy Check connection push plug in firmly Cause 1 Bearing not oiled sufficiently Remedy Oil the bearing see section entitled Fitting the platter Cause 2 Drive belt worn or exhausted Remedy Replace dri...

Page 38: ...38...

Page 39: ...tolerance plain bronze bush Gesamtgewicht Overall weight 12 kg Abmessungen H x B x T Dimensions H x W x D 14 x 44 x 39 cm Ausf hrung Finish Alu Silber schwarz Silver aluminium black Netzanschluss Mai...

Page 40: ...elektroakustik GmbH Co KG Herford Deutschland Germany...

Reviews: