background image


37 

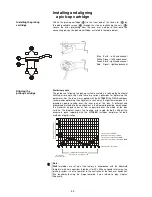
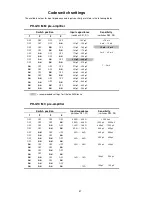
Code switch settings 


The available values for input impedance and input sensitivity are listed in the following tables. 


PH-G10  MM  pre-amplifier


Switch position 

Input capacitance 

(switches S51, S1)


Sensitivity 

(switches S52, S2)


OFF 


OFF 


OFF 


OFF 


         ... 100 pF 


> 10 mV 


OFF 


OFF 


OFF 


ON 


101 pF ... 120 pF 


6 mV ... 10 mV


OFF 


OFF 


ON 


OFF 


121 pF ... 140 pF 


3.5 mV ... 6 mV


OFF 


OFF 


ON 


ON 


141 pF ... 170 pF 


OFF 


ON 


OFF 


OFF 


171 pF ... 200 pF 

2 mV ... 3.5 mV 


OFF 


ON 


OFF 


ON 


201 pF ... 220 pF 


OFF 


ON 


ON 


OFF 


221 pF ... 240 pF 


OFF 


ON 


ON 


ON 


241 pF ... 270 pF 


ON 


OFF 


OFF 


OFF 


271 pF ... 320 pF 

1 ... 2 mV


ON 


OFF 


OFF 


ON 


321 pF ... 340 pF 


ON 


OFF 


ON 


OFF 


341 pF ... 360 pF 


ON 


OFF 


ON 


ON 


361 pF ... 380 pF 


ON 


ON 


OFF 


OFF 


381 pF ... 420 pF 


ON 


ON 


OFF 


ON 


421 pF ... 440 pF 


ON 


ON 


ON 


OFF 


441 pF ... 460 pF 


ON 


ON 


ON 


ON 


461 pF ... 500 pF 


= recommended settings for Ortofon 2M Bronze 


PH-G10  MC  pre-amplifier 


Switch position 

Input impedance 

(switches S51, S1)


Sensitivity 

(switches S52, S2)


OFF 


OFF 


OFF 


OFF 


450 

  ...  650 


>  2000 

µ


OFF 


OFF 


OFF 


ON 


200 

  ...  449 


1200 

µ

V  ...  2000 

µ


OFF 


OFF 


ON 


OFF 


130 

  ...  199 


800 

µ

V  ...  1200 

µ


OFF 


OFF 


ON 


ON 


 85 

  ...  129 


600 

µ

V  ...  800 

µ


OFF 


ON 


OFF 


OFF 


 50 

  ...   84 


400 

µ

V  ...  600 

µ


OFF 


ON 


OFF 


ON 


OFF 


ON 


ON 


OFF 


 30 

  ...   49 


300 

µ

V  ...  400 

µ

V


OFF 


ON 


ON 


ON 


ON 


OFF 


OFF 


OFF 


 20 

  ...   29 


200 

µ

V  ...  300 

µ

V


ON 


OFF 


OFF 


ON 


ON 


OFF 


ON 


OFF 


ON 


OFF 


ON 


ON 


ON 


ON 


OFF 


OFF 


 16 

  ...   19 


160 

µ

V  ...   200 

µ

V


ON 


ON 


OFF 


ON 


ON 


ON 


ON 


OFF 


ON 


ON 


ON 


ON 


          ...   15 


100 

µ

V  ...   160 

µ

V


Summary of Contents for G 1260 R

Page 1: ...V 2 0 Bestellnr Order No 9103 0425 DE UK BETRIEBSANLEITUNG USER MANUAL G 1260 R...

Page 2: ...2...

Page 3: ...3 Seite Page Deutsch 4 English 22 Anhang Appendix Technische Daten Technical specifications 39...

Page 4: ...Konstruktionselement Statt dessen wird auf Metalle oder andere unbedenkliche Materialien zur ckgegriffen die einerseits gut recyclebar sind und andererseits eine sehr gute elektrische Abschirmung erge...

Page 5: ...der R ckseite 8 Aufstellung und Verkabelung 9 Montage des Plattentellers 11 Montage des Gegengewichts und Kontrolle der Tonarmeinstellung 13 Einbau und Ausrichtung eines Tonabnehmersystems 14 Sicherhe...

Page 6: ...Taster Sobald die Soll geschwindigkeit erreicht ist leuchtet die LED dauerhaft Zum Umschalten der Geschwindigkeit tippen Sie einfach auf den anderen der beiden Taster Stoppen des Tellermotors Tippen S...

Page 7: ...esem Kapitel werden alle Dinge von grunds tzlicher Bedeutung f r die Aufstellung und Inbetriebnahme beschrie ben die nicht f r den t glichen Umgang mit dem Ger t relevant sind die aber trotzdem vor de...

Page 8: ...s Bitte beachten Sie dass wenn im G 1260 R kein Phonomodul eingebaut ist dieses im Verst rker Receiver vorhanden sein muss Bei im G 1260 R eingebautem PHONO Vorverst rkermodul Verbinden Sie diese Buch...

Page 9: ...st nden bzw Ger ten aufgestellt werden Sorgen Sie beim Einbau in Regale oder Schr nke deshalb unbedingt f r aus reichende Luftzufuhr und sorgen Sie daf r dass die W rme des Ger tes ab gef hrt werden k...

Page 10: ...ssend und unverbindlich Gern senden wir Ihnen auch unser umfangreiches Informationsmaterial zu diesem Thema Mechanische Entkopplung Die Standfl che und der Untergrund auf dem hochwertige HiFi Ger te a...

Page 11: ...lspritze gut ein 4 Setzen Sie die Plattentellerachse unter leichtem Drehen mit leichtem Druck wieder in die Lagerbuchse ein Dabei beachten Sie bitte dass sich die Achse im Lager nicht verkantet Die A...

Page 12: ...h die Scheibe leicht von Hand drehen l sst 7 Legen Sie den Treibriemen wie in der Abbildung gezeigt um das Teller antriebsrad und die Riemenscheibe 8 Setzen Sie den Plattenteller vorsichtig und senkre...

Page 13: ...Sie dazu das Tonarmgewicht auf das hintere Ende des Tonarms auf Wenn der Arm am vorderen Ende nun nach unten h ngt drehen Sie das Tonarmgewicht weiter nach hinten steigt das vordere Ende des Arms auf...

Page 14: ...inneren Bereich der Platte legt Eine andere weit verbreitete Tonabnehmer einstellung ist die nach Baerwald die den maximalen Fehlwinkel ber die gesamte Platte m glichst gering h lt Im Diagramm ist de...

Page 15: ...ersystems ein wenig so dass Sie das System in den Langl chern des Arms bewegen k nnen Schwenken Sie den Tonarm ber das Linienmuster auf der Schablone und richten Sie das Tonabnehmersystem wie auf der...

Page 16: ...etzstecker darf keine berm ige Krafteinwirkung ausge bt werden Sch tzen Sie das Ger t vor Tropf und Spritzwasser und stellen Sie keine Blumenvasen oder andere Gef e mit Fl ssigkeiten auf das Ger t Auf...

Page 17: ...l rt die Konformit t mit den EG Richtlinien 2006 95 EG und 2004 108 EG und den daraus abgeleiteten nationalen Gesetzen Die unver nderte unverf lschte Werksseriennummer muss au en am Ger t vorhanden un...

Page 18: ...d kann der Vor verst rker ber Codierschalter die ber ffnungen im Bodenblech zug nglich sind an das jeweilige System angepasst werden Die Lage der Codierschalter geht aus der nachfolgenden Abbildung he...

Page 19: ...pF 320 pF 1 2 mV ON OFF OFF ON 321 pF 340 pF ON OFF ON OFF 341 pF 360 pF ON OFF ON ON 361 pF 380 pF ON ON OFF OFF 381 pF 420 pF ON ON OFF ON 421 pF 440 pF ON ON ON OFF 441 pF 460 pF ON ON ON ON 461 pF...

Page 20: ...ken Wiedergabe hat Tonschwankungen Ursache 1 Lager nicht ausreichend ge lt Hilfe Lager len siehe Kapitel Montage des Plattentellers Ursache 2 Treibriemen verbraucht oder verschlissen Hilfe Treibriemen...

Page 21: ...21 English...

Page 22: ...h are easily recycled and which also provide effective electrical shielding The heavy all metal case of the G 1260 R eliminates the danger of adverse effects on reproduction quality caused by external...

Page 23: ...onnections 26 Setting up wiring 27 Fitting the base platter 29 Fitting the counterweight checking the tone arm settings 31 Installing and aligning a pick up cartridge 32 Safety notes 34 FCC Informatio...

Page 24: ...e button flashes while the motor runs up to speed The LED glows constantly as soon as the nominal speed is reached Simply press the other of the two buttons to change the disc speed Stopping the platt...

Page 25: ...ribes all those aspects which are of fundamental importance when setting up and using the turntable initially This information is not required when the unit is in normal daily use but should neverthel...

Page 26: ...if the G 1260 R is not fitted with a phono module this facility must be present in your amplifier or receiver If your G 1260 R is supplied with a factory fitted PHONO pre amplifier module Connect the...

Page 27: ...in a cupboard it is essential to provide an adequate flow of cooling air to ensure that the heat produced by the unit is dissipated effectively Any heat build up will shorten the life of the unit and...

Page 28: ...l dealer in the first instance as he will be able to offer competent comprehensive and impartial advice We will also be glad to send you a copy of our complete information pack on this subject Mechani...

Page 29: ...e supplied 4 Replace the platter spindle in the bush turning it and lightly pressing it down at the same time Please take care to keep the spindle exactly vertical the spindle should slide smoothly in...

Page 30: ...by hand to ensure that it revolves smoothly 7 Place the drive belt round the platter drive wheel and the belt pulley as shown in the drawing 8 Hold the disc platter exactly level and carefully lower i...

Page 31: ...t must be in stalled and adjusted before the turntable can be used screw the counterweight onto the rear section of the tone arm If the front end of the arm now hangs down please screw the counterweig...

Page 32: ...way that particular emphasis is placed on good tracking over the inner part of the disc A different and widespread method of pick up alignment is the Baerwald principle which keeps the maximum angular...

Page 33: ...ate Loosen the pick up cartridge retaining screws slightly so that the cartridge is free to move in the slots of the tone arm Move the tone arm over the pattern of lines on the template and align the...

Page 34: ...sk of lethal electric shock Do not exert undue force on the mains connectors Protect the turntable from drips and splashes of water Never place flower vases or other liquid filled containers on the un...

Page 35: ...nd approval and the unit may not be operated within the EC Improper use of the equipment makes the user liable to penalty under current EC and national laws Any modifications or repairs to the unit or...

Page 36: ...ge is fitted the pre amplifier can be adjusted to suit the system by means of coding switches which are accessible through openings in the metal base plate The position of these switches is shown in t...

Page 37: ...ON OFF OFF ON 321 pF 340 pF ON OFF ON OFF 341 pF 360 pF ON OFF ON ON 361 pF 380 pF ON ON OFF OFF 381 pF 420 pF ON ON OFF ON 421 pF 440 pF ON ON ON OFF 441 pF 460 pF ON ON ON ON 461 pF 500 pF recommend...

Page 38: ...medy Check connection push plug in firmly Fluctuating sound Cause 1 Bearing not oiled sufficiently Remedy Oil the bearing see section entitled Fitting the platter Cause 2 Drive belt worn or exhausted...

Page 39: ...tolerance plain bronze bush Gesamtgewicht Overall weight 12 kg Abmessungen H x B x T Dimensions H x W x D 14 x 44 x 39 cm Ausf hrung Finish Alu Silber schwarz Silver aluminium black Netzanschluss Mai...

Page 40: ...elektroakustik GmbH Co KG Herford Deutschland Germany...

Reviews: