background image


Total no. of pages: 30


PAGE 5


Anleitung EAG80_26_00_2017_03_28_GB 
Version 28.04.2017 

1


Description of the device 


1.1


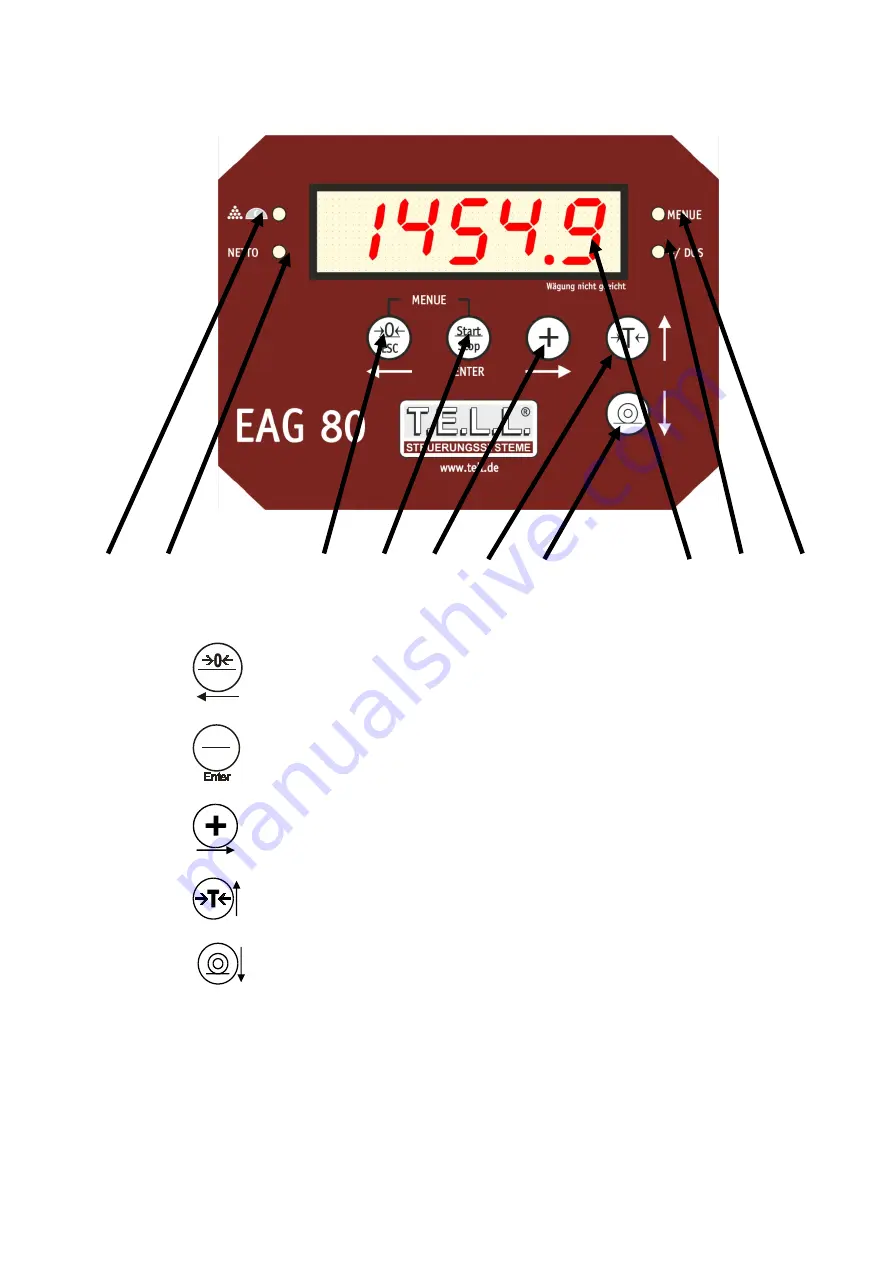
Description of buttons 

1.


Button 1

ESC

  Button Zeroing / Button left arrow / Button ESC 

2.


Button 2

Start

Stop


Button „Enter“ 

3.


Button 3


Button for weight addition / Button right arrow 

4.


Button 4


Button tare / Button up arrow 

5.


Button 5 

  Button down arrow 


Summary of Contents for EAG80

Page 1: ...sue 28 04 2017 Program version as of C26 00 Before switching on the device or installing components please carefully read through the manual to avoid malfunctions by wrong or incorrect operation or installation Manual EAG80 Dosing programs ...

Page 2: ..._____________________________________________ 15 4 2 Menu Interfaces Schnt ____________________________________________________ 16 4 2 1 Use of serial interfaces SE SC _____________________________________________________ 16 4 2 1 1 CON 1 ____________________________________________________________________ 16 4 2 1 2 CON 2 ____________________________________________________________________ 16 4 2...

Page 3: ...____________________________ 22 6 1 Fele1 FeLe1_______________________________________________________________ 22 6 2 Residual quantity Arest ____________________________________________________ 22 6 3 Maximum capacity Afass ___________________________________________________ 22 6 4 Power supply alarm A Net ___________________________________________________ 22 6 5 Inlet alarm A EIN_______________...

Page 4: ... of the program so you will become familiar with your new T E L L product and know the details of the correct operation Deviating from the standard usage the plant manufacturer may have changed the use of the computer In this case T E L L Steuerungssysteme cannot permanently monitor whether the safety of you your plant or other parts associated with the plant is still guaranteed after the change o...

Page 5: ...scription of the device A B 1 2 3 4 5 E D C 1 1 Description of buttons 1 Button 1 ESC Button Zeroing Button left arrow Button ESC 2 Button 2 Start Stop Button Enter 3 Button 3 Button for weight addition Button right arrow 4 Button 4 Button tare Button up arrow 5 Button 5 Button down arrow ...

Page 6: ...itung EAG80_26_00_2017_03_28_GB Version 28 04 2017 1 2 Description of the display elements A LED for display sleep B LED for display of net weight C LED for menu D LED for addition mode dosing programs active E 5 digit display screen ...

Page 7: ...utton 1 ESC pushed longer Zero the scales can be deactivated Button 2 Start Stop pushed longer Start program Button 2 Start Stop pushed briefly Cancel program manual stop Button 3 pushed briefly Selection of components and Discharge quantity presetting Button 4 pushed briefly Tare the scales and Function manual components can be deactivated Button 4 pushed longer Back to total weight and Leave man...

Page 8: ...onents and Discharge quantity presetting left and Selection digit to the left Button 3 pushed briefly Selection of components and Discharge quantity presetting right and Selection digit to the right Button 2 Start Stop pushed briefly Confirm selection and Confirm set value Button 4 pushed briefly Increase selected value Button 5 pushed briefly Decrease selected value ...

Page 9: ...he selected value Button 3 pushed briefly Access to the submenu and Selection digit to the right Button 1 ESC pushed briefly Back to the uper menu and Selection digit to the left Button 2 Start Stop pushed briefly Confirm selection and Confim set value 3 Function of LEDs LED A no function LED B lights when tared LED C lights when you are in the menu LED D lights when a dosing program is active bli...

Page 10: ...Start Stop for longer Then the menu items will appear All menu items are listed below You can navigate from one menu item to the next by pushing button 4 and button 5 Menu items can be selected with button 3 AllGe General settings SChnt Interface settings FILtE Filter Settings Waage Settings scales weighing system Dos p Parameters dosing programs rAuS Leave the menu ...

Page 11: ...f pages 30 PAGE 11 Anleitung EAG80_26_00_2017_03_28_GB Version 28 04 2017 4 1 Menu General Settings ALLGE ALL Ge ProG Program Uhr Time DAt Date Jahr Year taste Button Einga Input Init Init C9999 Software version ...

Page 12: ...ut 1 via input 1 In 1 and then discharge Out 2 do 10 Starting component 1 Out 1 via input 1 In 1 Output 2 Out 2 switches at 0 kg do 11 Starting component Out 1 via input 1 In 1 and then discharge Out 2 Starting via input 2 In 2 after alarm do 12 1 discharger Out 1 fast entry if the quantities to be discharged always differ with alarm contact Out 2 do 13 Filling 1 component Out 1 fast entry if the ...

Page 13: ...Filling 1 component Out 1 as soon as input 1 In 1 is set do 20 Currently no function do 21 Filling program Input Start weight minimum weight and target value Starting via button Start or activating In 1 stopping via button Stop or activating In 2 Program continually runs until button Stop and then ESC are pushed Jun 1 Filling 2 components Discharging with junior function Jun 2 Filling 1 component ...

Page 14: ...cales are set to 0 4 1 5 2 Tare button Tara Aus tare button deactivated Ein tare button activated tare button pushed briefly weight is tared to 0 tare button pushed longer total weight reappears 4 1 6 Function Inputs Einga Here the inputs function can be determined only for Pro1 and Junior 1 2 3 4 1 6 1 In 1 IN 1 Activate Function Input 1 AuS Input 1 Function deactivated rtArA Input 1 resets tare ...

Page 15: ...tivating function input 2 AuS Input 2 function deactivated rtArA Input 2 resets tare only if tare button is activated tArA Input 2 tares only if tare button is activated nuLL Input 2 has function of zero button 4 1 7 InIt INit Reset device to standard values 4 1 8 C2600 C2600 Show software version ...

Page 16: ...r protocol printing function GAJun Output format for T E L L large size display only for Jun 1 Jun 2 Jun 3 Jun 4 GAZ Output format for T E L L large size display only weight values 4 2 1 2 CON 2 Function of 2nd serial interface optional AuS Interface 1 deactivated GAZ t Output format for T E L L large size displays with messages Start Stop druck Output format for T E L L printer data logger or Tel...

Page 17: ...I Setting of changing time of large size display only for junior programs 4 2 3 GAInP GAINP Function for impulse large size display AuS Function deactivated InP 1 Impulse large size display variant 1 InP 2 Impulse large size display variant 2 4 2 4 PCCon PCCOM Activate EAG80 Explorer for PC connection ...

Page 18: ...be activated AuS Slowdown of scales deactivated SF FIL A and SPrun will be ignored EIn Slowdown of scales activated Setting via SF FIL A and SPrun 4 3 2 Filter speed SF Here you determine the speed of the weight measuring Values from 1 255 can be entered Value 1 quick measurement Value 255 slow measurement 4 3 3 FIL A FIL A Number of mean values 4 3 4 Weight difference SPRuN Weight difference from...

Page 19: ...ic settings of weighing elements adjustment via key data quantity max load mV V StAbA quantity of connected weighing elements LASt maximum load of connected weighing elements see type plate of weighing element StAbS mV V value of connected weighing element see type plate of weighing element 4 4 3 nuLLP NULLP Set scales to 0 when zero button is activated 4 4 4 Facto FaCTO Input of weight factor 4 4...

Page 20: ...alarm 0 off 4 5 4 nZEIt Input of after flow time for automatic after flow measurement 0 off 4 5 5 n Co1 Input of after flow quantity component 1 changes automatically 4 5 6 n Co2 Input of after flow quantity component 2 changes automatically 4 5 7 Jun G Input of junior total weight time only for junior programs 4 5 8 Jun 0 Input of junior zero setting time only for junior programs 4 5 9 toLEr Inpu...

Page 21: ...is set to 0 Attention For this function the button has to be activated in the parameters 5 3 2 Taring the scales 5 3 2 1 Tare away a weight on the scales Attention The button has to be activated in the parameters for this function Briefly pushing button is the simple tare function That means if you briefly press this button when the scales are loaded the weight value is set to 0 Pushing the tare b...

Page 22: ...m capacity Afass The quantity to be mixed would be bigger than the entered maximum capacity of the mixer 6 4 Power supply alarm A Net Power failure during the filling process 6 5 Inlet alarm A EIN For the time programmed no weight change could be registered during filling To correct this the alarm time could be increased 6 6 Discharging alarm A Aus For the time programmed no weight change could be...

Page 23: ...ities If the display unit finds the quantity in the mixer to be smaller than the quantity to be discharged the alarm is triggered 7 Connecting the device 7 1 General Information The device is delivered either with plug connectors or with screw connections For devices with plug connectors The weighing elements can be connected in any order to the sockets at the lower edge of the housing For devices...

Page 24: ...nleitung EAG80_26_00_2017_03_28_GB Version 28 04 2017 Mainboard Serial interface 7 1 1 Serial Interface Here you can connect e g a large size display TX terminal 6 transmit line RX terminal 7 receive line Gnd terminal 8 ground line ...

Page 25: ...s 30 PAGE 25 Anleitung EAG80_26_00_2017_03_28_GB Version 28 04 2017 7 3 Connection board 1 2 3 4 5 6 1 Connection to main board 2 Connection weighing elements 3 Connection input 1 and 2 4 Fuse 1A fast 5 Relay 6 Output ...

Page 26: ...s TWEH 550kg 1100kg 1760kg 6 wire connection cable transparent UB Supply weighing element plus Weighing element green blue UB Supply weighing element minus Weighing element black grey U In Measurement signal plus Weighing element white U In Measurement signal minus Weighing element red Weighing elements CO FX TA 4 wire connection cable black UB Supply weighing element plus Weighing element red UB ...

Page 27: ...under 4 1 2 Time Uhr 4 1 3 Date dAt and 4 1 4 Year JAhr ALLGE Uhr Input of time dAt Input of date JAhr Input of year 8 3 Settings for printers or large size displays Settings under 4 2 Menu Interfaces Schnt Schnt CON 1 Function of 1st serial interface AuS Interface 1 deactivated GAZ Output format for T E L L large size display druck Output format for T E L L printer data logger or Telog software G...

Page 28: ...ted settings via SF FIL A and SPrun 8 5 Test scales with highest possible weight Settings under 4 4 6 JUSt JUST If the weight value shown does not correspond to the weight on the scales the scales should be adjusted with weights Press and hold 0 ESC and Start Stop Stop simultaneously until ALLGE appears in the display WAAGE JUSt Scales adjustment with weights 0 JuS Empty platform and press Start S...

Page 29: ...ponent 1 Out 1 via input 1 In 1 Output 2 Out 2 switches at 0 kg do 11 Starting component Out 1 via input 1 In 1 and then discharge Out 2 After alarm starting via input 2 In 2 do 12 1 discharger Out 1 fast entry if the quantities to be discharged always differ with alarm contact Out 2 do 13 Filling 1 component Out 1 fast entry if the quantities to be filled always differ with alarm contact Out 2 do...

Page 30: ...ties for components and dischargers 12345 CO 1 CO 2 GES 12345 Start Stop Start Stop 00000 00000 Start Stop Start Stop CO 1 CO 2 ESC ESC e g Display 12345 then button CO 1 appears then button Start Stop O0000 appears enter a value via the arrow buttons then press Start Stop CO 1 appears then button ESC ...

Reviews: