background image

Obtaining more steam

(depending on model)

Press  the 

Burst  of  Steam

button

periodically  to  remove  stubborn  wrinkles 

(

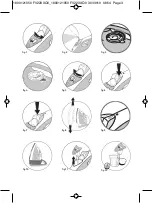
fig 6

).

Spray Function

The 

Spray

button

(

fig 7

) will release a mist of water onto your fa-

brics. Use this  to remove stubborn wrinkles.

Vertical steam function 

(depending on model)

This is ideal for removing wrinkles in delicate garments, jackets, skirts, curtains, etc.:

Hang the garment on a hanger and hold the fabric slightly taut with one hand.

• 

Set the temperature control dial to 

MAX

(

fig 3

).

• 

Repeatedly press the 

Burst of Steam

button

(

fig 6

) pausing a few seconds

between each push, and continuously move the iron over the fabric (

fig 8

).

• 

Hold the iron a few inches from the fabric to avoid burning delicate fabrics.

3-Way automatic shut-off 

(depending on model)

The iron is equipped with an electronic system that will automatically cut the
power  source  to  your  iron  if  it  is  left  vertically  on  its  heel  for  more  than  8
minutes, on its soleplate for more than 30 seconds or on its side for more
than 30 seconds.
The auto-off warning light (

fig 9

) will flash when the iron is in the shut-off

mode.
• 

To restart the iron, gently shake the iron until the warning light stops
flashing.

Storing your iron

• 

Set the steam control lever to

and unplug the iron.

• 

Let the soleplate cool completely and empty the water tank. A small amount of water may remain in the water
tank.

Wrap the cord around the heel of the iron.

• 

Store the iron on its heel (

fig 10

).

Maintenance and cleaning

Cleaning the anti-scale valve

It is recommended that you clean the anti-scale valve once a month to re-
move scale build up on the valve. Clean the anti-scale valve as noted below:
• 

Unplug your iron and empty the water tank.

Remove the anti-scale valve (

fig 11

).

Soak the valve (the black section only) in white vinegar or plain lemon
juice for 4 hours (

fig 12

).

Rinse the valve under running water and replace the anti-scale valve in
the iron.

Cleaning the iron

In order to reduce scale build-up and extend the life of your iron, it is recommended that you use the Self-Cleaning
feature once a month, as noted below:

Unplug the iron, set the steam control lever to

and fill the water tank to 

MAX

.

Place the iron on its heel, set the temperature dial to 

MAX

, plug in the iron and wait for the indicator light to

go out.

Unplug the iron and hold it horizontally over a sink.

Remove the anti-scale valve (

fig 11

).

In order to achieve the 
maximum amount of steam,
it is recommended that you
wait a few seconds after you
first push the Burst of Steam
button before pressing it
again.

Every fifth time you press the
button, return the iron to the
horizontal position.
The steam is very hot. When
using the ve  rtical steam func-
tion, always iron with the
garment on a hanger, never
while wearing it.

When the auto-off warning
light is on, it is normal for the
temperature light to remain
off.

Unplug your iron and let it
cool completely  before 
cleaning it. The iron will not
function without the 
anti-scale valve. Never touch
the end of the valve !

1800121050 FV22XXQ0_1800121050 FV22XXQ0  30/09/10  08:54  Page7

Summary of Contents for Primaglide FV2237Q0

Page 1: ...del mismo Verifique que el voltaje de su instalacion sea igual al de su aparato el cual se indica en este instructivo Importado por G S E B MEXICANA S A DE C V Goldsmith 38 401 Piso 4 Polanco Chapulte...

Page 2: ...1 9 10 12 11 3 4 6 7 5 8 2 1800121050 FV22XXQ0_1800121050 FV22XXQ0 30 09 10 08 54 Page2...

Page 3: ...o o l s i l k s y n t h nim max fig 4 fig 1 fig 5 fig 2 l i n e n c o t t o n wool si l k s y n t h n i m max fig 3 fig 9 fig 6 fig 12 fig 10 fig 11 fig 7 fig 8 1800121050 FV22XXQ0_1800121050 FV22XXQ...

Page 4: ...ama ged To avoid the risk of electric shock do not disassemble the iron Contact our Consumer Service Department for examination repair or adjustment Incorrect reas sembly can cause a risk of electric...

Page 5: ...antle your appliance have it inspected by an Approved Service Center to avoid any danger 1 Always unplug your appliance before filling or rinsing the reservoir before cleaning it and after each use 1...

Page 6: ...st the amount of continuous steam output by moving the steam control lever fig 5 See table below for recommended steam output levels Your iron heats up quickly therefore begin ironing with fabrics tha...

Page 7: ...n its heel fig 10 Maintenance and cleaning Cleaning the anti scale valve It is recommended that you clean the anti scale valve once a month to re move scale build up on the valve Clean the anti scale...

Page 8: ...gh theholesofthesoleplate andstainthefabric Youareusingchemicaldescalingagents Youarenotusingtherighttypeofwater Fabricfibershaveaccumulatedintheholes ofthesoleplateandareburning Yourfabrichasnotbeenr...

Page 9: ...pas le fer afin d viter un choc lectrique Pour un examen une r paration ou un r glage veuillez joindre notre Service la client le Un assemblage inad quat pourrait causer un choc lectrique au moment d...

Page 10: ...invisibles peuvent tre dangereux pour votre s curit Ne d montez jamais votre fer adressez vous toujours un centre de service autoris afin d viter tout danger D branchez toujours l appareil avant de re...

Page 11: ...ontr le de vapeur fig 1 Tenez le fer l horizontale et remplissez le r servoir fig 2 Remplissage du r servoir d eau N en mettez pas plus que le niveau MAX indiqu sur le r servoir du fer Ne remplissez j...

Page 12: ...yage de la soupape antitartre Entretien et nettoyage Il est recommand de nettoyer la soupape antitartre une fois par mois pour en enlever les accumulations de tartre Pour ce faire proc dez comme suit...

Page 13: ...nou veau v tement avant de le laver N ajoutez pas de produits de d tartrage dans le r servoir eau Effectuez un autonettoyage et lisez la section Quel type d eau faut il utiliser Effectuez un autonetto...

Page 14: ...a la f brica ver garant a en donde ser examinado y reparado Un armado incorrecto puede pro vocar descargar el ctricas durante la utilizaci n de la plancha 17 1 Vigile atentamente todo aparato utiliza...

Page 15: ...rvicio T cnico Autorizado para evitar cualquier peligro Desconecte siempre el aparato antes de llenar o enjuagar el dep sito antes de limpiarlo despu s de cada utilizaci n No deje nunca el aparato sin...

Page 16: ...n Desconecte la plancha antes de proceder al llenado y coloque el mando de vapor en la posici n fig 1 Ponga la plancha en posici n horizontal y ll nelo fig 2 Llene el dep sito de agua No sobrepase el...

Page 17: ...la plancha realice una auto limpieza una vez al mes Limpie su plancha como se muestra continuaci n Desconecte la plancha coloque el mando vapor en y llene el dep sito con agua hasta el nivel MAX Colo...

Page 18: ...enjuagada o ha planchado una prenda nueva antes de lavarla No a ada ning n producto contra los residuos calc reos en el agua del dep sito Realice una auto limpieza y consulte el cap tulo Qu agua util...

Page 19: ...1800121050 38 10 1800121050 FV22XXQ0_1800121050 FV22XXQ0 30 09 10 08 54 Page20...

Reviews: