73
Configuring the Comfort Pro S
Configuration
Basic Hardware Settings Switch
The Comfort Pro S configuration can also be returned to the factory settings by means of the basic hardware
settings switch.
S
Please note:
If the factory settings are restored, all customer settings and user data
will be lost.
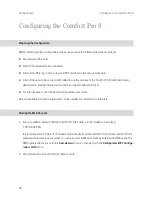
To restore the Comfort Pro S basic settings, proceed as described in the following paragraphs. For the
Comfort Pro S rack version note that the basic hardware setting switch is located on the front panel and can
be operated by using a pointed tool (please refer to the front panel figure in the chapter
Mounting the
Comfort Pro S Rack InfoCom System
starting on page 57).
1.
Switch off the Comfort Pro S by disconnecting the power plug.
2. Remove the cover (see
Opening and Closing Comfort Pro S
).
Caution!
Static charges can damage electronic devices. Observe the regulations regarding
electrostatically sensitive components.
3. The basic settings switch is designed as a key switch. The location of the switch can be found in the
chapter entitled
Interface Cards
starting on page 31. Press and hold the switch.
4. Replace the power plug in the mains socket. Wait about 30 seconds until the indicator on the front of the
Comfort Pro S constantly flashes.
5. Release the key switch.
The system data is now reset.
The Comfort Pro S will now reboot in the default configuration. The procedure is completed when system
terminals connected to the basic module are showing the time on their displays.
6. Push the cover all the way down.
7. Log on to the Web console (see
Starting the Web Console
on page 66). Configure the Comfort Pro S
(possibly by loading a saved configuration; see
Saving and Loading the Configuration
on page 70).
Summary of Contents for Comfort Pro S
Page 1: ...Comfort Pro S Mounting and Commissioning Installation Guide...
Page 2: ......
Page 166: ...164 Index Notes...
Page 167: ......


