background image

RWP Weighing Indicator Technical Manual(v1.16)

- 7 -

3. INSTALLATION

Unpacking

When you receive the scale, inspect it to make sure that it is not damaged and

that all are parts are included:

Remove the Indicator from the carton.

Remove the protective covering. Store the packaging and to use if you

need to transport the scale later.

Inspect the indicator for damage.

Make sure all components are included.

1. Indicator

2. Adaptor

3. Manual

4. Indicator holder (Optional)

5. Load cell Output connecter (Optional)

6. RS-232 Output Connecter (Optional)

Installation

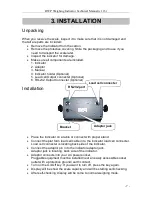
Place the Indicator on a table or connect with proper stand.

Connect the plat form load cell cable in to the indicator load cell connecter.

Load cell connecter is locating back side of the indicator.

Connect the adaptor pin in to the indicator adaptor jack.

Adaptor jack is locating, back side of the indicator.

Adaptor connects into your AC power socket.

Pluggable equipment must be installed near an easily accessible socket

outlet with a protective ground/ earth contact.

Turn on the On/Off key. If you want to turn off, press the key again.

Display will be show the scale capacity and will be starting self-checking.

After self-checking, display will be come to normal weighing mode.

Load cell connecter

RS-232 port

Adaptor jack

Bracket

Summary of Contents for RWP

Page 1: ...RWP Weighing Indicator V1 16 REV Y1 May 2016...

Page 2: ......

Page 3: ...OFF 11 5 2 Zero 11 5 3 Tare 1 1 5 4 Sample Weighing 11 5 5 Check Weighing 11 5 6 Enter to Menu 12 5 7 Set Limits 12 5 8 Set check weighing mode 12 5 9 Accumulation 13 5 10 Accumulation automatically 1...

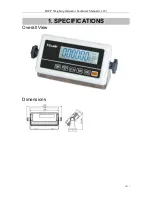
Page 4: ...RWP Weighing Indicator Technical Manual v1 16 4 1 SPECIFICATIONS Overall View Dimensions...

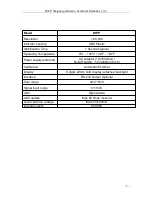
Page 5: ...e 0 C 40 C 32 F 104 F Power supply external AC Adaptor 12V 500mA Ni MH battery 1 2V 2000mAh x 6 Calibration Automatic External Display 6 digits 22mm LCD display attached backlight Interface RS 232 Out...

Page 6: ...gnals from a load cell converts it to digital data and displays it as a mass value It is suitable for general weighing or more specialized applications such as check weighing animal weighing and accum...

Page 7: ...lation Place the Indicator on a table or connect with proper stand Connect the plat form load cell cable in to the indicator load cell connecter Load cell connecter is locating back side of the indica...

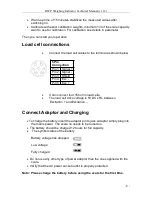
Page 8: ...voltage is 5V DC 5 between Excitation and Excitation Connect Adaptor and Charging To charge the battery insert the adaptor pin to jack Adaptor simply plug into the mains power The scale no needs to be...

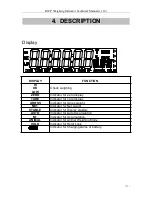
Page 9: ...display TARE Indicator for Tare display GROSS Indicator for Gross weight NET Indicator for Net weight STABLE Indicator for Display stability AUTO Indicator for Auto Accumulation M Indicator for Accumu...

Page 10: ...menu When the scale has been tared and display is in gross or net mode When using the settings mode can use to move active digits right For print the results to the PC or printer using the optional RS...

Page 11: ...ghing starts at zero 5 3 Tare The weight of any container can be tared by pressing button so that with subsequent weighing the net weight of the object being weighed is always displayed Load weight on...

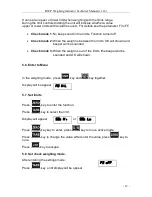
Page 12: ...l shown and beeper will be sounded Check mode 3 When the weight is out of the limits the beeper will be sounded and OK will shown 5 6 Enter to Menu In the weighing mode press key and key together Disp...

Page 13: ...n To enable accumulation function select parameter F5 ACC ACC on Place the goods on the platform to be weigh Wait few seconds for display stable then press key The value will be saved and printed if t...

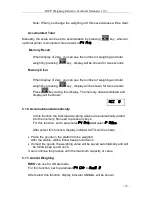
Page 14: ...isplay The memory data are deleted and display will be shown 5 10 Accumulation Automatically In this function the individual weighing values are automatically added into the memory No need to press an...

Page 15: ...t Setting In the weighing mode Press key and key to select parameter F3 OFF BL press key to select BK AU BK OFF BK ON After select the back light option press key to confirm and press key to escape fr...

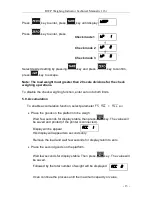
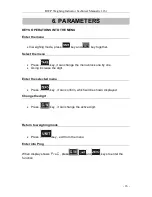
Page 16: ...ect the menu Press key it can change the menu block one by one Using increase the digit Enter the selected menu Press key it can confirm which will be shown displayed Change the digit Press key it can...

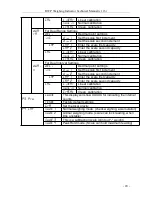
Page 17: ...t the auto off time Bl BK on Display of back light on BK au Display of back light on automatically BK off Display of back light off beep Bp 1 Beep sound off during the check weighing Bp 2 Beeper will...

Page 18: ...and enter by pressing key Set print out format If enter settings p prt p auto p cont and connected optional printer Pr X M format Date Time Only for p prt p auto format Lab X M format Gross Accumulat...

Page 19: ...ing range When the display is turn on the scale is set to zero P1 2 P1 4 P1 10 P1 20 P1 50 0 range P 2 2 Manually zero setting range by pressing P 2 4 P 2 10 P 2 20 P 2 50 P 2 100 Speed S 7 5 Set A D...

Page 20: ...l Settings Deci Decimal point settings Inc Div 1 Set the scale first increment Div 2 Set the scale second increment Cap Cap 1 Enter the scale first capacity Cap 2 Enter the scale second capacity cal L...

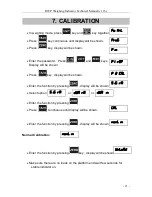
Page 21: ...ll be shown Enter the function by pressing display will be shown Select option or or Enter the function by pressing Press continuous until display will be shown Enter the function by pressing display...

Page 22: ...form during the test Display will come to weighing mode automatically If display will be shown any error or incorrect value repeat the procedure again Linear Calibration The linearity deviation caused...

Page 23: ...r the calibration the display will start a self test Remove the load from platform during the test Display will come to weighing mode automatically Creep Calibration Enter the function by pressing dis...

Page 24: ...RS 232 9pin connector Pin RXD Input Receiving data Pin TXD Output Transmission data Pin GND Signal ground 9pin Air Connecter Indicator Computer Printer Pin 2 Pin 3 Pin 3 Pin 2 Pin 5 Pin 5 Note If data...

Page 25: ...1 00kg TOTAL 1 00kg WEIGHT 1 00kg TOTAL 1 00kg 2 2011 12 30 11 11 NET 1 00kg GROSS 1 00kg TARE 0 00kg NET 1 00kg GROSS 1 00kg TARE 0 00kg 3 2011 12 30 11 11 NET 1 00kg GROSS 1 00kg TARE 0 00kg TOTAL...

Page 26: ...26 6 2011 12 30 11 11 S NO 10 NET 1 00kg GROSS 1 00kg TARE 0 00kg S NO 10 NET 1 00kg GROSS 1 00kg TARE 0 00kg 7 2011 12 30 11 11 S NO 10 NET 1 00kg GROSS 1 00kg TARE 0 00kg TOTAL 10 00kg S NO 10 NET...

Page 27: ...RWP Weighing Indicator Technical Manual v1 16 27 9 DRAWING...

Page 28: ...RWP Weighing Indicator Technical Manual v1 16 28...

Page 29: ...heck the pan is installed proper Check the load cell connectors Err 7 Percentage error Value should be 0 01 weight must 0 5d Err 9 Unstable Reading Check any air variation vibration RF noise and touch...

Page 30: ...ruments The TSCALE products Medical Scale Counting Scale Tabletop Scale Retail Scale Precision Scale Pallet Scale Weighing Indicator Crane Scale Floor and Pallet Scale Accessory Software TSCALE has it...

Reviews: