background image

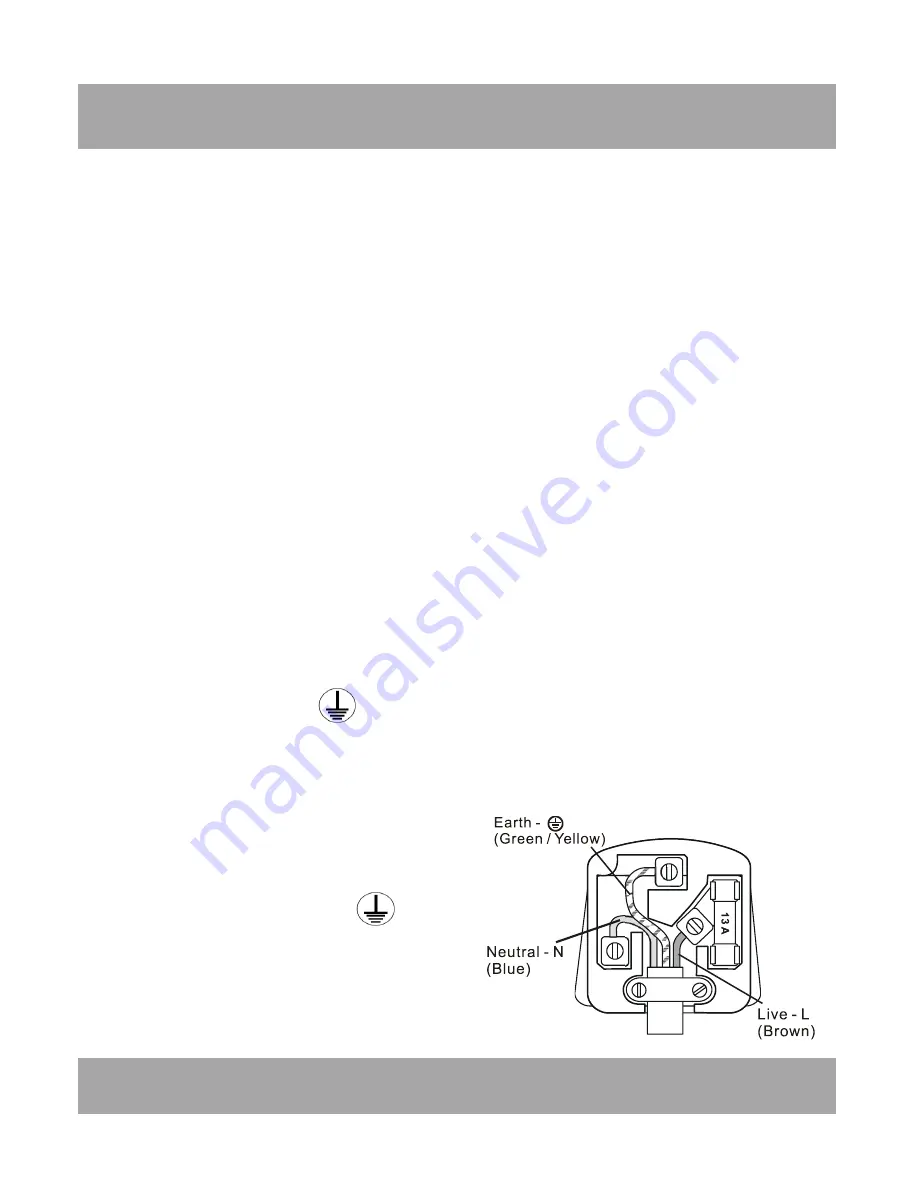
Wiring for a 13 Amp plug (BS 1363) 
The Earth Terminal is marked with 
the letter E or Earth Symbol

BS Plug Wiring

Wiring Instructions: Should it be necessary to change the plug please note
the wires in the mains lead are coloured in accordance with the following
code:

BLUE - NEUTRAL 
BROWN - LIVE 
GREEN/YELLOW - EARTH

As the colours of the wires in the mains lead of this appliance may not
correspond with the coloured markings identifying the terminals in your
plug, proceed as follows:

1. The

BLUE

wire is the

NEUTRAL

and must be connected to the terminal

that is marked with the letter

N

or coloured

BLACK

.

2. The

BROWN

wire is the

LIVE

and must be connected to the terminal that

is marked with the letter

L

or coloured

RED

.

3. Neither wire is to be connected to the terminal which is marked with the
letter

E

or earth symbol

, coloured

GREEN

or

GREEN/YELLOW

.

4. Always ensure that the cord grip is positioned and fastened correctly.
If a

13A (BS 1363)

fused plug is used it must be fitted with a

13A (BS 1362)

fuse. If in doubt consult a qualified electrician.

TECHNICAL DATA

10

Summary of Contents for DEHUM3

Page 1: ...Rotary Desiccant Dehumidifier DEHUM3 INSTRUCTION MANUAL SAVE THESE INSTRUCTIONS FOR FUTURE REFERENCE...

Page 2: ...ailer DO NOT leave children unattended with any of the packaging since it is a potential source of danger Disposal of all packaging must be carried out responsibly safely and in accordance with your l...

Page 3: ...desiccant dehumidifier is designed to provide an optimum operating performance between 1 C and 37 C To achieve maximum efficiency keep doors and windows closed When first used or periodically afterwa...

Page 4: ...he appliance or allow objects to obstruct the inlet or outlet openings or operate in close proximity to walls or curtains etc 8 The use of attachments or accessories not recommended or sold by the pro...

Page 5: ...DESCRIPTION Continuous drain 2m hose included Return air Dry Air intake Humid Auto air louvre 4 DO NOT OBSTRUCT THE AIR INLET OR OUTLET Power cable Control panel Condensate tank Air Filter Filter Rele...

Page 6: ...l the fan speed through the sequence below L Low M Medium H High The corresponding LED will illuminate on the control panel and side panel TROL PANEL OPERATING INSTRUCTIONS Low Medium High CONTINUOUS...

Page 7: ...ted to airborne particles These molecules build up around the particles until they become too heavy to remain air borne and float to the ground ALARM The alarm will sound and the ALARM LED will illumi...

Page 8: ...pillage should be dried immediately to avoid a potential hazard Emptying the Condensate Tank Continuous Drain Option 1 Ensure the appliance is unplugged from the power supply socket 2 Remove the conde...

Page 9: ...e is disconnected from the mains power outlet Remove the filter located at the back of the appliance by pulling the filter tab and slide out Clean the filter using clean water and allow to dry Alterna...

Page 10: ...appliance will stop dehumidifying automatically The dehumidifying process will only restart once the condensate tank and been emptied and re installed Once re installed correctly the LED will turn of...

Page 11: ...g the terminals in your plug proceed as follows 1 The BLUE wire is the NEUTRAL and must be connected to the terminal that is marked with the letter N or coloured BLACK 2 The BROWN wire is the LIVE and...

Page 12: ...tore the heater in its original packaging in a well ventilated dry place V Repairs should only be carried out by a qualified service agent VI DO NOT modify the appliance or use in a manor not original...

Page 13: ...or alter the appliance in any way the warranty will be invalidated If the unlikely event of a fault the appliance must be returned to the point of sale with proof of purchase and a FULL description o...

Reviews: