TAC-H
2
S/H
2
O/O
2
Pg. 13
TEXAS ANALYTICAL CONTROLS
4418 Bluebonnet Drive | Stafford, TX 77477 | (281) 240-4160 |
www.tac-controls.com
4 Controls and Their Operation
4.4 H
2
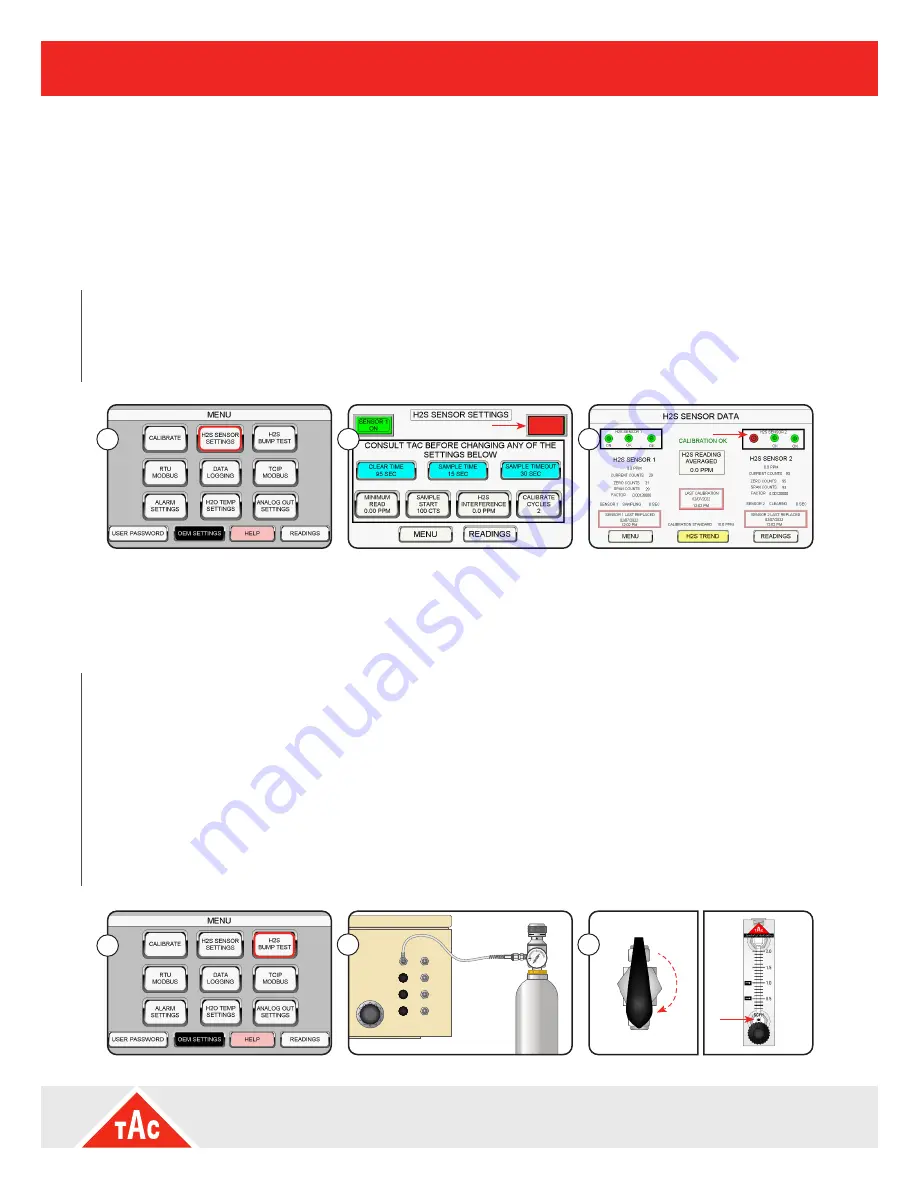
S Sensor Settings Menu
The H
2
S Sensor-setting button enables you to turn on or off one of the H
2
S sensors, as well as adjust the
sample and clearing times. Do not change Clearing Time/Sample Time, etc., without consulting TAC tech
support.
If either H
2
S sensor is too weak to operate properly it can be turned off. The analyzer will continue to
operate on one H
2
S sensor.
4.5 H
2
S Bump Test
To verify the readings without removing the sample line, perform a bump test. The alarms and 4-20 are
disabled during the bump test, as well as for 5 minutes after its completion.
To Turn Off a Sensor
1 From the menu screen, press the H2S SENSOR SETTINGS button.
2 Press the respective sensor to turn it off.
3 The main screen will show, in red, that the sensor is off.
To Perform a Bump Test
1 From the menu screen, press the H2S BUMP TEST button.
2 Connect the calibration gas to the STANDARD IN port. (Do not turn on the bottle gas yet.)
3 Turn the manual calibration valve to STANDARD IN and confirm that the flow meter drops to zero.
4 Turn on the calibration bottle and adjust the flow meter to 1.0.
5 The display will flash "Bump Test in Progress", and the countdown will begin.
6 To abort the bump test, press the MENU or READINGS button.
7 The display should read the same as the calibration standard.
8 Turn off the bottle gas and return the manual valve to SAMPLE IN.
1
SENSOR 2
OFF
2
3
OFF
1
3
Standard In
Sample In
continued >
+ / -
+ / -
+ / -
+ / -
+
to back
of panel
STANDARD
IN
PSIG
OFF
SAMPLE
IN
SAMPLE
VENT
SENSOR
VENT 1
SENSOR
VENT 2
PSIG
OFF
FRONT VIEW
BOTTOM VIEW
Remove plug from
STANDARD IN
before attaching the
calibration bottle.
2


