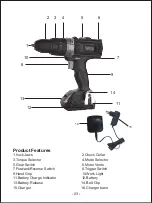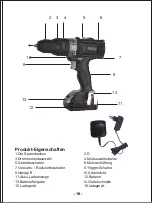
1. To start the drill, squeeze the Trigger Switch (7).
2. The built-in Work Light (9) will illuminate when the Trigger Switch is squeezed.
Note
If the Trigger Switch cannot be pressed down, check that the Forward/Reverse
Switch (6) is not set to its middle position, which locks the device (see ‘Direction
control’).
3. The speed of the drill is controlled by the movement of the trigger: the further the
Trigger Switch is pressed down, the faster the drill will run.
4. Release the Trigger Switch to stop the machine.
Screwdriver use
Note
Always use a universal bit holder when working with screwdriver bits. Do not mount
screwdriver bits directly into the chuck.
1. Select gear 1 using the Gear Switch (5).
2. Rotate the Mode Selector (4) to Drive.
3. Adjust the drill to the appropriate torque setting (see ‘Torque control’).
●
When driving screws NEVER use the machine in drill mode.
Note
If in doubt which torque setting best suits the application, start with a low setting and
increase, should more torque be required (e.g. if the screw is not being driven far
enough into the workpiece).
Drilling masonry and concrete
1.Select gear 1 using the Gear Switch (5)
2.Rotate the Mode Selector (4) to the hammer drill position
●
Hammer drill mode should be used for drilling into masonry and concrete
●
Apply moderate pressure to the rear of the drill, in line with the drill bit
●
Use masonry drill bits only. Ensure that the bit size is within the maximum capacity
of the machine (see ‘Specification’)
●
DO NOT apply too much pressure. If debris blocks the drill hole, run the drill slowly
and remove the bit from the hole. Repeat until hole is cleared
WARNING
The drill bit, especially the tip, will become very hot when drilling masonry and
concrete. DO NOT touch the bit and never allow it to come into contact with combus-
tible materials.
- 13 -


