background image

12


  Hold the circular saw firmly with both hands.

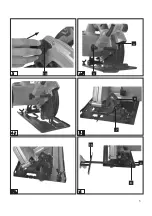
8.3 Switching ON/OFF (Fig. 7)

To switch on:

Press the locking button (3) and the ON/OFF 

switch (2) at the same time.

   Allow the saw blade to accelerate until it reaches

full speed. Then slowly move the saw blade along

the cutting line. Only exert gentle pressure on the

saw blade as you do so.

To switch off:

Release the locking button and ON/OFF switch.

  If you release the handle the equipment will 

shut down automatically which means that it 

cannot operate accidentally.

   Ensure that you do not cover or block the

ventilation openings whilst working with the tool.

   Do not slow down the saw blade after you 

switch it off by pressing it sideways.


  Important! Do not put down the machine until 

the saw blade has reached a complete standstill.

Important. Carry out a trial cut in a 
piece of waste wood.

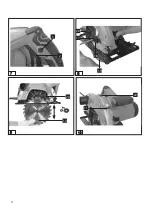
8.4 Changing the saw blade (Fig. 8/9)

Important. Always pull out the power 

plug before doing any work on the 

circular saw!

Only use saw blades of the same type as the saw

blade supplied with this circular saw. Ask your 

dealer for advice.

Use the saw blade key (13) supplied to change 

the saw blade.

Important.

 The hand-held circular saw must not 

be operated with the saw blade key (13) inserted 

in it.


  Undo the screw to secure the saw blade (17)

using the saw blade key (13).

   Push back and secure the moving swing guard

hood (19) using the lever for the swing guard

hood (20).

   Remove the flange (18) and the saw blade (12) 

in a downwards direction.

   Clean the flange and insert the new saw blade.

Pay attention to the running direction (see arrow

on the guard hood and saw blade).

   Tighten the screw to secure the saw blade (17),

check it runs true.

   Before you press the On/Off switch, make sure

that the saw blade is correctly fitted and that

moving parts run smoothly and the clamping

screws are tightened securely.

8.5 Using the laser (Fig. 10)

   The laser (11) enables you to make precision

cuts with your circular saw.

   The laser light is generated by a laser diode. The

laser light is enlarged to form a line and is emitted

through the laser emission aperture. You can

then use the line as an optical marker for the

sawing line for precision cuts. Follow the laser

safety instructions.

• Use the switch for the laser (22) to switch the 

laser on and off.

   Always switch off the laser when not in use.

   The laser is powered by the mains voltage. 

Batteries are therefore not required.

Summary of Contents for PES03A

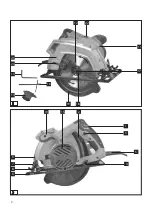
Page 1: ...User Manual Circular Saw PES03A ...

Page 2: ...2 1 12 17 18 19 20 21 2 8 10 15 2 1 3 5 6 4 9 7 11 22 13 16 14 ...

Page 3: ...3 3 4 2 5 2 4 1 5 1 6 16 8 14 4 a 7 9 a ...

Page 4: ...4 7 10 8 9 20 12 11 22 17 19 18 20 3 2 ...

Page 5: ...ll lit Cluttered or dark areas invite accidents b Do not operate power tools in explosive atmospheres such as in the presence of flammable liquids gases or dust Power tools create sparks which may ignite the dust or fumes c Keep children and bystanders away while operating a power tool Distractions can cause you to lose control 2 Electrical safety a Power tool plugs must match the outlet Never mod...

Page 6: ...zards 4 Power tool use and care a Do not force the power tool Use the correct power tool for your application The correct power tool will do the job better and safer at the rate for which it was designed b Do not use the power tool if the switch does not turn it on and off Any power tool that cannot be controlled with the switch is dangerous and must be repaired c Disconnect the plug from the powe...

Page 7: ...of operation Causes and operator prevention of kickback Kickback is a sudden reaction to a pinched bound or misaligned saw blade causing an uncontrolled saw to lift up and out of the workpiece toward the operator When the blade is pinched or bound tightly by the kerf closing down the blade stalls and the motor reaction drives the unit rapidly back toward the operator If the blade becomes twisted o...

Page 8: ...compound cuts Raise lower guard by retracting handle and as soon as blade enters the material the lower guard must be released For all other sawing the lower guard should operate automatically Always observe that the lower guard is covering the blade before placing saw down on bench or floor An unprotected coasting blade will cause the saw to walk backwards cutting whatever is in its path Be aware...

Page 9: ... other way may result in hazardous exposure to laser radiation Never open the laser module Important Read the instructions for use before starting the machine Wear safety goggles Wear ear protection Wear good quality strong gloves Always use breathing apparatus when machining materials which generate dust End of life machines contain valuable materials and therefore they should not be placed in ho...

Page 10: ...e the saw until the saw blade 12 is at the required cutting depth a Refasten the handle for adjusting the cutting depth 4 Check the handle is securely fastened 7 3 Miter stop Figure 5 The preset standard angle between the saw foot 6 and saw blade 12 is 90 You can adjust this angle to carry out angled cuts Release the locking lever for miter setting 7 on the front of the saw foot You can now adjust...

Page 11: ...nuts whose bore hole is larger or smaller than those in the saw blade The saw blade must not be decelerated by hand or by applying lateral pressure to the blade The swing guard hood must not jam and must return to its initial position after the operation has been completed Before you use the circular saw check the function of the swing guard hood with the mains plug disconnected Before you use the...

Page 12: ... key 13 supplied to change the saw blade Important The hand held circular saw must not be operated with the saw blade key 13 inserted in it Undo the screw to secure the saw blade 17 using the saw blade key 13 Push back and secure the moving swing guard hood 19 using the lever for the swing guard hood 20 Remove the flange 18 and the saw blade 12 in a downwards direction Clean the flange and insert ...

Page 13: ...es Keep the noise emissions and vibrations to a minimum Only use appliances which are in perfect working order Service and clean the appliance regularly Adapt your working style to suit the appliance Do not overload the appliance Have the appliance serviced whenever necessary Switch the appliance off when it is not in use Wear protective gloves 11 Cleaning and maintenance Always pull out the mains...

Page 14: ... only have it repaired by an authorized electrician If the supply cord of the appliance is damaged this has to be done by the manufacturer or his agent or electrician in order to avoid a safety hazard 13 Environmental protection End of life electrical equipment must not be placed in household waste Please take it to a return point Find out about your nearest return point from your council or sales...

Page 15: ...Warranty Registration We are glad to invite to register the warranty information at www tacklifetools com After registration you may kindly enjoy the exclusive service ...

Reviews: