background image

WARNINGS: LP TANK

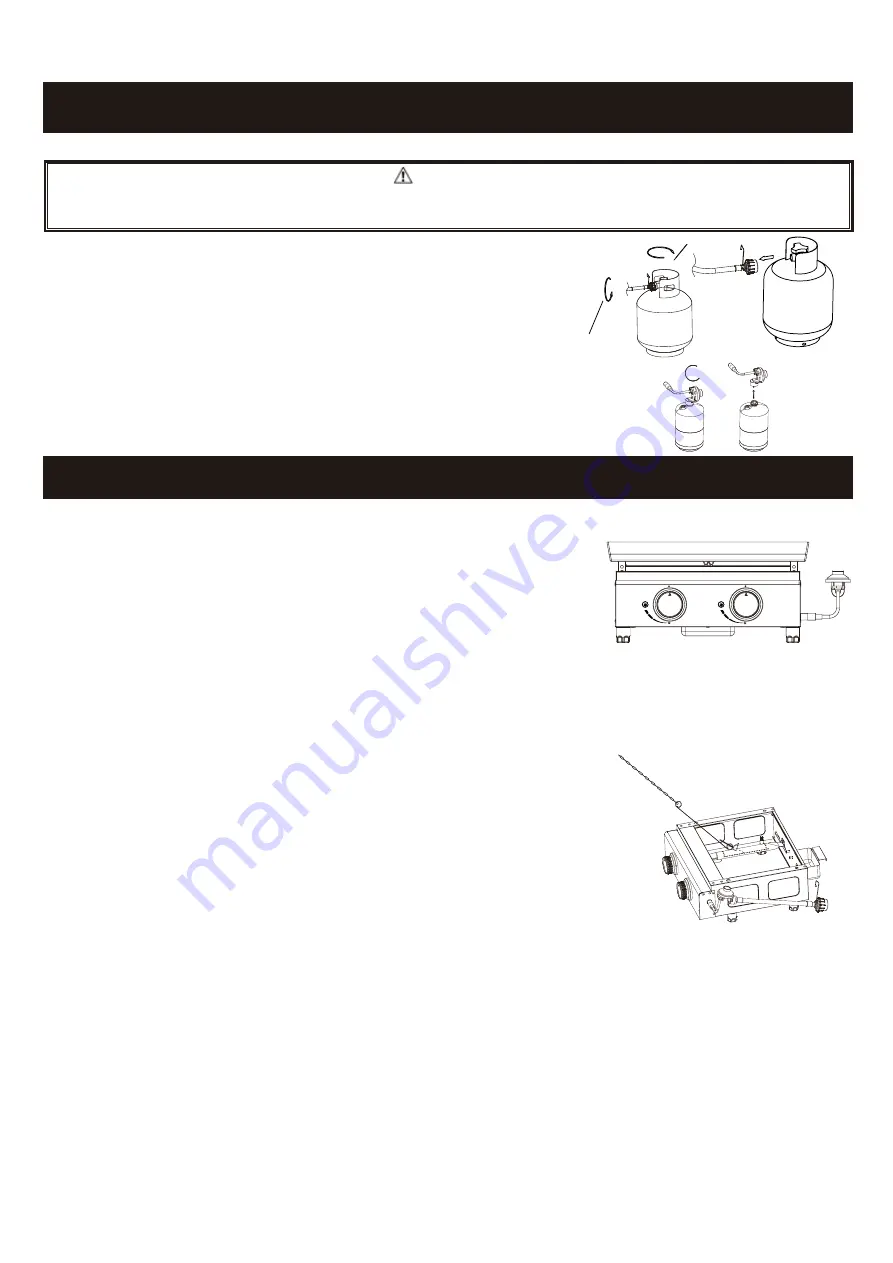
INSTRUCTIONS FOR LIGHTING BURNER:

OPERATING INSTRUCTIONS

1. Read all instructions before lighting.

2. Make sure all control knobs are in the OFF position.

3. When use 20lb. cylinder: Turn on the cylinder valve.

4. Select the burner to be lit. Push and turn the control knob

of that burner counter-clockwise to HIGH. Hold the control

knob pushed down for 2-3 seconds. It will light the burner.

5. Adjust the flame by turning control knob between HIGH and LOW.

6. Repeat step 4 for lighting other burner.

7. If ignition does not occur in 5 seconds, turn the burner control(s) OFF, wait 5 minutes, and repeat

the lighting procedure.

MANUAL LIGHTING

1. Make sure all control knobs are in the OFF position.

2. When use 20lb. cylinder: Turn on the cylinder valve.

3. Remove the cooking plate. Insert a match into the match lighter.

Strike the match and place near the gas outlet openings on the

burner. Push and turn the control knob of that burner

counter-clockwise to HIGH. Hold the control knob pushed down for

2-3 seconds. It will light the burner.

4. Adjust the flame by turning control knob between HIGH and LOW.

5. Repeat step 3 for lighting other burner.

6. If ignition does not occur in 5 seconds, turn the burner control(s)

OFF, wait 5 minutes, and repeat the lighting procedure.

7. Place the cooking plate back onto the plancha body.

Note: Match lighter is attached to the main valve tube at the bottom of gas plancha

by the manufacturer. Place the match lighter on the platform of the control panel after use.

SHUT DOWN INSTRUCTIONS

2. 20LB. cylinder: Turn LP cylinder gas valve clockwise to OFF position when plancha is not in use.

1LB cylinder: Turn the cylinder counter-clockwise to disconnect cylinder from regulator when

plancha is not in use.

1. Push and turn control knob clockwise to OFF position.

WHEN THE BURNER FLAME IS ACCIDENTALLY EXTINGUISHED

1. Close the LP tank valve.

2. Push and turn control knob clockwise to OFF position.

3. Inspect if the hose etc. connections are good, wait 5 minutes. After waiting 5 minutes, re-start the

appliance following the lighting instructions.

REGULATOR HOSE ASSEMBLY CHECK:

 WARNING

Before each use, check to see if there is evidence of abrasion, wear, cuts or leaks on the hose. If 

damage is evident, the hose must be replaced prior to appliance use.

DISCONNECTING HOSE ASSEMBLY FROM 20LB. CYLINDER:

1. Turn control knob to the OFF position.

2. Turn the cylinder valve off fully (turn clockwise to stop).

Detach the hose assembly from the cylinder valve

by turning the quick coupling nut counterclockwise.

DISCONNECTING REGULATOR ASSEMBLY FROM 1LB CYLINDER

1. Turn control knob to the OFF position.

2. Turn the cylinder counter-clockwise to disconnect cylinder

     from regulator assembly.

NOTE:

 Loosen by hand only. DO NOT use tools.

8

Shut off gas supply by rotating valve of gas cylinder clockwise.

Gas cylinder

Detach hose assembly
by rotating it
counterclockwise

OFF

OFF

Summary of Contents for TGG02

Page 1: ...s Griddle Keep this manual for future reference READ INSTRUCTION MANUAL BEFORE ATTEMPTING TO ASSEMBLE OR OPERATE THIS PRODUCT Adult assembly required Keep screws and parts out of reach of children War...

Page 2: ...serious injury WARNING Be alert to the possibility of serious personal injury if the instructions are not followed CAUTION Indicates a potentially hazardous situation which if not avoided could resul...

Page 3: ...rmation 15 NOTE Before beginning assembly of product make sure all parts are present Compare parts with package content list and hardware contents If any part is missing or damaged do not attempt to a...

Page 4: ...ON The instruction manual contains important information necessary for the proper assembly and safe use of the appliance Read and follow all warnings and instructions before assembling and using the a...

Page 5: ...e used as a heater NEVER use this appliance as a source of heat Introduction of water or ice from any source into the oil grease may cause overflow and severe burns from hot oil and water splatter Whe...

Page 6: ...have a safety cap installed NEVER leave an LP tank in a car that can become overheated by the sun 6 The cylinder must be stored outdoors out of the reach of children NEVER store the cylinder in enclos...

Page 7: ...TOR DO NOT smoke or have anything nearby that can easily ignite such as lighters or matches Appliance must be leak checked outdoors in a well ventilated area away from open flames or sparks STEPS TO L...

Page 8: ...is attached to the main valve tube at the bottom of gas plancha by the manufacturer Place the match lighter on the platform of the control panel after use SHUT DOWN INSTRUCTIONS 2 20LB cylinder Turn...

Page 9: ...move everyone to safety and immediately contact CO2 extinguisher or preferably a Class K extinguisher Special care must be taken to understand the manufacturers instructions and be prepared to operat...

Page 10: ...EXPLODED VIEW 10 4 5 6 3 2 1...

Page 11: ...mage Qty 1 Plancha body 1 1 2 3 Cooking Plate NOTE Wash all parts that will come in contact with food or water with warm soapy water rinse and towel dry 4 Adjustable Feet 4 5 Regulator Assembly 1 6 Ho...

Page 12: ...2 R STEP 4 Turn clockwise the nut on regulator assembly 5 to connect regulator assembly 5 with the plancha body 1 1 5 STEP 5 USE 20LB CYLINDER Rotate the hose assembly 6 clockwise to attach the hose...

Page 13: ...FTER EVERY USE NOTE Clean the entire appliance each year and tighten all hardware on a regular basis 1 2 times a year or more depending on amount of use 1 Before cleaning turn off the appliance at the...

Page 14: ...CARE AND MAINTENANCE SUGGESTED CLEANING MATERIALS Hot water Mild dishwashing liquid detergent Soft nylon cleaning pad CLEANING BURNERS 14 D5 Spring Washer M5 Nut M5 x 12 Screw A...

Page 15: ...age incurred in installation repair or replacement nor for incidental or consequential damage SHINERICH INDUSTRIAL LTD Toll free No 1 866 814 0585 Addr 8 F Noble Center 1006 Fuzhong 3rd Rd Futian Dist...

Reviews: