


iWorx® HPU3
505-035, Effective: June 30, 2015
5
© 2015 Taco Electronic Solutions, Inc.
INSTALLATION INSTRUCTIONS
General
CAUTION:
This symbol is intended to alert the user to the presence of important installation and mainte-
nance (servicing) instructions in the literature accompanying the equipment.
CAUTION:
Risk of explosion if battery is replaced by an incorrect type. Contains lithium type battery; dis-
pose of properly.
WARNING:
Electrical shock hazard. Disconnect
ALL
power sources when installing or servicing this
equipment to prevent electrical shock or equipment damage.
Make all wiring connections in accordance with these instructions and in accordance with pertinent national and local
electrical codes. Use only copper conductors that are suitable for 167 °F (75 °C).
Static Electricity
Static charges produce voltages that can damage this equipment. Follow these static electricity precautions when han-
dling this equipment.
• Work in a static free area.
• Touch a known, securely grounded object to discharge any charge you may have accumulated.
• Use a wrist strap when handling printed circuit boards. The strap must be secured to earth ground.
FCC Compliance
This equipment has been tested and found to comply with the limits for a Class A digital device, pursuant to Part 15 of
the FCC rules. These limits are designed to provide reasonable protection against harmful interference. This equip-
ment can radiate radio frequency energy and, if not installed and used in accordance with the instructions, may cause
harmful interference to radio communications. However, there is no guarantee that interference will not occur in a par-
ticular installation. If this equipment does cause harmful interference to radio or television reception, which can be
determined by turning the equipment off and on, the user is encouraged to try to correct the interference by one or
more of the following measures:
• Reorient or relocate the receiving antenna.
• Increase the separation between the equipment and the receiver.
• Connect the equipment to a power source different from that to which the receiver is connected.
• Consult the equipment supplier or an experienced radio/TV technician for help.
You are cautioned that any changes or modifications to this equipment not expressly approved in these instructions
could void your authority to operate this equipment in the United States.
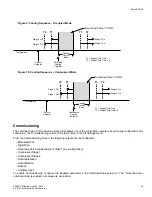
BEFORE INSTALLING
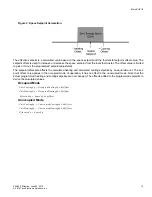
About this Document
The instructions in this manual are for the HPU3 module which supports a liquid source heat pump.
Inspecting the Equipment
Inspect the shipping carton for damage. If damaged, notify the carrier immediately. Inspect the equipment for damage.
Return damaged equipment to the supplier.


