4
left. When using the rudder in conjunction with the ailerons, the airplane’s nose can
point into a turn (instead of pointing up and “skidding” through the turn), allowing the
airplane to perform tighter, more coordinated turns.
TRIMS
A “trim” lever is included for each of the main controls, located adjacent to the
respective stick.
The aileron, elevator, and rudder trim levers are digital in function, and always rest
at center position. Briefl y defl ecting the lever to either direction away from center
will cause the respective servo output to fi nely rotate to one direction, and will be
accompanied by an audible tone. Pressing and holding the trim lever will cause
the servo output to move repeatedly. During a fl ight, when the main sticks are
released and spring back to center position, the aircraft should ideally not veer in
any direction. If the aircraft does veer in a particular direction, click the respective
trim lever until the aircraft maintains a straight attitude on its own.
The throttle trim lever is analog in function, and can move mechanically up or down
and rest at any point in the range. Moving the throttle trim lever slightly up or down
will fi nely adjust the engine or motor at low speeds. For safety reasons, it’s a good
idea to use throttle trim when controlling the engine/motor at very low speed while
on the ground. For aircraft with glow engines, the precise position of the trim lever is
helpful when determining the engine’s preferred idle point. The throttle trim lever is
not active when the main throttle stick is above the center point.
REVERSING SWITCHES
Four reversing switches are built into the Tx, one for each control. Each switch
can reverse the rotational direction of the servo that is connected to the respective
channel. This is often a much easier method for changing the direction of a servo’s
movement as opposed to altering the mechanical connections between the model’s
surface and the servo. Refer to the model’s instructions for specifi c details.
ADJUSTABLE STICKS
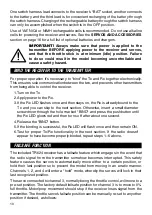
The length of both gimbal sticks
can be adjusted as desired.
Loosen the set screw inside
the center of the stick with a
2mm hex wrench. Rotate the
stick end counter-clockwise to
lengthen the stick, or clockwise
to shorten the stick. Once the
desired stick length is found,
tighten the set screw with the
hex wrench.

