background image

 TAG Heuer Timing 


Page 21 

  Quick Guide 

7.


Reset memory 
 

Buttons: Start/Stop + Memory 

Change mode:  
 

Clear Memory (Start/Stop + Memory) 


Button: Mode 

Power off 
 

Buttons:  Mode (hold down together for 5 seconds) 

Recall recorded times 
 

Button: Memory  

Setting (Date / Time / CD) 
 

Button: Memory to select the digit 


Button: Split/Lap to change value 


Button: Mode to validate the selection 

Stopwatch  
 

Button: Start/Stop: start or stop counter 


Button: Split/Lap: memorize Split/Lap 


Button: Mode: select display Split or LAP or both 


Button: Memory: recall split/lap memorized 

Count Down 
 

Button: Start/Stop: Start or Stop counter 


Button: Split/Lap: reset the preselected count-down 


Button: Memory: count-down setting 


Button: Mode: Select single Count Down or Multi Count Down (CD blinking) 

Time (function manual back-up with Time-of-Day) 
 

Button: Start/Stop + Split/Lap: Set Time-of-Day (+ 1 minutes) 


Button: Start/Stop:  S Start 


Button: Split/Lap: Memorize Time-of-Day 


Button: Memory: recall/view memorized time 


Summary of Contents for POCKET PRO HL400-R RALLY

Page 1: ...TAG Heuer Timing Page 1 POCKET PRO HL400 R RALLY User Manual Version 09 2015 ...

Page 2: ...own mode CD 7 2 5 1 Count Down timing 7 2 6 TIME Mode 8 2 6 1 Internal Time of Day setting 8 2 6 2 Time of day synchronisation 8 2 6 3 To Synchronise at Zero 8 2 6 4 Timing 9 3 Specific Rally Timing Modes 10 3 1 Starter Marshall mode A 11 3 2 Time Check mode B 13 3 3 Stage Timer mode C 15 4 Recommendations 18 5 Download a new version of Firmware 19 6 Technical specification 20 6 1 Pocket Pro chara...

Page 3: ...er the complete solution for timekeepers rally drivers and co drivers with the added benefit to download all data and times for post event calculations and results Together with its integrated USB connector free POCKET MANAGER Application and Pocket Pro 800 measurements internal memory this device makes downloading analysis printing and archiving of results extremely simple Results can also be vie...

Page 4: ...WATCH TIME CD A B C 2 2 2 Power The Pocket Pro functions with an internal battery It can be recharged when it is connected to a PC USB cable or by a USB 5VDC power supply When not used for 36hours the Pocket Pro will switch OFF automatically LCD OFF To wake up the Pocket Pro just press any button It is also possible to switch OFF manually the Pocket Pro by pressing simultaneously the MODE and MEMO...

Page 5: ...n is displayed on the top left of the LCD Press the MEMORY button again and the next stored time will be displayed 2 2 4 Delete Memory To delete the memory press simultaneously START STOP and MEMORY buttons Warning You will not receive a request for you to confirm Delete Memory Once this step is made all times are irretrievably deleted 2 3 Date Mode This mode allows you to update the date of the P...

Page 6: ...P time display is in the middle of the LCD mm ss dc Running Time Running time between Start and Finish The running time is on the bottom of the LCD mm ss dc The running time always starts from 00 00 00 To start press the START STOP button icon is ON Three times are running and displayed At Split Lap press SPLIT LAP Button The SPLIT and LAP time is stopped The running time bottom continues to run A...

Page 7: ...ts on the bottom A timer on the top is started increments At any time it is possible to PAUSE and RESTART the count down A long single beep will sound at the end of the Count Down The count down will stop automatically at 00 00 To restart a new count down you have to reset the value by pressing SPLIT LAP button During the count down sequence by pressing the MODE button it is possible to change the...

Page 8: ...ing Time 1 100 5 Pocket Pro time 2 6 1 Internal Time of Day setting To set the Internal Time of Day on Pocket Pro The Pocket Pro memory has to be reset START STOP MEMORY Press and hold the MEMORY button for 5 sec the first digit will flash and SET icon is ON Press the SPLIT LAP button to change the value Press the MEMORY button to move to the next digit 2 6 2 Time of day synchronisation Press SPLI...

Page 9: ...ng Once the Synchronization is made the icon appear To memorize the time of day press SPLIT LAP button The time on the LCD will stay and the passing counter top left is incremented To see the time of the day running press MEMORY button ...

Page 10: ... the co driver and driver with an indication of available time before their next start stage timing and target timing Time Check mode allows the user to select a count down with audible beeps to the next start occurring on either the next full minute or half minute A count down clock is visible during the count down phase which will then change to a count up clock during the stage The internal mem...

Page 11: ...t down to the next scheduled start 6 Interval time between 2 scheduled starts user selectable Button Start Stop Start Count Down Memorize the scheduled start time gap difference Button Split Lap Increment competitor Change configuration of the next start count down 60 for the next full minute 30 for the next full 30 seconds 60 30 for next 30 sec full minutes full 30 sec Hold during 5 sec stop coun...

Page 12: ...interval time between starts options are 1 2 or 4 minutes and move to automatic starts on the selected delay End of count down Press the START STOP button to store the scheduled start time and the actual start time gap or After 30 seconds the count down sequence for the next competitor starts automatically Shown count down is currently at 1 29 sec Sequence N Scheduled start time for the competitor...

Page 13: ...for the next full minute 30 for the next full 30 seconds 60 30 for next 30 sec full minutes full 30 sec Stage count down setting Change the digit value Button Memory Change the configuration of stage count down before a start Button Mode Validate the stage Count Down time selected During timing Button Start Stop Start stop the count down for the next start Finish memorize the finish arrival time B...

Page 14: ...ge count down 32 37 Running time 7 37 Button START STOP Restart Fly Back Time of day 15 51 34 Stage count down 18 26 Running time 21 34 Button START STOP End of stage n 001 Time of day 16 19 19 Stage Count down 41 sec Running time 39 19 Button START STOP Pause function Fly Back Time of day 15 48 23 Stage count down 21 37 Running time 18 23 Button SPLIT LAP 5 seconds Change the stage to n 2 Setting...

Page 15: ...e next stage stores the previous stage time to memory Use Split Lap before starting the next stage to change the configuration for next start 60 for the next full minute 30 for the next full 30 seconds 60 30 for next 30 sec full minutes full 30 sec Button Memory Recall View the stored stage times from memory Important If the Start Stop button is pressed during a stage the running time will tempora...

Page 16: ...ou will have 1 Stage number 2 Ideal start time of day 3 Finish time of day 4 Net time for the stage When the stage 000 you will get the cumulative time for all stages completed 1 Stage 000 Global over view 2 Total time for all stages completed hh mm ss 2 4 3 1 2 1 ...

Page 17: ... time 3 78 sec Button START STOP Return to running time Time of day 10 47 19 Running time 32 12 76 Button START STOP End of stage n 001 Time of day 11 09 51 Net time 54 51 18 Button START STOP Split function Fly back Time of day 10 42 18 Split Time 27 18 51 not stored in memory Button SPLIT LAP Store Stage time for stage n 001 Time of day 11 27 32 Increment to stage n 002 Select start interval for...

Page 18: ...n The USB socket is protected by the black rubber and prevents any water ingress It is very important and recommended to keep the rubber in place at all times when not using the USB connection The optimal visibility of LCD is when the Pocket Pro is protected from direct sunlight The Pocket Pro can overheat in excessive direct sunlight The LCD Plexiglas is fragile It is not recommended to clean it ...

Page 19: ...he software TAGHeuerFirmmanager exe version minimum V10 0 Procedure Copy the software TAGHeuerFirmManager exe onto your hard disk drive Connect the Mini USB cable HL545 3 to the PC and to the Pocket Pro Run the software TAGHeuerFirmManager exe Select the COM Port Select the file Update HL400_xxx dat Press START on the software Press reset on Pocket Pro As soon as the upgrade is downloaded into the...

Page 20: ...s in use after full charge Shell Aluminium PVD surface treatment Weight 160 g Precision 2 sec month Calibration available Display LCD 3 lines of 6 characters Battery level Timing Mode Size of characters 7mm height Accuracy 1 100 th second Memory 800 stored times Temperature range 20 C to 60 C 6 2 USB Connector Pin Description 1 5V 2 D 3 D 4 TAG Heuer Photocell 5 GND ...

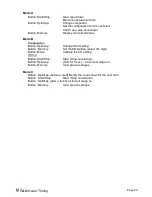
Page 21: ...on Start Stop start or stop counter Button Split Lap memorize Split Lap Button Mode select display Split or LAP or both Button Memory recall split lap memorized Count Down Button Start Stop Start or Stop counter Button Split Lap reset the preselected count down Button Memory count down setting Button Mode Select single Count Down or Multi Count Down CD blinking Time function manual back up with Ti...

Page 22: ...tton Split Lap Change Start setting Button Memory Set the CD Setting select the digit Button Mode Validate the CD setting Timing Button Start Stop Start Stop count down Button Split Lap hold for 5 sec Increment stage no Button Memory View previous stages Mode C Button Split Lap before a start Modify the count down for the next start Button Start Stop Start Stop count down Button Split Lap after a ...

Page 23: ...TAG Heuer Timing Page 23 Notes 8 ...

Page 24: ...Heuer Timing Page 24 TAG Heuer PROFESSIONAL TIMING 6A Louis Joseph Chevrolet 2300 la Chaux de Fonds Switzerland Tel 032 919 8000 Fax 032 919 9026 E mail info tagheuer timing com http www tagheuer timing com ...

Reviews: