background image

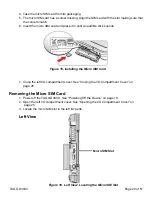
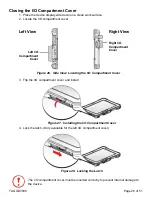
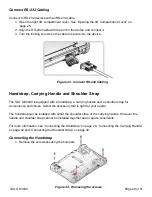
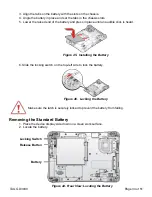
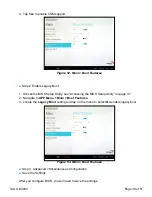
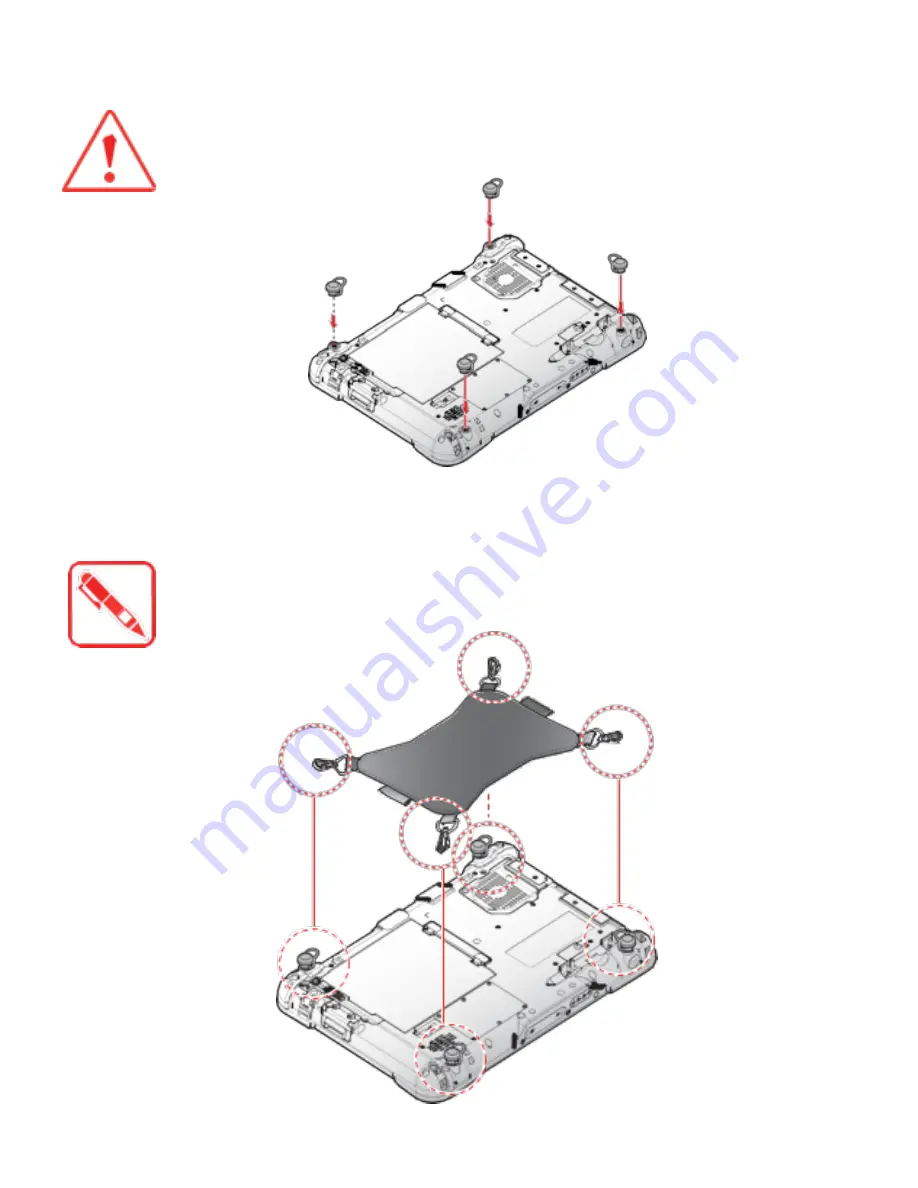
2.  Install the D-rings.

Make sure the D-rings are tightly secured before installing the handstrap.

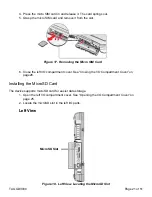
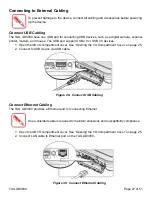
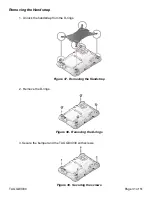
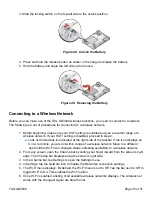
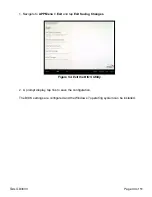
3. Connect the handstrap on the D-rings.

When the handstrap is installed, the digitizer can be placed under the strap.

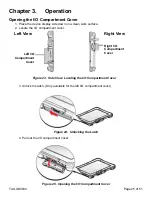
Figure 35.  Installing the D-rings

Figure 36.  Connecting the Handstrap

 TAG GD3030 


          Page 30 of 51

Summary of Contents for GD3030

Page 1: ...TAG GD3030 User Manual TAG Global Systems ...

Page 2: ...poration in the United States and or other countries Microsoft products are licensed to OEMs by Microsoft Licensing Inc a wholly owned subsidiary of Microsoft Corporation The Bluetooth word mark and logos are registered trademarks owned by Bluetooth SIG Inc All other brand and product names are trademarks or registered trademarks of their respective owners Images shown in this document may vary sl...

Page 3: ...fication 4 Lithium Battery Safety Statement 5 CHAPTER 1 INTRODUCTION About This Guide 6 Unpacking the Device 6 Technical Specifications 6 TAG GD3030 Configuration Options 8 Parts List 9 Identifying the Device 10 LED Status 11 Identifying the Digitizer 14 Dimensions 15 Touch Screen Features 16 CHAPTER 2 GETTING STARTED First Time Use 17 Charging the Battery 17 Powering the Device On and Off 18 Inst...

Page 4: ...attery 33 Removing the Standard Battery 34 Connecting to a Wireless Network 35 CHAPTER 4 USING BIOS SETUP UTILITY When to Use the BIOS Setup Utility 37 Accessing the BIOS Setup Utility 37 Installation an Operating System 38 BIOS Passwords 41 EC and BIOS 43 CHAPTER 5 USING THE DASHON UTILITY Overview 48 CHAPTER 6 TROUBLESHOOTING Troubleshoot the Wi Fi Connection 49 Troubleshoot Operating the Comput...

Page 5: ...tion Current information and manuals are available for download at the following website www tagglobalsystems com Conventions Bolded or underlined text is used to emphasize the designated information A Note is used to provide additional information for the device or settings A Caution is used to warn against potential hazards or to caution against unsafe practices A Warning is used to identify imm...

Page 6: ... it evenly aligned to prevent bending the connector pins Intended Use The TAG GD3030 rugged tablet is equipped with multi functional terminals for stationary and mobile applications in industrial environments such as logistics warehousing fleet management manufac turing and the automotive industry Read the safety guidelines thoroughly before starting any servicing on the device Read the guide line...

Page 7: ...tal Hazards Do not use the TAG GD3030 in locations near with flammable gases or vapor The use of electrical equipment in explosive environments can be dangerous Turn off the device when near a gas station fuel depot chemical plant or a place where blasting operations take place Environmental Ambient Temperature The TAG GD3030 operates on the basis of a passive cooling concept which internal waste ...

Page 8: ...energy and if not installed and used in accordance with the instruction manual may cause harmful interference to radio communications Operation of this equipment in a residential area is likely to cause harmful interference in which case the user will be required to correct the interference at his own expense However there is no guarantee that interference will not occur in a particular installati...

Page 9: ...the FCC is 0 55 W kg when placed next to the body CE Marking This product has passed the CE test for environmental specifications when shielded cables are used for external wiring We recommend the use of shielded cables Please contact your local representative for ordering information This product has passed the CE test for environmental specifications Test conditions for passing included the equi...

Page 10: ...mponents and accessories Contact your representative if there are any missing or damaged items See Contacting TAG Global Systems on page 52 Technical Specifications Table 1 Technical Specifications Item Description Display 10 1 inch LED Backlight 1920 W x 1200 H WUXGA Touch screen 10 point capacitive touch screen with digitizer Brightness 1000 nits before touch CPU Intel Core i5 5350U 1 8 GHz Oper...

Page 11: ...icro SIM Card Slot x1 MicroSD Slot x1 Audio Jack x1 headphone microphone combo USB 3 0 x1 type A RS 232 x1 Micro HDMI x1 Ethernet x1 Security TPM TPM 1 2 BIOS On Off for I Os YES Data Collection Camera Front 2 0 Mega Pixels camera Rear 5 0 Mega Pixels camera with LED auxiliary light and Auto focus GNSS YES NFC Optional Barcode Reader Optional Magnetic Stripe Reader Optional Smart Card Reader Optio...

Page 12: ...ion and storage temperature MIL STD 810G Method 501 5 and 502 5 Humidity MIL STD 810G Method 507 5 Humidity Procedure II Ag gravated Cycles Fig 507 5 7 IP rating IP65 Operating Temperature Range 20 C 4 F to 60 C 140 F Storage Temperature Range 30 C 22 F to 70 C 158 F Humidity 5 95 without condensation TAG GD3030 Configuration Options The following options are available for the TAG GD3030 NFC modul...

Page 13: ...d and ordered separately For help contact your local TAG Global Systems sales representative See Contacting TAG Global Systems on page 52 TAG GD3030 Digitizer Power Adapter 2 Point Carrying Handle 2 Point Shoulder Strap Hitch D rings Attaching straps 4 Point Handstrap TAG GD3030 Page 9 of 51 ...

Page 14: ...n page 11 for further information 3 Rear view See Rear View on page 14 for further information 4 Right view See Side View on page 13 for further information 5 Rubber bumpers Easy to grip rubber bumpers enable the rugged tablet to withstand shocks and drop for use in demanding environments 6 Bottom view See Bottom View on page 12 for further information TAG GD3030 Page 10 of 51 ...

Page 15: ...ry status see LED Status on page 12 5 Wi Fi LED The Wi Fi LED lights to indicate Wi Fi is enabled 6 FN LED The FN LED lights when the function switch on 7 Home key Windows 8 home key 8 Volume Volume increase 9 Volume Volume decrease 10 Power key Turns the TAG 3030 on or off 11 Power LED The power LED lights when the device is on 12 F2 key Programmable function key 13 F1 key Programmable function k...

Page 16: ...Blue On FN function switch on Blue Off FN function switch off Wi Fi Blue On Wi Fi on Blue Off Wi Fi off Table 5 Bottom View No Item Description 1 Docking connector 12 pin connector for docking onto a station 2 Kensington lock Lock the TAG GD3030 to a stationary object for security 3 Pass through Dual pass through for WLAN GNSS and WWAN 2 3 1 Bottom View Figure 3 Bottom View TAG GD3030 Page 12 of 5...

Page 17: ... ON to provide power from the backup battery 6 Micro SIM slot Insert micro SIM card for 3G or 4G LTE communication function 7 USB 3 0 Connect USB devices to the TAG GD3030 8 Audio jack Connect a 3 5 mm jack for a headphone or external speakers 9 Ethernet Connect the TAG GD3030 to an Ethernet RJ 45 cable 10 DC IN jack Insert power connector to charge battery 11 RS 232 Connect the TAG GD3030 to a se...

Page 18: ...for cooling 5 Securing holes Secure the bumpers and the D rings for the handstrap and shoulder strap 6 Expansion bay Remove the cover to find the expansion accessory connector 7 Digitizer holder Place digitizer here Identifying the Digitizer You can use the digitizer to control your TAG GD3030 as with a mouse or keyboard The digitizer is not waterproof Take care not to soak it or dip it in water F...

Page 19: ...Dimensions The following image lists the device dimensions without add ons mm inches 280 11 195 7 7 Figure 7 Front View Dimensions Figure 8 Side View Dimensions 23 0 9 TAG GD3030 Page 15 of 51 ...

Page 20: ... a desktop computer screen The following actions are available through the use of the digitizer Open applications Choose commands in menu Select options in dialog box or drop down menu Drag the scroll bar Drag across the text to select content Place the cursor in a text box before typing A right click is generated by tapping the mouse icon in the system tray After tapping the mouse icon highlights...

Page 21: ...an anti static mat First Time Use 1 Open the left I O compartment cover See Opening the I O Compartment Cover on page 25 2 Switch the switch to the ON position 3 Close the left I O compartment cover See Closing the I O Compartment Cover on page 26 Charging the Battery When you use the AC adapter to connect your TAG GD3030 to a power outlet the standard and external optional battery will automatica...

Page 22: ...N cover must be inserted correctly to prevent internal damage to the device Powering the Device On and Off Powering On the Device Only power on the TAG GD3030 after connecting all of the peripherals and cabling 1 Press and hold the power button until the screen lights The device runs through the start up sequence and powers up Figure 11 Connecting the AC Adapter Figure 12 Closing the DC IN Cover F...

Page 23: ...ce includes a micro SIM card slot for cellular and wireless connection Only a micro SIM card is supported in the slot Check with your network or cellular service provider for availability and cost rates 1 Power off the TAG GD3030 See Powering Off the Device on page 19 2 Open the left I O compartment cover See Opening the I O Compartment Cover on page 25 3 Locate the micro SIM slot in the left I O ...

Page 24: ...eft I O compartment cover See Closing the I O Compartment Cover on page 26 Removing the Micro SIM Card 1 Power off the TAG GD3030 See Powering Off the Device on page 19 2 Open the left I O compartment cover See Opening the I O Compartment Cover on page 25 3 Locate the micro SIM slot in the left I O parts Figure 15 Installing the Micro SIM Card Figure 16 Left View Locating the Micro SIM Slot Micro ...

Page 25: ... Compartment Cover on page26 Installing the MicroSD Card The device supports microSD card for easier data storage 1 Open the left I O compartment cover See Opening the I O Compartment Cover on page 25 2 Locate the microSD slot in the left I O parts Figure 17 Removing the Micro SIM Card Figure 18 Left View Locating the MicroSD Slot MicroSD Slot Left View TAG GD3030 Page 21 of 51 ...

Page 26: ...s 5 Close the left I O compartment cover See Closing the I O Compartment Cover on page 26 Removing the MicroSD Card 1 Open the left I O compartment cover See Opening the I O Compartment Cover on page 25 2 Locate the microSD slot in the left I O parts Figure 19 Installing the MicroSD Card Figure 20 Left View Locating the MicroSD Slot MicroSD Slot Left View TAG GD3030 Page 22 of 51 ...

Page 27: ...ge the digitizer and result in scratches on the screen The digitizer uses electromagnetic induction and may not work properly near strong electrical field or magnetic field such as Near AM radio base stations or relay station antennas Near CRT displays that generate strong electromagnetic field noise Move the digitizer away from such locations so it works properly The pointer cannot follow the dig...

Page 28: ...rotected during transport by a transparent film This film should remain on the front display during assembly to avoid damage to the front display surface Only remove the film once all of the assembly work has been completed Figure 22 Removing the Protective Film TAG GD3030 Page 24 of 51 ...

Page 29: ...t cover 3 Unlock the latch Only available for the left I O compartment cover 4 Pull out the I O compartment cover Left View Right View Left I O Compartment Cover Right I O Compartment Cover Figure 23 Side View Locating the I O Compartment Cover Figure 25 Opening the I O Compartment Cover Figure 24 Unlocking the Latch TAG GD3030 Page 25 of 51 ...

Page 30: ...t I O Compartment Cover Figure 26 Side View Locating the I O Compartment Cover 3 Flip the I O compartment cover and install 4 Lock the latch Only available for the left I O compartment cover The I O compartment cover must be inserted correctly to prevent internal damage to the device Figure 27 Installing the I O Compartment Cover Figure 28 Locking the Latch TAG GD3030 Page 26 of 51 ...

Page 31: ...the left I O compartment cover See Opening the I O Compartment Cover on page 25 2 Connect to USB device via USB cable Connect Ethernet Cabling The TAG GD3030 provides a Ethernet port for connecting Ethernet Use a shielded cable is required to maintain emissions and susceptibility compliance 1 Open the left I O compartment cover See Opening the I O Compartment Cover on page 25 2 Connect LAN cable t...

Page 32: ...ver See Opening the I O Compartment Cover on page 25 2 Connect the audio cable Connect Micro HDMI Cabling Connect to HDMI devices via micro HDMI cable 1 Open the left I O compartment cover See Opening the I O Compartment Cover on page 25 2 Connect micro HDMI cable to micro HDMI port on the TAG GD3030 Figure 31 Connect Audio Cabling Figure 32 Connect Micro HDMI Cabling TAG GD3030 Page 28 of 51 ...

Page 33: ...ying handle and a shoulder strap for convenience and choice Select the accessory that is right for your needs The handstrap can be installed with either the shoulder strap or the carrying handle However the handle and shoulder strap cannot be installed together due to space constraints For more information see Connecting the Handstrap on page 29 Connecting the Carrying Handle on page 32 and Connec...

Page 34: ...htly secured before installing the handstrap 3 Connect the handstrap on the D rings When the handstrap is installed the digitizer can be placed under the strap Figure 35 Installing the D rings Figure 36 Connecting the Handstrap TAG GD3030 Page 30 of 51 ...

Page 35: ...nlock the handstrap from the D rings 2 Remove the D rings 3 Secure the bumper and the TAG GD3030 with screws Figure 37 Removing the Handstrap Figure 38 Removing the D rings Figure 39 Securing the screws TAG GD3030 Page 31 of 51 ...

Page 36: ...andle 1 Press in the clips to release them from the metal loop 2 Remove the clips Connecting the Shoulder Strap 1 Attach the clips to the metal loop on the bumper Figure 40 Connecting the Carrying Handle Figure 41 Removing the Carrying Handle Figure 42 Connecting the Shoulder Strap TAG GD3030 Page 32 of 51 ...

Page 37: ... use components specifically designed for this device Contact your local representative for ordering information Make sure the power switch is switched to ON before installing the standard external battery See First Time Use on page 17 1 Place the device display side down on a clean work surface 2 Locate the battery Figure 43 Removing the Shoulder Strap Figure 44 Rear View Locating the Battery Loc...

Page 38: ... Slide the locking switch on the top left side to lock the battery Make sure the latch is securely locked to prevent the battery from falling Removing the Standard Battery 1 Place the device display side down on a clean work surface 2 Locate the battery Figure 45 Installing the Battery Figure 46 Locking the Battery Figure 44 Rear View Locating the Battery Locking Switch Release Button Battery TAG ...

Page 39: ...n displays an X in a red circle you are not within range of a wireless network Move to a different spot until the Wi Fi icon changes status indicating availability to a wireless network 2 From any screen open the Charms bar by sliding your finger inward from the screen s right edge The Charms bar displays along the screen s right side 3 In the Charms bar tap Settings to open the Settings menu 4 In...

Page 40: ...shed with the process The network is considered an Open unsecured network no password is required 8 If a password is required type the password in the Enter the network security key field Alternatively you can also push the WPS button on your router to begin the security handshake 9 Tap Next to finish the connection process You have successfully connected to a wireless network TAG GD3030 Page 36 o...

Page 41: ...p Utility screens shown in this chapter are for your reference only The actual images or settings on your tablet computer may differ The BIOS Setup Utility program may have been updated after the publication of this manual To run the BIOS Setup Utility use the following procedures 1 Perform one of the following If the TAG GD3030 is powered off Press the Power button to start up the device The powe...

Page 42: ... Environment There are several settings in BIOS that must be modified before you can install a Windows 7 operating system Use the following guidelines to prepare the BIOS environment Step 1 Enable CSM Support 1 Access the BIOS Setup Utility see Accessing the BIOS Setup Utility on page 37 2 Navigate to APP Menu Main Boot Features 3 Locate the CSM Support setting and tap the drop down menu to displa...

Page 43: ... 37 2 Navigate to APP Menu Main Boot Features 3 Locate the Legacy Boot setting and tap on the menu to select On enable legacy boot Step 3 Advanced Miscellaneous Configuration Save the Settings After you configure BIOS you will need to save the settings Figure 52 Main Boot Features Figure 53 Main Boot Features TAG GD3030 Page 39 of 51 ...

Page 44: ...xit and tap Exit Saving Changes 2 A prompt display tap Yes to save the configuration The BIOS settings are configured and the Windows 7 operating system can be installed Figure 54 Exit the BIOS Utility TAG GD3030 Page 40 of 51 ...

Page 45: ... 1 Go to APP Menu Security Account s Password Status 2 Tap the Enter icon next to Setup the Supervisor Password to access the virtual keyboard 3 Tap the password to use for the Supervisor profile and tap Enter Figure 55 Security Account s Password Status Figure 56 Set Supervisor Password TAG GD3030 Page 41 of 51 ...

Page 46: ...vigate to APP Menu Security Account s Password Status 2 Tap the Enter icon next to Setup Supervisor Password 3 Enter the current supervisor password 4 Enter a new password 5 Enter the new password again to confirm 6 Go to APP Menu Exit 7 Tap Exit Saving Changes and tap Yes to save the configuration Resetting a Supervisor Password A supervisor password can not be reset In the event that you forget ...

Page 47: ...vent a sudden loss of power during the BIOS updating process 1 Contact your technical sales or technical representative to obtain the correct BIOS file 2 Copy the BIOS file on to the USB device 3 Connect the USB device to one of the device s USB ports and power on the TAG GD3030 A USB keyboard is required for entering command 4 Once the device is on and the Windows 8 Home screen displays open the ...

Page 48: ...6 Tap Change PC settings 7 From the PC settings menu tap Update and recovery to continue Figure 59 Change PC Settings Figure 60 Update and Recovery TAG GD3030 Page 44 of 51 ...

Page 49: ...8 From the Update and recovery screen tap Recovery The Advanced startup option displays 9 Under Advanced startup tap Restart now Figure 61 Recovery Figure 62 Restart Now TAG GD3030 Page 45 of 51 ...

Page 50: ...reference 11 From the Use a device menu tap Internal Shell to open the command screen Make sure connect the TAG GD3030 to the AC adapter to prevent a sudden loss of power Figure 63 Use a Device Figure 64 Internal Shell TAG GD3030 Page 46 of 51 ...

Page 51: ...ocess is complete 15 Once the process is complete the TAG GD3030 automatically reboots The BIOS is now updated Updating EC Connect the TAG GD3030 to the AC adapter to prevent a sudden loss of power 1 Updating EC requires the use of the Internal Shell Command menu refer to steps 1 to 12 of Updating BIOS 2 Enter the EC source file folder 3 In the source folder enter f 4 Do not turn off your device o...

Page 52: ...nable screen auto rotate function Airplane Turn on or off the airplane mode Battery Shows the battery level or charging status Brightness Adjust brightness level and enable or disable auto brightness function Volume Control Adjust volume level and enable or disable mute function GNSS Disable or enable GNSS function Wi Fi Disable or enable Wi Fi function Bluetooth Disable or enable Bluetooth functi...

Page 53: ...uter now shows you are not connected to the network A Move closer to an access point or to a different location to reestablish communications until you reconnect with the network Q The computer appears to be connected to the network but you cannot establish a terminal emulation session with the host computer A There may be a problem with the host computer or with the connection between the access ...

Page 54: ...er data A Restart the computer Call Product Support Simple instructions please contact the dealer contact TAG Global Systems representative or leave a message visit the TAG Global Systems website at www tagglobalsystems com To better assist you have the following information ready Configuration number Serial number Operating system BIOS and MCU versions Service pack version System component versio...

Page 55: ... pressure cleaner the additional risk of water entering the TAG GD3030 may damage the electronics or touch screen Touch Screen Use neutral detergent or isopropyl alcohol on a clean soft cloth to clean the panel surface Prevent using any kind of chemical solvent acidic or alkali solution Returning the Device Please put the contents in the original package gently when you need to return the TAG GD30...

Reviews: