5-4
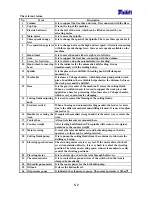
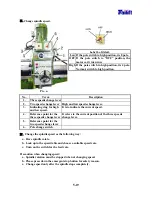
The relevant names
:
No
Name Description
1 Top Cover
It is located on the top of the Column, inside which Elevating Motor and Reducing
Speed Motor are installed.
2 Column
It is designed to support the Gearbox and Arms. It connects with the Base.
3 Transmission
ball
screw.
It is designed to transmit the rotation of the Elevating Motor to the Arm so that it
can move up and down.
4 Arm
It is to support the Gearbox. It connects with the Column.
5 Rotating lever
It is designed to move the Arm. It is easy and safe to use.
6 Work table
It shortens the distance between the work piece and drilling bit. The T-shaped
surface facilitates the clamping and positioning of the work piece.
7 Base
It serves as a foundation, the gravity center of the machine. It contains cutting fluids
inside. It can support the work piece. Its T-shaped surface facilitates the clamping
and positioning of the work piece.
8 Spindle Motor
It is the source of the driving for the Spindle.
9 Three steps feeding
rate selection ring
It is designed to select the feeding rate. Used together with the two steps feeding rate
selection lever, it provides 6 options for the feeding rate.
10 Two steps feeding
rate selection ring
It is designed to select the feeding rate. Used together with the three steps feeding
rate selection lever, it provides 6 options for the feeding rate.
11 Dual Speed
changing lever
It is designed to switch the spindle rotation speed. Used together with the three steps
feeding rate selection lever, it provides 6 options for the feeding rate.
12 Triple speed
changing lever
It is designed to switch the spindle rotation speed. Used together with the two steps
feeding rate selection lever, it provides 6 options for the feeding rate.
13 High-low speed
changing lever
It is designed to switch the spindle rotation speed. Used together with the two and
three steps feeding rate selection lever, it provides 12 options for the feeding rate.
14 Auto feeding lever It is used simultaneously with the feeding lever to enable the auto mechanism.
15 Manual feeding
wheel
It indicates the scale of the manual feeding. It rotates simultaneously with the auto
feeding devices.
16 Hand wheel
It is designed to move the Gearbox. It can move right- or leftward.
17 Spindle
It is the place where the drilling bit, tapper and drill clamp head are installed to.
18 Cutting fluid
adjustment switch
While at drilling, cutting fluid might be used. The switch is used to control the
passage volume.
19 Feeding Lever
It is to control on and off of the auto feeding mechanism.
20 Bit releasing lever
When releasing the drilling bit, a releasing pin is used. This Bit releasing lever works
the same as the releasing pin.
21 Main Scale
It indicates how deep the drilling has reached.
22 Cutting fluid pump It is designed to extract out the fluid from the container.
23 Column clamping
devise
24 Oil Pressure pump
motor
It is the dynamic source of the oil pressure pump.
25 Metal cover
There are the ball screw and oil pressure pump inside. It is designed to protect the
operation and staffs’ safety.
26 Gearbox clamping
devise
It is designed to fasten the gearbox. It is used simultaneously with the ball screw.
27 Counter weight
After feeding finished, the Spindle will return to the original point due to the counter
weight.
28 Guide lever
It is designed to guide the gearbox movement and clamp it.
29 Electricity box
Most of the control elements for the radial drill are put in this box.
Summary of Contents for TPR1230
Page 11: ...1 6 z Gearbox For TPR 1230 TPR 1230H For TPR 1600H TPR 2000H z Hydraulic oil pump...
Page 74: ...9 4 9 4 Electrical circuit diagram For TPR 2000H CE Standard...
Page 83: ...9 13 9 9 Electrical circuit diagram For TPR 1230 Standard...
Page 84: ...9 14 9 10 Electrical circuit diagram For TPR 1230H Standard...
Page 85: ...9 15 9 11 Electrical circuit diagram For TPR 1600H TPR 2000H Standard...


