09/01 IPN: M5000-00-102
Disassembling the radio D - 7
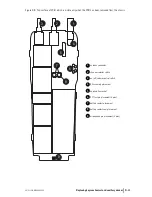
Removing the rear panel
Follow the disassembly instructions and disas-
semble the radio to the PCB level. Refer to
Figure D-10 for the details of the rear panel
assembly.
Insert a small flat bladed screw driver under
the auxiliary dummy rear cover and apply
pressure to push the dummy rear cover lugs
free of the holes in the rear panel. To remove
the rear panel, either:
■
slide the cover forward by pushing at the
base with your thumbs; or
■
insert a small flat-bladed screwdriver just
under the notch in the base and twist.
Remove the rear panel seal. Note that the RF
contact pin normally remains in the rear panel
seal. Make sure that this is not lost during
disassembly.
Using a calibration pin, lift the auxiliary flexi-
ble PCB contact area from the lower lefthand
corner. Remove the flexible PCB with the seal
from the chassis; they should come out as a
unit.
You can now replace the auxiliary flexible PCB.


