112
General Information
TM9100 Service Manual
© Tait Electronics Limited
August 2005
4.8
Computer-Controlled Test Mode (CCTM)
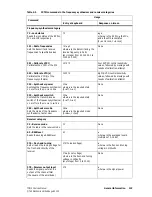
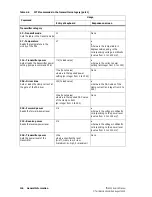
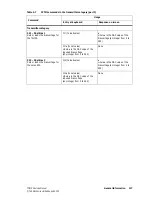
The servicing procedures require a radio to be placed in the computer-
controlled test mode. In this mode CCTM commands can be entered at
the test PC. These commands are then relayed via the test unit to the
radio. Certain CCTM commands cause the radio to carry out particular
functions; others read particular settings and parameter values in the
radio. The CCTM commands of use in servicing radios are listed in
Table 4.3
to
Table 4.7
, grouped according to category.
Terminal Program
for CCTM
Use the calibration application to place the radio in CCTM. To do this,
run the calibration application, select
Tools > CCTM
, and click the
CCTM
Mode
button. For more information, refer to the online help of the
calibration application.
You can also use the HyperTerminal utility which is supplied with
Microsoft Windows. As a preliminary, first select the settings for the
communications port as follows:
1.
Open the terminal program. (In the case of HyperTerminal, click
Start
>
Programs
>
Accessories
>
Communications
>
HyperTermi-
nal
.)
2.
In the terminal program first select the COM port to which the
radio is connected. Then select the following settings for the port:
■
bits per second : 19 200
■
data bits
: 8
■
parity
: none
■
stop bits
: 1
■
flow control
: none
3.
Click the
OK
button (or equivalent).
4.
Save the file with the port settings under a suitable name.
For subsequent sessions requiring the terminal program, open this
file.
Invoking CCTM
Using the terminal program, place the radio in CCTM as follows:
1.
Enter the character
^
to reset the radio.
2.
As soon as the radio is reset, the letter
v
is displayed. (If an
uppercase letter
V
appears, this implies a fault.)
3.
Immediately the letter
v
is displayed, enter the character
%
.
(The character
%
must be entered within half a second of the letter
v
appearing.)
4.
If the character
%
is accepted, the character
–
is displayed in
response, and the message
Test Mode
appears on the radio display.
Summary of Contents for TM9100
Page 1: ...TM9100 mobiles Service Manual MMA 00017 01 Issue 1 August 2005 ...
Page 4: ...4 TM9100 Service Manual Tait Electronics Limited August 2005 ...
Page 10: ...10 TM9100 Service Manual Tait Electronics Limited August 2005 ...
Page 22: ...22 Introduction TM9100 Service Manual Tait Electronics Limited August 2005 ...
Page 62: ...62 Description TM9100 Service Manual Tait Electronics Limited August 2005 ...
Page 96: ...96 TM9100 Service Manual Tait Electronics Limited August 2005 ...
Page 138: ...138 Disassembly and Reassembly TM9100 Service Manual Tait Electronics Limited August 2005 ...
Page 152: ...152 Servicing Procedures TM9100 Service Manual Tait Electronics Limited August 2005 ...
Page 168: ...168 Interface Fault Finding TM9100 Service Manual Tait Electronics Limited August 2005 ...
Page 244: ...244 Receiver Fault Finding TM9100 Service Manual Tait Electronics Limited August 2005 ...
Page 396: ...396 CODEC and Audio Fault Finding TM9100 Service Manual Tait Electronics Limited August 2005 ...
Page 420: ...420 Fault Finding of Control Head TM9100 Service Manual Tait Electronics Limited August 2005 ...
Page 426: ...426 Spare Parts TM9100 Service Manual Tait Electronics Limited August 2005 ...
Page 430: ...430 TM9100 Service Manual Tait Electronics Limited August 2005 ...
Page 444: ...444 TMAA04 05 Ignition Sense Kit TM9100 Service Manual Tait Electronics Limited August 2005 ...
Page 448: ...448 TMAA10 01 Desktop Microphone TM9100 Service Manual Tait Electronics Limited August 2005 ...


