358
Transmitter Fault Finding (25W Radios)
TM9100 Service Manual
© Tait Electronics Limited
August 2005
Task 26 —
Output of Buffer in
Exciter Circuit
If the synthesizer output is correct, check the output at C313 of the buffer
amplifier in the exciter circuit.
1.
If not already done, remove the
PAD
TOP
can.
2.
Enter the CCTM command
326 x
, where
x
defines the power level
selected in
Task 25
.
3.
Enter the CCTM command
101 x x 0
, where
x
is the frequency
selected in
Task 25
.
4.
Enter the CCTM command
33
to place the radio in transmit mode.
5.
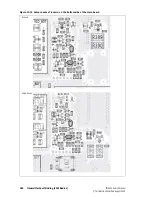
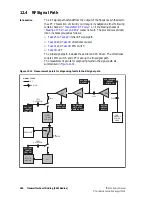
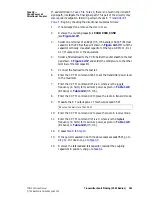
Measure the RF voltage after C313 (see
Figure 12.15
). (Use an
RFP5401A RF probe or the equivalent.) The required voltage
should be as given in
Table 12.8
(B1 band) or
Table 12.9
(H5, H6).
6.
Enter the CCTM command
32
to place the radio in receive mode.
7.
If the voltage measured above is correct, go to
Task 27
. If it is not, go
to
Step 8
.
8.
Check the components around Q300 (see
Figure 12.15
).
9.
Repair any fault revealed by the above checks. Replace Q300
(see
Figure 12.15
) if none of the other components is faulty.
10.
Confirm the removal of the fault and go to
“Final Tasks” on
page 147
. If the repair failed, replace the main-board assembly and go
to
“Final Tasks” on page 147
.
Task 27 —
Output of Exciter
If the output of the buffer amplifier is correct, check that of the exciter at
C301.
1.
With the radio still in transmit mode, measure the RF voltage after
C301
(see
Figure 12.15
). (Use an RFP5401A RF probe or the
equivalent.) The required voltage should be as given in
Table 12.8
(B1 band) or
Table 12.9
(H5, H6).
2.
If the voltage is correct, go to
Task 28
. If it is not, go to
Step 3
.
3.
Enter the CCTM command
32
to place the radio in receive mode.
4.
Check the components between C313 and Q303, and between
Q303 and R308 (see
Figure 12.15
).
5.
Repair any fault revealed by the above checks. Replace Q303
(see
Figure 12.15
) if none of the other components is faulty.
6.
Confirm the removal of the fault and go to
“Final Tasks” on
page 147
. If the repair failed, replace the main-board assembly and go
to
“Final Tasks” on page 147
.
Summary of Contents for TM9100
Page 1: ...TM9100 mobiles Service Manual MMA 00017 01 Issue 1 August 2005 ...
Page 4: ...4 TM9100 Service Manual Tait Electronics Limited August 2005 ...
Page 10: ...10 TM9100 Service Manual Tait Electronics Limited August 2005 ...
Page 22: ...22 Introduction TM9100 Service Manual Tait Electronics Limited August 2005 ...
Page 62: ...62 Description TM9100 Service Manual Tait Electronics Limited August 2005 ...
Page 96: ...96 TM9100 Service Manual Tait Electronics Limited August 2005 ...
Page 138: ...138 Disassembly and Reassembly TM9100 Service Manual Tait Electronics Limited August 2005 ...
Page 152: ...152 Servicing Procedures TM9100 Service Manual Tait Electronics Limited August 2005 ...
Page 168: ...168 Interface Fault Finding TM9100 Service Manual Tait Electronics Limited August 2005 ...
Page 244: ...244 Receiver Fault Finding TM9100 Service Manual Tait Electronics Limited August 2005 ...
Page 396: ...396 CODEC and Audio Fault Finding TM9100 Service Manual Tait Electronics Limited August 2005 ...
Page 420: ...420 Fault Finding of Control Head TM9100 Service Manual Tait Electronics Limited August 2005 ...
Page 426: ...426 Spare Parts TM9100 Service Manual Tait Electronics Limited August 2005 ...
Page 430: ...430 TM9100 Service Manual Tait Electronics Limited August 2005 ...
Page 444: ...444 TMAA04 05 Ignition Sense Kit TM9100 Service Manual Tait Electronics Limited August 2005 ...
Page 448: ...448 TMAA10 01 Desktop Microphone TM9100 Service Manual Tait Electronics Limited August 2005 ...

