background image


TM9300/TM9400 Installation Guide

Tait General Software Licence Agreement

41

© Tait Limited


December 2015

Tait General Software Licence Agreement

This Software License Agreement ("Agree-

ment") is between you (“Licensee”) and Tait

Limited (“Tait").

By using any of the Software items embedded

and pre-loaded in the related Tait Designated

Product, included on CD, downloaded from the

Tait website, or provided in any other form, you

agree to be bound by the terms of this Agree-

ment. If you do not agree to the terms of this

Agreement, do not install or use any of the Soft-

ware. If you install or use any of the Software,

that will be deemed to be acceptance of the

terms of this Agreement.

For good and valuable consideration, the parties

agree as follows:

Section 1 DEFINITIONS

“Confidential Information”

 means all or any

information supplied to or received by Licensee

from Tait, whether before or after installation or

use and whether directly or indirectly pertaining

to the Software and Documentation supplied by

Tait, including without limitation all informa-

tion relating to the Designated Products, har-

dware, software; copyright, design registra-

tions, trademarks; operations, processes, and

related business affairs of Tait; and including

any other goods or property supplied by Tait to

Licensee pursuant to the terms of this Agree-

ment.

“Designated Products”

 means products pro-

vided by Tait to Licensee with which or for

which the Software and Documentation is

licensed for use.

“Documentation”

 means product and sof-

tware documentation that specifies technical

and performance features and capabilities; user,

operation, and training manuals for the Soft-

ware; and all physical or electronic media upon

which such information is provided.

“Executable Code”

 means Software in a form

that can be run in a computer and typically

refers to machine language, which is comprised

of native instructions the computer carries out in

hardware. Executable code may also refer to

programs written in interpreted languages that

require additional software to actually execute.

“Intellectual Property Rights”

 and 

“Intel-

lectual Property”

 mean the following or their

substantial equivalents or counterparts, recog-

nized by or through action before any govern-

mental authority in any jurisdiction throughout

the world and including, but not limited to all

rights in patents, patent applications, inventions,

copyrights, trademarks, trade secrets, trade

names, and other proprietary rights in or relating

to the Software and Documentation; including

any adaptations, corrections, de-compilations,

disassemblies, emulations, enhancements fixes,

modifications, translations and updates to or

derivative works from, the Software or Docu-

mentation, whether made by Tait or another

party, or any improvements that result from Tait

processes or, provision of information services.

“Licensee”

 means any individual or entity that

has accepted the terms of this License.

“Open Source Software”

 means software

with freely obtainable source code and license

for modification, or permission for free distribu-

tion.

“Open Source Software License”

 means the

terms or conditions under which the Open

Source Software is licensed.

“Person”

 means any individual, partnership,

corporation, association, joint stock company,

trust, joint venture, limited liability company,

governmental authority, sole proprietorship, or

other form of legal entity recognized by a gov-

ernmental authority.

“Security Vulnerability”

 means any flaw or

weakness in system security procedures, design,

implementation, or internal controls that if exer-

cised (accidentally triggered or intentionally

exploited) could result in a security breach such

that data is compromised, manipulated, or sto-

len, or a system is damaged.

“Software”

 (i) means proprietary software in

executable code format, and adaptations, trans-

lations, de-compilations, disassemblies, emula-

tions, or derivative works of such software; (ii)

means any modifications, enhancements, new

versions and new releases of the software pro-

vided by Tait; and (iii) may contain one or more

items of software owned by a third-party sup-

plier. The term "Software" does not include any

third-party software provided under separate

license or not licensable under the terms of this

Agreement. 

“Source Code”

 means software expressed in

human readable language necessary for under-

standing, maintaining, modifying, correcting,

and enhancing any software referred to in this

Agreement and includes all states of that sof-

tware prior to its compilation into an executable

programme. 

“Tait”

 means Tait Limited and includes its

Affiliates.

Section 2 SCOPE

This Agreement contains the terms and condi-

tions of the license Tait is providing to Licensee,

and of Licensee’s use of the Software and Doc-

umentation. Tait and Licensee enter into this

Agreement in connection with Tait delivery of

certain proprietary Software and/or products

containing embedded or pre-loaded proprietary

Software. 

Section 3 GRANT OF LICENSE

3.1. Subject to the provisions of this Agreement

and the payment of applicable license fees, Tait

grants to Licensee a personal, limited, non-

transferable (except as permitted in Section 7),

and non-exclusive license to use the Software in

executable code form, and the Documentation,

Summary of Contents for TM9300 DMR

Page 1: ...TM9300 DMR Mobile Radios TM9400 P25 Mobile Radios Installation Guide MMB 00002 05 Issue 5 December 2015...

Page 2: ...624 NZ593888 NZ600346 NZ610563 NZ615954 NZ629167 NZ630718 NZ700387 NZ700908 NZ701777 NZ708662 NZ710766 NZ711325 AU2004216984 AU2015 215962 AU339391 AU339127 EU000915475 0001 EU000915475 0002 US13 5421...

Page 3: ...leum Gas 9 1 9 Non standard Radio Installations 10 1 10 Negative Earth Supply 10 2 Installation Options 11 2 1 Radio Body 11 2 2 Remote Control Head 13 2 3 Dual Control Heads 14 2 4 Hand Held Control...

Page 4: ...g to the Auxiliary Connector Ignition Signal Emergency Switch External Alert Devices 33 4 10 Installing the Radio 37 4 11 Installing the Microphone 39 4 12 Checking the Installation 40 4 13 Checking t...

Page 5: ...ation refer to Installation Options on page 11 and the installation instructions provided with the equipment Some installation options may not be suitable for some models of radio For more information...

Page 6: ...lert is used to highlight significant information that may be required to ensure procedures are performed correctly or draw your attention to ways of doing things that can improve your efficiency or e...

Page 7: ...n the roof with a gain of 2 15dBi or 5 65dBi or centrally mounted on the trunk with a gain of 5 65dBi For radios with a transmit power of 25W The radio must be installed using an externally mounted an...

Page 8: ...950 Safety of Information Technology Equipment Caution The bottom surface of the radio and the heatsink fins can become hot during prolonged operation When installing the radio position the radio so t...

Page 9: ...rvice center for more details 1 8 Vehicles Powered by Liquefied Petroleum Gas Warning Radio installation in vehicles powered by LPG lique fied petroleum gas with the LPG container in a sealed off spac...

Page 10: ...standard installation method is used care must be taken that sufficient heat can be dissipated from the heatsink fins and the ridged bottom surface of the radio For this to be achieved there must be a...

Page 11: ...Kits The U cradle install kits are supplied as standard for mounting a radio body fitted with either a local control head or a remote interface for a remotely mounted control head The following kits a...

Page 12: ...efer to the installation instructions 402 00014 xx provided with the security bracket for full details Re install Kits Re install kits allow you to remove radios from one installation and re install t...

Page 13: ...remote head installations 20ft 6m contain two remote cables and one control head interface box The following diagram summarizes how the components are installed Refer to the installation instructions...

Page 14: ...ad kits provide two complete remote heads whereas the dual head upgrade kits provide one complete remote head and one remote control head interface which is fitted to an existing local control head Th...

Page 15: ...bles the user to operate the radio at a distance from the radio body The hand held control head plugs into one of the RJ45 sockets on the appropriate remote control head A remote speaker is required w...

Page 16: ...1 10ft 3m T02 00009 0202 20ft 6m T02 00009 0203 30ft 9m T02 00009 0204 A housing unit and gasket encloses the extension cable socket and provides additional strain relief and some protection from wate...

Page 17: ...e power supply using a plinth The following diagram shows the components included in each kit Refer to the TMAA13 Power Supplies User s Guide MMZ 00002 xx for full details Tait strongly recommends to...

Page 18: ...e the volume of the audio from the radio s existing internal speaker Refer to the installation instructions 402 00010 xx provided with the speaker for full details Horn Speaker The T02 00004 0202 horn...

Page 19: ...mobile radio is powered up and down battery power sense auxiliary power sense ignition sense internal options power sense no power sense emergency power sense The emergency power sense option can be u...

Page 20: ...efer to the online help of the programming software The ON OFF key can be used with any of the of the power sense options to turn the radio on and off Table 3 1 shows the configuration of the hardware...

Page 21: ...e highb LK4M out IOP GPIO7 can be used as GPIO internal power sense LK1M out IOP GPIO7 0 7V off IOP GPIO7 2 6V high active ignition sense tolerant to 3 3V and 5V only LK2M out AUX GPI3 can be used as...

Page 22: ...ution If the radio is configured for auxiliary power sense i e 13 8V from the ignition is supplied to pin AUX GPI3 and a Y type breakout cable such as T02 00009 0301 0302 or TA3101 01 is used 13 8V wi...

Page 23: ...ed by hardware links FLK1N to FLK4N on the top side of the main board as shown in Figure 3 2 and Table 3 3 Notice The hardware links are SMT components Do not replace SMT components unless you are tra...

Page 24: ...out out out out switched no power no power no power in out out in switched switched switched switched out in out in switched switched unswitched unswitched in out in out switched unswitched switched...

Page 25: ...llation on page 40 TM9300 TDMA digital channels do not give a true power level reading on an in line power meter 4 1 Installation Tools The following tools are required to install the radio drill and...

Page 26: ...he radio body Notice It may be necessary to mount the radio upside down to main tain a gap of more than 3 8 inch 10 mm for air circulation between the underside of the radio body and the mounting surf...

Page 27: ...lation Ensure the mounting position complies with the following safety warnings Warning Safe radio mounting Mount the radio securely so that it will not break loose in the event of a collision An unse...

Page 28: ...s not installed an accessory is added which is not rated to IP54 e g control head interface box or hand held control head remote interface box 4 5 Mounting the U Cradle The U cradle can be used to ins...

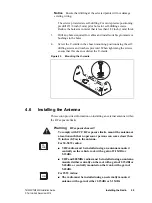
Page 29: ...not distort the U cradle 4 6 Installing the Antenna This section provides information on installing an external antenna within the RF exposure limits Warning RF exposure hazard To comply with FCC RF...

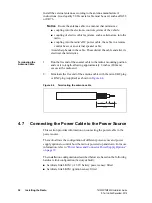
Page 30: ...xial cable to the radio s mounting position and cut it to length allowing approximately 8 inches 200mm excess at the radio end 2 Terminate the free end of the antenna cable with the mini UHF plug or B...

Page 31: ...ble the radio can be connected to a suitable terminal inside the fuse box that is connected directly to the battery 24V to 12V Converter In vehicles with a supply voltage larger than 16 0V such as man...

Page 32: ...mation refer to Checking the Installation on page 40 1 Disconnect the vehicle s battery unless specifically prohibited from doing so by the customer vehicle manufacturer agent or supplier Notice Route...

Page 33: ...and operates in addition to the radio s existing internal speaker For information about Tait external speakers refer to External Speakers on page 18 If a different speaker is used receptacles for the...

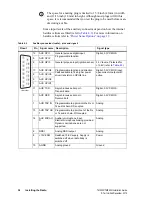
Page 34: ...pose input ignition sense 3 3V levels Protected for 13 8V refer to Table 4 3 10 AUX GPIO4 Programmable function and direction Pads available to fit a higher power driver transistor on GPIO4 line Digit...

Page 35: ...ons Comments min max units Input low level All inputs AUX_GPI2 0 7 Vs 4 V V No hardware links fittedb LK3M fitted Includes AUX_GPI3 with LK1M 2 fitted Configured as emergency power sense input Input h...

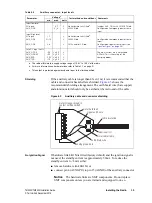
Page 36: ...ce The AUX GPI3 line must be programmed to Power Sense Ignition and active to High For more information refer to the online help of the programming application Connect the ignition signal to pin 4 AUX...

Page 37: ...nal Alert 1 or 2 active to Low and signal state to Momentary Connect the external alert device to the pin of the output line pin 10 for AUX GPIO4 and pin 8 13V8 SW of the auxiliary connector or a diff...

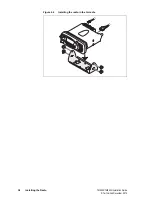
Page 38: ...38 Installing the Radio TM9300 TM9400 Installation Guide Tait Limited December 2015 Figure 4 6 Installing the radio in the U cradle...

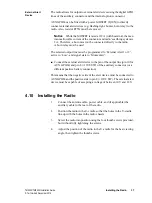
Page 39: ...sh two adjacent corners of the grommet into the microphone socket cavity 3 Squeeze the grommet and push the remaining corners into position 4 Check that the grommet is seated correctly in the cavity I...

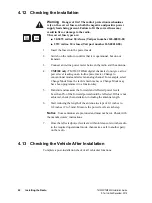
Page 40: ...ve a true power level reading on an in line power meter Change to conventional mode and select an analog channel For example select Change Mode from the radio s main menu or Change Mode may have been...

Page 41: ...g any adaptations corrections de compilations disassemblies emulations enhancements fixes modifications translations and updates to or derivative works from the Software or Docu mentation whether made...

Page 42: ...entation as it may reasonably require for the internal use of the Software 4 3 Unless otherwise authorized by Tait in writ ing Licensee will not and will not enable or allow any third party to i insta...

Page 43: ...isted at any time under network products at http www taitradio com 7 5 If Licensee as a contractor or subcontractor integrator is purchasing Tait Designated Products and licensing Software not for its...

Page 44: ...nd intended third party beneficiary of this Agreement 11 6 SURVIVAL Sections 4 5 6 3 7 8 9 10 and 11 survive the termination of this Agree ment 11 7 ORDER OF PRECEDENCE In the event of inconsistencies...

Page 45: ...TM9300 TM9400 Installation Guide Tait General Software Licence Agreement 45 Tait Limited December 2015...

Page 46: ...ignal Emergency Switch External Alert Devices on page 33 5 16 9 16 5 32 4 mm 8 mm 14 mm For more information refer to Installing the Antenna on page 29 rear view 30 50W radio Pin Signal Function 1 AGN...

Reviews: