Screen display
28
Chapter 3
RR07
1.
Screen display
1-1.
Main screen
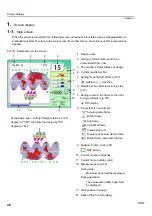
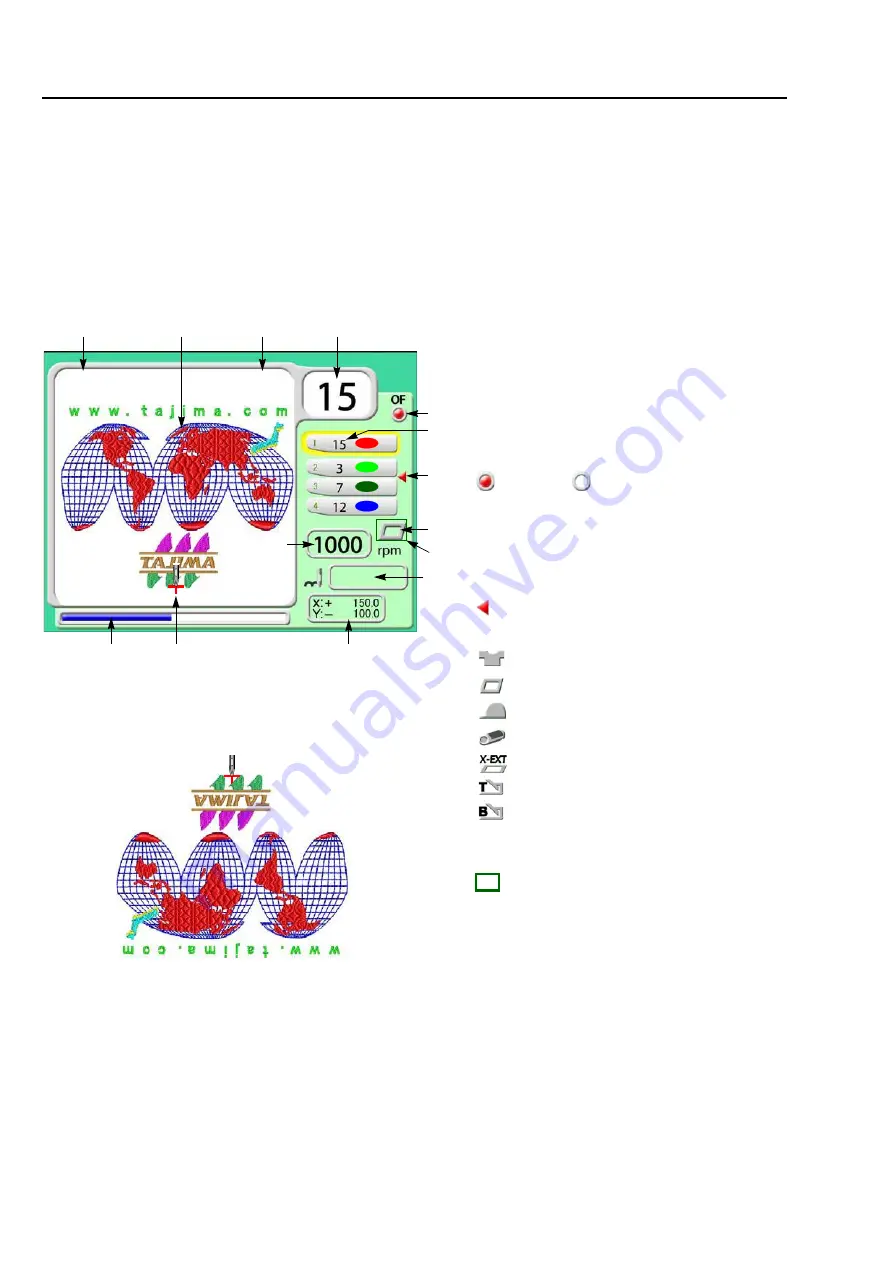
When the power is turned ON, the following screen will appear. From this screen, setting/operation to
embroider will start. To return to the main screen from other screen, press E key until the main screen
appears.
1-1-1.
Explanation on the screen
1
3
4
14
8
10
TAJIMA_W
14117
5
6
11
7
9
12
13
0
2
1. Design name
2. Design (of which data is set) to be
embroidered from now
3. The number of total stitches of design
4. Current needle bar No.
5. Setting for automatic offset (p.153)
: Existence
: Absence
6. Needle bar No. selected in every step
7. Setting to return the frame to the front
during embroidery (p.155)
: With setting
8. Frame that is currently set
9. Software Frame Limit (p.87)
: With setting
10. Current number of stitches
11. Current frame position (mm)
12. Maximum speed (p.62)
During stop
Maximum speed will be displayed.
During operation
The actual embroidery speed will
be displayed.
13. Start position of design
14. Ratio of finish of embroidery
Tubular goods frame
Cap frame
Border frame
Cylindrical frame
Tubular goods auto clamp frame
Border frame auto clamp frame
X-extension unit
At cap frame spec., setting "Design rotation by 180°
degree" to "YES" will rotate the design by 180°
degree (p.144).
Summary of Contents for TEMX-C Series
Page 13: ...To search from the menu key ...
Page 25: ...Inspection before starting work 12 Chapter 1 ...
Page 39: ...How to use each part 26 Chapter 2 ...
Page 40: ... E 1 2 3 4 5 6 7 8 9 10 11 27 PT10 Chapter 3 Screen 1 Screen display 28 2 Message display 31 ...
Page 147: ...Other functions that must be remembered 134 Chapter 5 ...
Page 171: ...To move the frame to the position registered 158 Chapter 6 ...

