Screen display
30
Chapter 3
QS07
1-5.
Design confirming screen
It is possible to check setting contents of design starting to embroider from now and/or occurrence records of
stop factor(s) (Error Stack).
To switch to design confirmation screen, press i key.
Pressing again i key will switch to the next screen.
To return the original screen, press E key.
i key
E key
Coordinates
Stitch Counter
Stitch Length
Design Counter
OFFSET
Data conversion
Rotation
Reversion
Repeat
M. Repeat
57.0
-56.8
95.2 -7.2
(From Start Point)
1/ 10
3.
10. 5. 7. 2
7
8. 4. 1. 9.
80
10
150.0
pp
185.0
90.0
TAJIMA_W
80
0
10
-130.0
Function
Step
1
4
3
5
10
2
Error stuck
14
1000 rpm
600rpm
43210st
280
Cap frame
2
YES
YES
NO
YES
3
4.0 mm
YES
30
+2
NO
4
0st
NO
Maximum RPM
Min. Revolution
Total Stitch Counter
Frame Start Timing
Stop at the lower dead point (pseudo-fixed position)
Frame Back All Head Sew
Frame Type
12
13
6
7
8
9
11
Upper T. Detection
Under T. Detection
Under T.D. ( Step Ratio )
Auto Color Change (AC)
Automatic start (AS)
A.S. after Auto Data Set
Auto Origin Return
Jump Convert
Auto Jump
Automatic thread trimming (ATH)
Tail Length
Return Stitches (ATH)
Tie Stitches
M.shaft Inching after ATH
70%
4
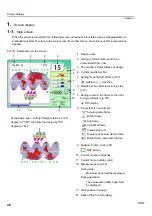
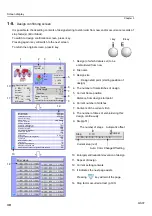
1. Design (of which data is set) to be
embroidered from now
2. File name
3. Design size
: Design start point (starting position of
design)
4. The number of total stitches of design
5. Current frame position
Distance from design start point
6. Current number of stitches
7. Contents of the current stitch
8. The number of times of embroidering this
design continuously
9. Step(p.51)
10. Enlargement/reduction/reversion of design
11. Repeat of design
12. Current setting contents
13. It indicates the next page exists.
Pressing
key will scroll the page.
14. Stop factor occurred at last (p.193)
Step
OFFSET
1/ 10
3.
10. 5. 7. 2
7. 8. 4. 1
9.
Automatic offset
Current step (red)
The number of steps
Auto. Color Change Offsetting
Summary of Contents for TEMX-C Series
Page 13: ...To search from the menu key ...
Page 25: ...Inspection before starting work 12 Chapter 1 ...
Page 39: ...How to use each part 26 Chapter 2 ...
Page 40: ... E 1 2 3 4 5 6 7 8 9 10 11 27 PT10 Chapter 3 Screen 1 Screen display 28 2 Message display 31 ...
Page 147: ...Other functions that must be remembered 134 Chapter 5 ...
Page 171: ...To move the frame to the position registered 158 Chapter 6 ...

