INS
TALLA
TION
On-Demand Water Heater Installation Manual and Owner’s Guide
15
INSTALLATION
Step 5:
General instructions of venting
How to install venting into the water heater
WARNING
• When inserting the pipe into the exhaust/intake port, make sure that the pipe end is cut
straight and positioned properly under the o-ring to seal the connection firmly.
• Improper venting of this appliance can result in excessive levels of carbon monoxide which can
result in severe personal injury or death.
• Improper installation can cause nausea or asphyxiation, severe injury or death from carbon
monoxide and flue gases poisoning. Improper installation will void product warranty.
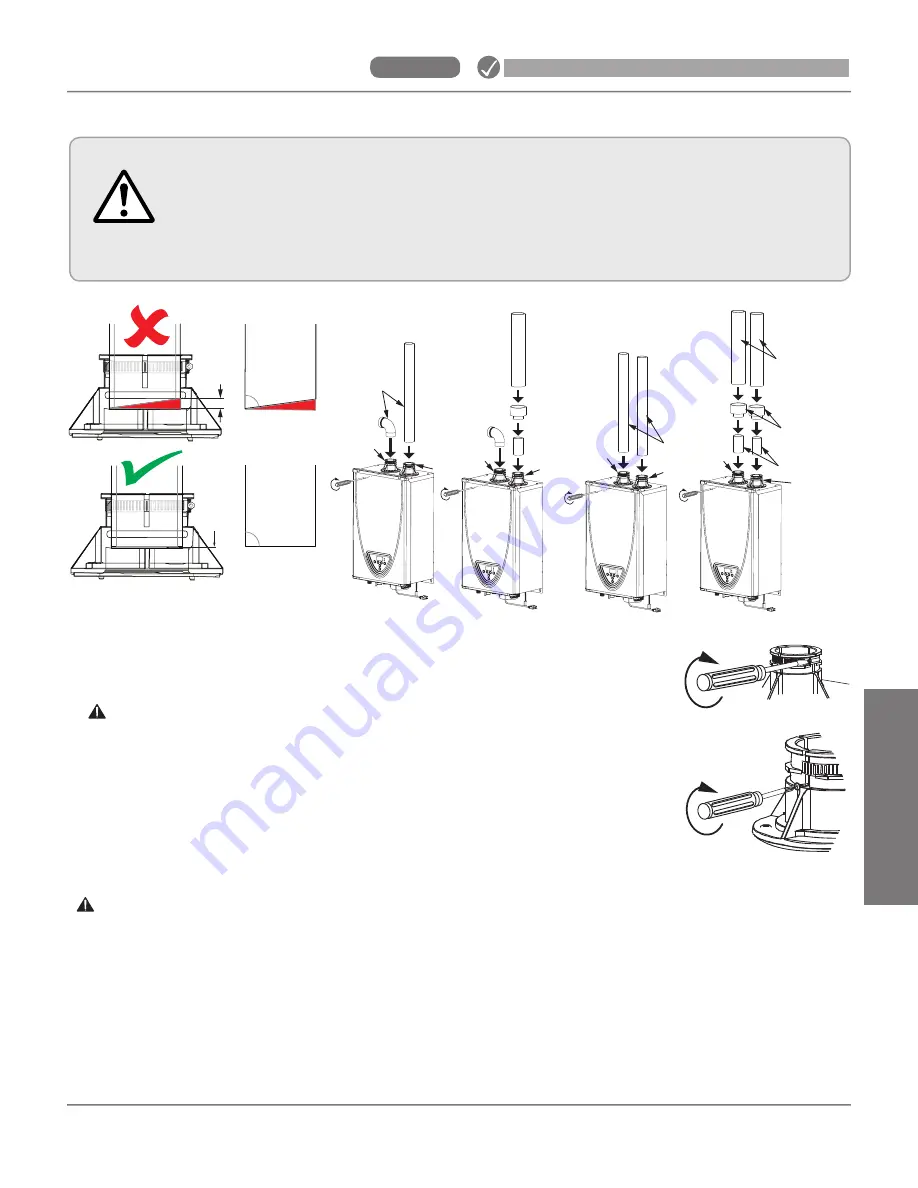
1. Insert 2" straight pipe fully into the exhaust/intake ports. (Figure 1) The pipes should
insert 2 inches.
WARNING: The exhaust vent pipe connection to the water heater must be flush to
maintain a proper seal. Check pipe for a 90° edge before installation. DO NOT use a
field cut end for the connection. Failure to follow can cause carbon monoxide poisoning
or death.
2. Use a screwdriver to tighten the clamp. (Figure 2)
3. Use the supplied self-tapping screws to secure the venting to the intake and exhaust
ports as shown in the image on the right. (Figure 3)
For 3" Vent Installs:
Insert 2" straight pipe, up to 1 ft max. length, into the heater exhaust/intake ports.
WARNING: The exhaust vent pipe connection to the water heater must be flush to maintain a proper seal.
Check pipe for a 90° edge before installation. DO NOT use a field cut end for the connection. Failure to follow can
cause carbon monoxide poisoning or death.
Install a 2" x 3" increaser to convert to 3" venting. For low clearance installations, a 2" long sweep elbow may be
used. Then 1 ft max length straight pipe may be used to fit a 2" x 3" increaser.
Air Intake for Power Vent Installs:
Insert the male end of a 2" or 3" long sweep street elbow into the heater's air
intake port.
2” to 3”
Adapter
Power Vent (PV)
2” Pipe
3” Pipe
2” to 3”
Adapter
2” Pipe
2” Pipe
Direct Vent (DV)
2” Pipe
2” Pipe
3” Pipe
Pipe end
not flush
with base.
Pipe end
is flush
with base.
Figure 1
90° edge
Not a 90° edge
Exhaust Vent
Pipe
Exhaust Vent
Pipe
Intake Port
Exhaust
Port
Intake Port
Exhaust
Port
Intake Port
Exhaust
Port
Intake Port
Exhaust Port
Figure 2
Figure 3
Summary of Contents for 160X3P
Page 84: ...7J8071 1 2000570774 REV B...


