MAINTENANCE
On-Demand Water Heater Installation Manual and Owner’s Guide
69
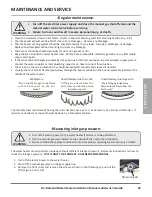
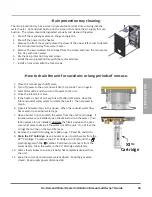
-Rain protection tray cleaning-
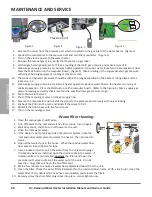
-How to drain the unit for vacations or long periods of non-use-
The rain protection tray has a screen to prevent lint or dust from entering into the
water heater. Lint and dust built up on the screen can reduce the air supply for com-
bustion. The screen should be inspected annually and cleaned if needed.
1. Shut off the manual gas valve on the gas supply line.
2. Shut off the power to the heater.
3. Remove the front cover and remove the screw of the upper left corner to detach
the rain protection tray from water heater.
4. Remove the accumulated lint and dust from the screen and rinse the rain protec-
tion tray with clean water.
5. Dry the rain protection tray and screen.
6. Install the rain protection tray with the removed screw.
7. Install a front cover with the four screws.
Rain protection tray
X3
TM
Cartridge
1. Close the manual gas shutoff valve.
2. Turn off power to the unit and wait five (5) seconds. Turn on again.
3. Wait 30 seconds, and then turn off power to the unit.
4. Close the inlet water valve.
5. If the heater is part of an Easy-Link or Multi-Unit System, close the
inlet and outlet water valves to isolate the heater. Then proceed to
step 6.
6. Open all hot water taps in the house. When the residual water flow
has ceased, close all hot water taps.
7. Have a bucket or pan to catch the water from the unit’s drain plugs. If
isolation valves are installed, open the drains to drain the water. If iso-
lation valves are not installed,
unscrew
the filters and open the pres-
sure relief valve to drain all the water out of the unit. Do not lose the
o-rings that will be on the two filter caps.
8. Remove the small drain plug, item 469 on pp. 79 and 81, and drain.
9.
Drain the X3
™
Cartridge:
Have a bucket or pan to catch water from the
X3™ Cartridge. To remove the X3
™
Cartridge, turn it left until the
symbol aligns with the symbol. Pull down to remove it from the
water heater. Drain the water in the X3
™
Cartridge completely.
10. Wait a few minutes to ensure all water has completely drained from
the unit.
11. Keep the cold, hot, return water valves closed. Keep the gas valve
closed. Keep supply power disconnected.
Summary of Contents for 160X3P
Page 84: ...7J8071 1 2000570774 REV B...


