background image

21

15. 

MAINTENANCE AND SERVICE

The water heater should be checked at least once a year or as necessary by a licensed techni-

cian.

If repairs are needed, any repairs should be done by a licensed technician.

The water heater’s lifetime may be extended by frequent maintenance.

WARNING

Turn off the electrical power supply and close the manual gas control valve and the 

manual water control valve before servicing.

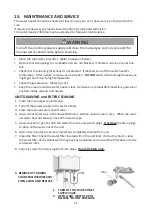
•  Clean the cold-water inlet filter.  (Refer to diagram below.)
•  Be sure that all openings for combustion air are not blocked.  If blocked, remove any obstruc-

tion.

•  Check that the opening for exhaust is not blocked.  If blocked, shut off the water heater’s 

combustion.  After a while, remove any obstruction.  

DO NOT

 touch while burning because you 

might get burnt due to high temperature.

•  Check the gas pressure.  (Refer to p.11.)
•  Keep the area around the water heater clear.  Remove any combustible materials, gasoline or 

any flammable vapours and liquids.

UNIT DRAINING and FILTER CLEANING

1.  Close the manual gas shut off valve.
2.  Turn off the power supply to the water heater.
3.  Close the manual water shut off valve.
4.  Open all hot water taps in the house (Bathroom, kitchen, laundry room, etc.).  When the resid-

ual water flow has ceased, close all hot water taps.

5.  Have a bucket or pan to catch the water from the unit’s drain plugs. 

 Unscrew

 the drain plugs 

to drain all the water out of the unit. 

6.  Wait a few minutes to ensure all water has completely drained from unit.
7.  Clean the filter: Check the water filter located within the cold inlet.  With a tiny brush, clean 

the water filter of any debris which may have accumulated and reinsert the filter back into the 

cold water inlet.

8.  Securely screw the drain plugs back into place.  

Hand- tighten only.

3.  REMOVE BY TURNING 

COUNTERCLOCKWISE AND 

THEN CLEAN AND REPLACE

1.  TURN OFF THE WATER INLET 

SUPPLY VALVE.

2.  OPEN A HOT WATER TAP TO 

RELEASE THE LINE PRESSURE.

filter

Summary of Contents for GS-20W-AU5

Page 1: ... 26W AU5 6 EXTERNAL INSTALLATION ONLY WARNING DO NOT SPRAY AEROSOLS IN THE VICINITY OF THIS APPLIANCE WHILE IT IS IN OPERATION DO NOT USE OR STORE FLAMMABLE MATERIALS IN OR NEAR THIS APPLIANCE DO NOT PLACE ARTICLES ON OR AGAINST THIS APPLIANCE DO NOT MODIFY THIS APPLIANCE ...

Page 2: ...ed for Installers and service of the equipment and users Please keep it in a safe place for future reference FOR THE INSTALLER The installation must be done in accordance with the information supplied in this Guide All other relevant National State or Local regulations must also be conformed with and these include but are not limited to 1 IMPORTANT AU NZ Standard AS NZS3500 1 Water Supply AU NZ St...

Page 3: ...l length to first tap or outlet is required to be a minimum of 1 4 metres from the outlet connection of the water heater Pipe size is nominal 18 mm from hot water outlet to the first tap or outlet First tap or outlet 2 SPECIFICATIONS MODEL GS 20W AU5 6 GS 20W AU5 6 GS 20W AU5 6 GS 26W AU5 6 GS 26W AU5 6 GS 26W AU5 6 Gas Type Nat Gas LPG ULPG Nat Gas LPG ULPG Gas Input MJ h 160 195 Inlet Pressure k...

Page 4: ...nciple behind the water heater is simple Burner Heat exchanger Exhaust Flow sensor Thermistor Computer board AC240V Gas valve Fan Cold water inlet Gas Hot water outlet This diagram illustrates the main components only and does not accurately represent the water heater s physical description 1 A hot water tap is turned on 2 Water enters the heater 3 The water flow sensor detects the water flow 4 Th...

Page 5: ...rews are included with the unit 4 ACCESSORIES Screws 4 Manual 5 DIMENSIONS AND CONNECTION POINTS 350 339 228 53 23 490 515 45 GAS GAS 117 84 133 52 COLD 44 HOT HOT COLD HOT GAS 60 124 332 95 30 COLD 170 15 7 544 GS 26W AU5 6 GS 20W AU5 6 Unit mm ...

Page 6: ...e Gas Company or the manufacturer WARNING Water temperatures above 50 C can cause severe burns or death from scalding Children the disabled and the elderly are at a high risk of being injured Feel the water temperature before bathing or showering Do not leave children disabled persons or the elderly unsupervised The Australian Standards AS 3498 gives full details of the requirements for supply of ...

Page 7: ... that are suitable for its efficient long use This is a water heating apparatus only and the final quality of water delivered is de pendent upon the quality of water supplied to this system The connection attachment integration or general association of other equipment or parts not specified by the water heater which either directly or indirectly affect the operation or performance of this equipme...

Page 8: ...an Particles may clog the air vent reduce fan function or cause improper combustion Locate unit for easy access and maintain proper space for service and maintenance Install the unit so that it can be connected or removed easily The water heater must be installed outdoors only Do not install the water heater indoors Do not locate your water heater in a pit or any location where gas and water can a...

Page 9: ... 50 MJ h input Other appliances up to 50 MJ h input Appliances over 50 MJ h input up to 150 MJ h input Appliances over 150 MJ h input Ref Item Minimum clearances mm Natural draft Fan assisted 300 500 300 500 1000 500 150 500 500 200 300 300 300 1000 500 75 500 300 500 1500 1500 300 500 1500 1500 1000 1500 150 500 1000 1500 150 500 1000 1500 f c n j j j k k h h h e e d d b c a g See note 3 T T T g ...

Page 10: ...sting of the main gas line supply pressure is completed ensure the gas line to the water heater is disconnected to avoid any damage to the water heater Size the gas piping for the water heater according to AS5601 installation code Always use approved connectors to connect the unit to the gas line Always purge the gas line of any debris before connecting to the water heater Install a manual gas shu...

Page 11: ... and safety 1 Shut off the manual gas valve on the supply gas line 2 Open a faucet The unit should turn on and the gas in the gas pipe line should purge Leave the faucet open to keep the unit running until the unit shuts down due to lack of gas supply Then shut the faucet off 3 Remove the screw for the pressure port located on the gas inlet of the water heater shown in the diagram below 4 Connect ...

Page 12: ...o stop taps or check valves are to be used as this will void the warranty and damage the wa ter heater Check the cold water pressure and if above 1000 kPa an approved pressure limiting valve must be fitted Before installing the water heater flush the water line to remove all debris and after instal lation is complete purge the air from the line Failure to do so may cause damage to the heater There...

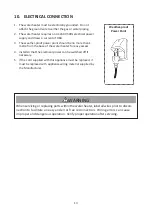
Page 13: ...e water heater for easy access 4 Install so that the electrical power can be switched off if necessary 5 If the cord supplied with this appliance must be replaced it must be replaced with appliance wiring material supplied by the Manufacturer Weather proof Power Point WARNING When servicing or replacing parts within the water heater label all wires prior to discon nection to facilitate an easy and...

Page 14: ...ure within the range from 37 C to 50 C when it is connected to GS 20W 26W AU5 See the chart below The controller can adjust the output water temperature with in the range from 37 C to 60 C when it is connected to GS 20W 26W AU6 See the chart below When BURNER ON lamp is on the set temperature can not be adjusted to 55 and 60 C If you want to set it to 55 and 60 C you should close the hot water tap...

Page 15: ... PROVIDED BEHIND THE MOUNTING POSITION REMOTE CONTROLLER INSTALLATION 1 Crimp the fork terminals provided to the wires Minimum 18AWG wire No polarity Maximum 100m long 2 Attach the crimped fork terminals on the end of the wiring to the terminals on the back of the controller 3 Install the wiring downward through the cable trench and out the bottom of the connector base 4 Fix the remote controller ...

Page 16: ... the unit s casing 4 Connect the remote control wires to the remote terminals directly There is no polarity in the terminations DO NOT jump or short circuit wires as it will damage the computer 5 Replace the front cover Then connect the power plug REMOTE CONTROLLER CABLE CONNECTIONS Remote control wires Remote control terminals Put the remote control wires through the hole on the bottom of the uni...

Page 17: ...nder water Immediately call a qualified ser vice technician to replace a flooded water heater WARNING IF YOU SMELL GAS Do not try to start the water heater Do not touch any electric switch do not use any phone in your building Immediately call your gas supplier from a neighbour s phone Follow the gas sup plier s instructions If you cannot reach your gas supplier call the fire department 000 12 INI...

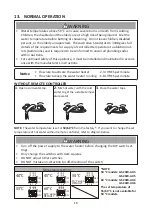
Page 18: ...upervised The Australian Standards AS 3498 gives full details of the requirements for supply of controlled temperature to ablution out lets bathrooms and is required to be conformed to under all plumbing codes within Australia For continued safety of this appliance it must be installed and maintained in accord ance with the manufacturer s instructions 40 C 60 C MODEL DEFAULT 60 C 45 C 55 C Tempera...

Page 19: ...the ON OFF button of any remote controller Then ensure the PRIORITY lamp of the remote controller is on and the set temperature is displayed on each remote controller 2 Adjust the set temperature The set temperature can only be changed by the remote controller with the PRIORITY lamp on If you want to adjust the set temper ature with other remote controller press the PRIORITY button of the remote c...

Page 20: ...these instructions carefully Gas Cold Hot Drain plug Power supply Manual water valve Manual gas valve 1 Close the manual gas shut off valve 2 Turn off the power supply to the water heater 3 Close the manual water shut off valve located on the water supply line 4 Open all hot water taps in the house Bathroom kitchen laundry room etc When the water flow has ceased close all hot water taps 5 Have a b...

Page 21: ...ter heater clear Remove any combustible materials gasoline or any flammable vapours and liquids UNIT DRAINING and FILTER CLEANING 1 Close the manual gas shut off valve 2 Turn off the power supply to the water heater 3 Close the manual water shut off valve 4 Open all hot water taps in the house Bathroom kitchen laundry room etc When the resid ual water flow has ceased close all hot water taps 5 Hav...

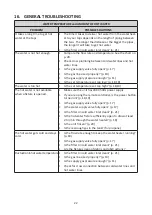
Page 22: ...e set too high p 18 19 The hot water is not available when a fixture is opened Make sure the unit has 240V 50Hz power supply If you are using the remote controller is the power button turned on p 18 19 Is the gas supply valve fully open p 17 Is the water supply valve fully open p 17 Is the filter on cold water inlet clean p 21 Is the hot water fixture sufficiently open to draw at least 2 3 l min t...

Page 23: ... for 15 to 75 seconds in order to re ignite quickly as well as push all exhaust gas out of the flue Unit sounds abnormal while in operation Contact the manufacturer REMOTE CONTROLLER OPTIONAL PROBLEM POSSIBLE SOLUTIONS Remote controller does not display anything when the power button is turned on Press the ON OFF button If the lamp does not light Make sure the unit has power supply Make sure the c...

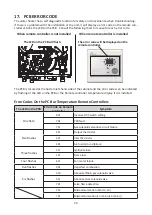
Page 24: ...s installed The LED on the PCB Error Code on Remote Controller Symptom One flash 031 Incorrect DIP switch setting 701 PCB fault 711 Gas solenoid valve drive circuit failure Two flashes 311 Output thermistor 321 Inlet thermistor 391 Air fuel ratio rod failure Three flashes 111 Ignition failure 121 Flame loss Four flashes 611 Fan motor failure Five flashes 991 Imperfect combustion Six flashes 510 Ab...

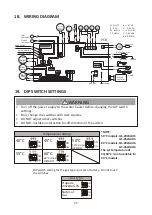
Page 25: ...istor Gas propor tional valve Flow sensor Flow adjust valve Ground Hi limit Ground 240 VAC Air fuel ratio rod Flame rod Remote controller O H C F Heater Heater Thermostat IG FM PCB SV3 MV SV1 SV2 BK BK BL BL BL BL BL BR BL BL BL BL 40 C 60 C MODEL DEFAULT 60 C 45 C 55 C Temperature settings 50 C MODEL DEFAULT 50 C OFF ON TMP1 TMP2 TMP3 8 7 6 TMP1 TMP2 TMP3 OFF ON 8 7 6 TMP1 TMP2 TMP3 OFF ON 8 7 6 ...

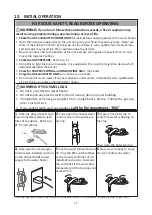
Page 26: ...vice technician Forced or attempted repair may result in a fire or explosion D Do not use this water heater if any part has been under water Immediately call a qualified service technician to replace the water heater OPERATING INSTRUCTIONS 1 STOP Read the safety information above or in the Owner s Manual 2 Turn off all electric power to the water heater 3 Do not attempt to light the burner by hand...

Page 27: ...r s manual is missing contact the retailer or manufacturer DO NOT SPRAY AEROSOLS IN THE VICINITY OF THIS APPLIANCE WHILE IT IS IN OPERATION DO NOT PLACE ARTICLE ON OR AGAINST THIS APPLIANCE DO NOT MODIFY THIS APPLIANCE WARNING The outlet hot water temperature of the water heater is factory set at 50 C Use this heater at your own risk The set outlet water temperature can cause severe burns instant ...

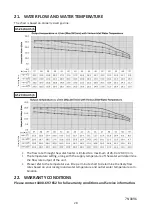
Page 28: ...re of the water will determine the flow rate output of the unit Please refer to the temperature vs litre per minute chart to determine the likely flow rates based on your local ground water temperature and outlet water temperature com bination 22 WARRANTY CONDITIONS Please contact 1800 697 652 for full warranty conditions and Service information Set Temp Incoming Temp GS 26W AU5 6 Set Temp Incomin...

Reviews: