

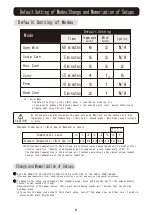
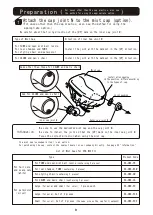


Default Setting of Modes
変更した条件で運転が始まります。
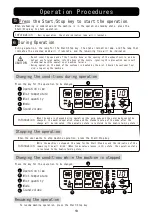
Set the modes to the desired conditions by referring to the table shown above.
※The maximum temperature level, enabling and disabling cooling, and cooling time cannot be changed.
3. スタート/ストップキーを押します
Standard Temperature in Mist Cap at Respective Levels
※The standard temperatures in the mist cap are reference values measured about five minutes after
starting operation. (Results of measurement by our company at a room temperature of 25°C)
The standard temperatures in the mist cap will fluctuate according to the operation environment
such as room temperature or the operating condition.
To memorize the setup you changed as the standard setup, press and hold the key for the mode presently
chosen for two seconds or longer.
Upon completion of the memorization, short electronic beeping sounds will indicate that the setting
has been saved.
※To restore the memorized setup to the default setup, turn off the power once, and then turn it on while
pressing the Start/Stop button.
Temperature Level
Standard Temperature in Mist Cap (℃)
0
1
− 36
2
39
3
42
4
45
5
48
6
50
7
52
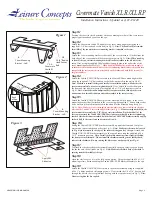
Change and Memorization of Setups
Default Setting
Open Mist
Scalp Care
Hair Care
Color
Perm
Hand Care
6
8 minutes
5
3
5
3
1
4
1
10 minutes
3
2
1
2
5
N/A
N/A
N/A
3
Temperature
Level
Cooling
Time
N/A
Mist
Level
60 minutes
5 minutes
5 minutes
15 minutes
Mode
Default Setting of Modes/Change and Memorization of Setups
8
CAUTION
Open Mist
Mode Only
1
2
※1
※1 Color Mode
The default setting is set to Mist Level 1, considering dripping, etc.
If you want to enhance the dyeing capacity, increase the mist level, paying attention to
dripping when using the color mode.
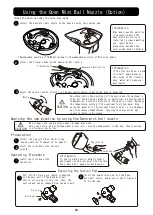
Do not execute cap practice under the open mist mode. When you use the machine at a high
temperature level, the temperature in the cap will become higher, which may cause dizziness
or burns.
Summary of Contents for SPA MIST II AK-160
Page 2: ......