

洗面器などを排水口の下に置き、ドレンコックを開いて水を
抜いてください。
水を抜き終わりましたら、ドレンコックを閉じてください。
※排水の際は給水ボトルを本体に差したまま水を抜いてください。
本体内部の清掃になります。
※清潔にお使いいただくために、毎日終業時には必ず水を抜いて
ください。終業時に水を抜くことで故障の原因になるスケール
の発生を大幅に減らすことができます。
開いている状態
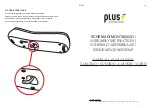
本体前面にある電源スイッチを切ってください。
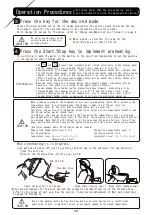
設定時間が経過する(時間の表示が0になる)と運転が終了し、タイムアップを知らせる電子アラーム
(ピッピッピー)が鳴り、タイムアップ状態になります。
※タイムアップ状態では表示パネルに運転終了後の経過時間が表示されます。
タイムアップ状態で時間設定キーの△を押し、スタート/ストップキーを押すと、元の設定で延長運転
を開始します。(延長時間は時間設定キーで任意に変更できます。)
タイムアップ状態でモードキーを押すと、保温状態になります。
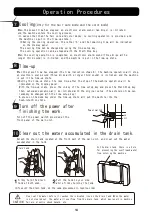
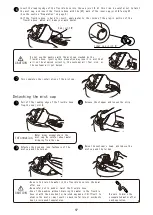
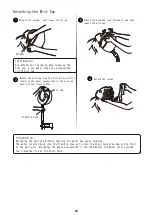
本体前にあるドレンタンクをはずして、中にたまった水を捨ててください。
ドレンタンクの両側を
しっかりと持ちます。
ドレンタンクには差入口
からあふれた水が機器内
部に入るのを防止するた
めの穴があいています。
しっかりと持ったまま手前に
ひきます。
※ドレンタンクを装着するときは逆の順序で行ってください。
O p e r a t i o n P r o c e d u r e s
・機器が十分に冷えてから水を抜いてください。運転中や運転直後は高温になっており、機器の破損ややけ
どなどのけがのおそれがあります。
・排水時には、排水口に手足等を近づけないでください。熱湯が出る場合があり、やけどやけがのおそれが
あります。
・室温が0℃以下になると内部の水が凍り、動作しなくなります。必ず水を抜いてください。
・ドレンコックを閉め忘れると、給水時に排水口から水がこぼれ出てしまいますので、ドレンコックは必ず
閉じてください。
注意
15
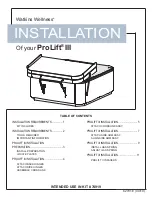
ドレンタンクの両側を
しっかりと持ちます。
たまった水がこぼれないよ
うにドレンタンクをはずし
て水を捨ててください。
→
→
しっかりと持ったまま下に押し下
げます。
凸部
孔
注意
CAUTION
この線まで、水がたまる
前に排水してください。
入
切
・ドレンタンクの表示ラインまで水がたまる前に捨ててください。
放置するとドレンタンクから水があふれ、故障や感電等の原因になります。
注意
12
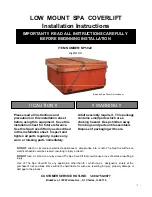
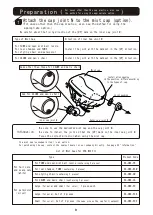
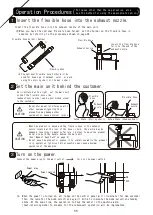
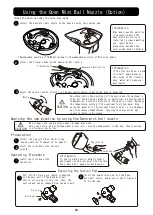
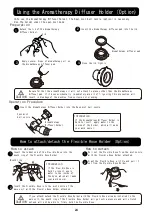
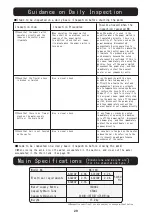
Accommodating the flexible hose
11
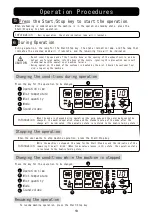
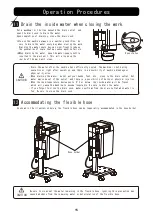
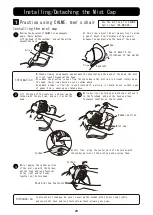
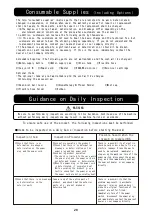
終業時は内部の水を抜きますす
Put a washbowl or the like beneath the drain outlet, and
open the drain cock to drain the water.
Upon completion of draining, close the drain cock.
As shown in the illustration below, the flexible hose can be temporarily accommodated in the hose holder.
※When draining the water, keep the water‑supply bottle
inserted in the main unit. This will also keep the
inside of the main unit clean.
※To use the machine always in a sanitary condition, be
sure to drain the water every day when closing the work.
Draining the water every day can significantly reduce
the generation of scale that may cause machine failure.
Open status
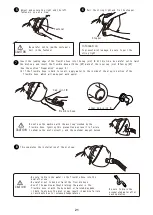
・Drain the water after the machine has sufficiently cooled. The machine is hot during
operation or right after operation, and there is a possibility of machine breakage or
physical injuries.
・When draining the water, do not put your hands, feet, etc., close to the drain outlet. Hot
water may come out of the outlet, and there is a possibility of burns or physical injuries.
・When the room temperature decreases to 0°C or below, the inside water will be frozen,
which will cause the machine to become inoperable. Be sure to drain the water.
・If you forget to close the drain cock, water overflows from the drain outlet when water is
fed. Be sure to close the drain cock.
CAUTION
Be sure to clean out the water remaining in the flexible hose. Ignoring this precaution may
cause bad odors from the remaining water or deterioration of the flexible hose.
CAUTION
11
Drain the inside water when closing the work.
Hose holder
Summary of Contents for SPA MIST II AK-160
Page 2: ......