background image

29

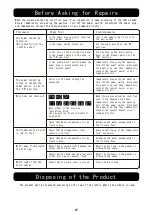
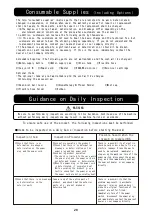
Items to be inspected on a daily basis (Inspection before starting the work)

Inspection Item

Inspection Procedures

Possible hazard when the
inspection revealed NG

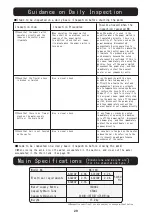
G u i d a n c e   o n   D a i l y   I n s p e c t i o n

Model No.

Electrical reguirements

Water-supply Bottle

CapacityDrain Tank

CapacityDimensions

Weight

AK-160

AC110V

4.6A

AC220V

2.1A

AC120V

4.2A

AC230V

2.2A

AC240V

2.1A

50/60

Hz

1400mL

450mL

330(W)×355(D)×750(H)mm

15.2kg

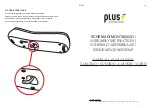
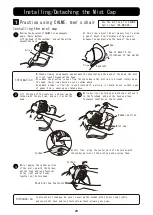
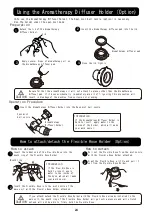
Using the machine with the hose
bended or twisted may make it
difficult to atomize the mist and
causemachine failure or accidents
due to temperature increases.Be sure
to restore the hose to the original
shape.If it is hard to restore it to
the original shape, immediately stop
using the machine, turn off the power
switch, disconnect the power plug,
and then immediately contact the
nearest dealer or our company directly.

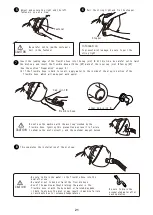
If any flaws or cracks are noted,
immediately stop using the machine,
turn off the power switch, disconnect
the power plug, and then immediately
contact the nearest dealer or our
company directly.

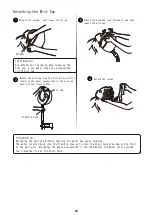
In case hair is tangled on the caster,
remove the hair by referring to the
daily inspection and maintenance
procedures of the caster.

When the product is used in the
condition where the power switch is
not operated correctly, there is a
possibility of failures such as the
power becoming disconnected
unexpectedly during operation.In
addition, in the condition where the
lamps on the control panel do not
illuminate, the product may not be
used properly because the setup
state cannot be confirmed.If this is
the case, immediately stop using the
machine, turn off the power switch,
disconnect the power plug, and then
immediately contact the nearest
dealer or our company directly.

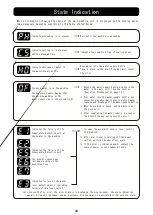
□Check that the power switch

operates correctly and the
lamps on the control panel
illuminate.


When operating the power switch,
there shall be no problems such as
jamming of the power switch.
In addition, check that all lamps
illuminate when the power switch is
turned on.

□Check that the flexible hose

is broken or twisted.


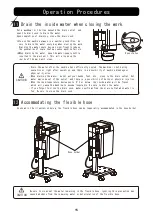
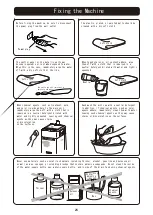
□When closing the work, drain the water accumulated in the machine, and clear out the water

accumulated in the drain tank. (See page 14)


Give a visual check.

□Check that there is no flaw or

crack on the water-supply
bottle or the drain tank.


□Check that hair is not tangled

on the caster.


Give a visual check.

※Respective specifications are subject to change without notice.

■Items to be inspected on a daily basis (Inspection before closing the work)

Give a visual check.

M a i n   S p e c i f i c a t i o n s

Dimensions and weight are
for the stand-alone type

Summary of Contents for SPA MIST II AK-160

Page 1: ...mable Supplies Including Options 28 Guidance on Daily Inspection 28 Main Specifications 29 201411 Rev 1 SPA MIST II Installing Detaching the Mist cap Option 18 Operation Procedures 11 Book No 1A0FTPA0...

Page 2: ......

Page 3: ...he product be handled improperly the possibilities of minor physical injuries mild physical disorder or material damages are increased Safety Precautions To be strictly observed Improper handling of t...

Page 4: ...e the product Never touch the parts inside the product since there is a possibility of an electric shock hazard Be sure to ask the after sales division of our company for maintenance of the product Do...

Page 5: ...ot use chemical agents that are designated for use in room temperature When disconnecting the power plug do not hold it at the cord but pull it out while holding the plug part at the end When discharg...

Page 6: ...dy holder Drain outlet Power switch Inlet Location of Warning Label Do not remove May Cause Burns 4 Top plate Caster Storage basket State indication lamp Detachable tray Hook Open the drain cock to dr...

Page 7: ...g disk spare disk 1 piece Open Mist Ball Nozzle Joint hose spare hose 1 piece Mist Cap 2 pieces Use the one adequate for the practice This can also be used for the standalone type The Open mist ball n...

Page 8: ...the elapsed time after the completion of operation Depending on the mode the cooling function is activated after the completion of operation and either of displays to is displayed Example Example Disp...

Page 9: ...the mode after turning on the power Volume Key and Lamp Lamp Volume Key Lamp Lamp Lamp Lamp Lamp Lamp The standard setup time for each mode can be changed for desirable conditions and can be memorized...

Page 10: ...electronic beeping sounds will indicate that the setting has been saved To restore the memorized setup to the default setup turn off the power once and then turn it on while pressing the Start Stop b...

Page 11: ...types of cap Inner cap joint N Outer cap joint N Mist cap Install the joint with the markset in the UP direction For YUME and open mist ball nozzle For rear shampoo and YUME For styling chair and perm...

Page 12: ...ring this precaution may cause the error see the State Indication on page 26 or water leakage Never use any liquids such as the perm solution essence cosmetic liquid aromatherapy oil and mineral water...

Page 13: ...Connect the power plug to the wall outlet Turn on the power switch When the power is turned on all lamps on the control panel will illuminate for two seconds Then the lamp for the mode selection key w...

Page 14: ...in this case does not mean a failure Turn off the power switch once and then execute the operation again with the correct operation procedures Operation example where E2 indication may be issued Chang...

Page 15: ...matter into the hose or the nozzle Ignoring this precaution may result in abnormal machine operation or machine failure During operation the head of the customer is heated by the mist Should the custo...

Page 16: ...k to your side while firmly holding the tank To mount the drain tank do the same procedures in reverse order Operation Procedures 14 ON OFF Clear out the water before it reaches the indicated line on...

Page 17: ...ter after the machine has sufficiently cooled The machine is hot during operation or right after operation and there is a possibility of machine breakage or physical injuries When draining the water d...

Page 18: ...e optional Open bowl nozzle are requested to see the description on page 23 At this time align the center part of the turban with the rubber portion of the mist cap and overlap them Installing the mis...

Page 19: ...bent or twisted may make it difficult to atomize the mist or may result in machine failure or accidents due to increased temperatures Be sure to drain the accumulated water after each operation CAUTI...

Page 20: ...ter to the inside of the plug in portion of the flexible hose which will make your work easier Method for fixing the hook and loop fasteners on the forehead Position the center of the turban at the ba...

Page 21: ...rned into the flexible hose will enter the drain tank provided at the front of the main unit Discharge the water accumulated in the tank before the water level exceeds the indicated line on the drain...

Page 22: ...the back of the head the mist will not reach throughout the head Even when the practice is done from the state where the mist cap is already installed on the head the pillow should be set as shown ab...

Page 23: ...int N 21 Be sure to drain the water in the flexible hose into the bowl after use Be careful not to bend or twist the flexible hose Use of the machine without draining the water in the flexible hose or...

Page 24: ...ble hose Pay attention to dripping when removing the mist cap since water drops are accumulated in the mist cap Detaching the mist cap without draining the water may cause dripping The water returned...

Page 25: ...hose Use the machine under the open mist mode CAUTION Fixing pin Suction pad Cap joint N Joint hose Nozzle Open mist ball nozzle CAUTION Wipe and clean the position in advance to which the Open mist b...

Page 26: ...paration Operation Procedure How to attach detach the Flexible Hose Holder Option How to detach Pull out the Flexible Hose from the mist nozzle with the Flexible Hose Holder attached Slant the Flexibl...

Page 27: ...agents such as treatment perm and color liquids adhere to the main unit immediately wipe them off with a cloth that is immersed in a neutral detergent diluted with water and tightly squeezed Leaving s...

Page 28: ...icate the remaining time of cooling phase Pour water into the water supply bottle Then a press on the Start Stop key will cancel the error Detach the water supply bottle and drain the water in the mai...

Page 29: ...sconnect the power plug and then immediately contact the nearest dealer or our company directly The power cannot be turned on though the power switch is set to the ON position Failure of the machine m...

Page 30: ...Consumable Supplies The following parts are not warrantable and the cost will be charged Optional Items The optional items are not warrantable and the cost will be charged Including the accessories Co...

Page 31: ...is used in the condition where the power switch is not operated correctly there is a possibility of failures such as the power becoming disconnected unexpectedly during operation In addition in the c...

Page 32: ...d knowledge unless they have been given supervision or instruction Be careful of use Children shall not play with the appliance Be careful of use Cleaning and user maintenance shall not be made by chi...

Reviews: