Features
Application
Content
Operating Instruction
Notice
Specification
Strap
1pc
E190M Amplifier
1pc
Headworn Microphone
1pc
Power Adapter
1pc (Ferr Part)
Buckle
1pc
User Manual
1pc
E190M
Guangdong Takstar Electronic Co.,Ltd.
Address: No
.
2 Fu Kang Yi Rd., Longxi Boluo Huizhou, Guangdong 516121 China
Tel: +86 752 6383644 Fax: +86 752 6383952 Email:sales@takstar.com Website: www.takstar.com
⑨
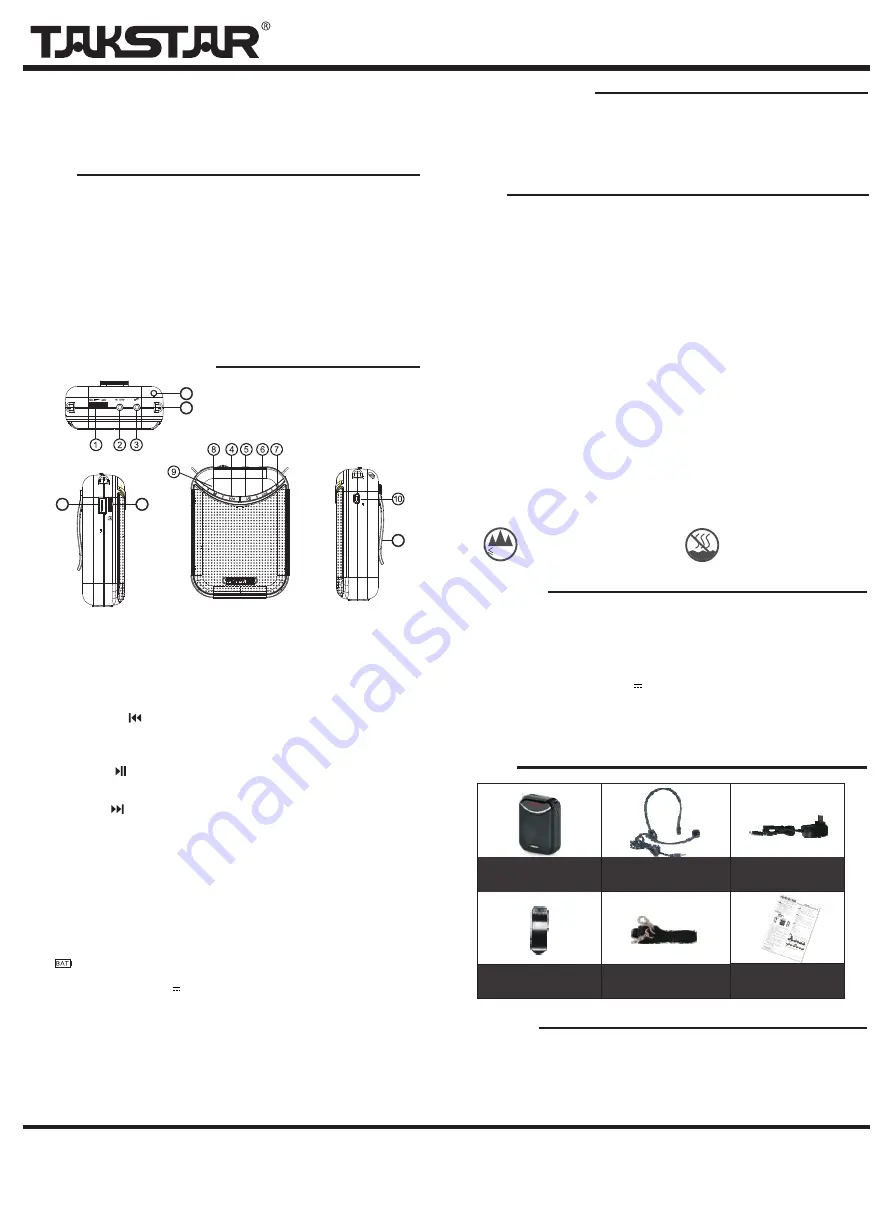
Control Panel Function Diagram
15
11
12
14
13
DC 5V 150mA
DC 5V 600mA
1. Do not input the external audio signal such as DVD, MP3 into the MIC socket to avoid the
sound distortion due to high volume
2. To achieve the best performance, please aim at the capsule of the headworn microphone
(1-2cm) to speak to avoid howling due to wrong direction
3. Non-professional technician is not allowed to disassemble and modify or repair the device.
Please contact your local agent if you need service or have any question
4. Please fully charge the battery to assure its service life if the device will not be used for a
long time or the battery voltage is low
5. Do not expose the battery or battery pack to extremely hot environment such as sunlight
or fire etc
6. Caution: improper replacement of battery or battery pack is likely to cause an explosion,
user can only use the same or equivalent type of battery to replace the original one and
should pay attention to the battery polarity
7. Warning: it's forbidden to connect the battery in reverse, to short circuit or hit the battery
violently, to use the battery as a child's toy. Do not use other charging equipment to charge
the battery of this device, do not use the device to charge other battery, improper use may
cause a risk of explosion. Do not charge a non-rechargeable battery
8. Put the device and its accessories in a dry and ventilated place, keep them from rain, water,
avoid falling down heavily and don't cover the ventilation hole
9. Put the used battery in a designated trash can or send it back to the manufacturer to
protect the environment
10. Keep the power adapter or charger handy, unplug it from the power socket if you are not
going to use it for a long time
11. The applicable altitude and climate condition of this product is subject to the power adaptor,
the meaning of the power adaptor icons is as below:
Welcome to use TAKSTAR portable multimedia amplifier. This product is
teaching, tour guiding, etc. It adopts PO² digital power synthetic technology for long battery
play time and maximum output power, it is an ideal choice for teaching and tour guiding.
Please read this user manual carefully before using to make sure the correct operation and
exert its best performance.
specially designed for
· PO²
· Rare earth material speaker features light weight, excellent sound quality and loud output
volume
∙ Music play function, supports the multimedia audio files play of USB disk and TF card
∙ High brightness digital LED display for controlling the working status intuitively
∙ Recording function controlled by one button, supports microphone and FM broadcasting
content recording
∙ Built-in FM function to search and save the radio stations automatically
∙ Built-in high capacity lithium-ion battery and MCU intelligent recharging management
system for secure recharge/discharge, 5 hours fast recharging time and long play time up
to 12 hours
∙ Unique and fashionable design
digital power synthetic technique, 10W output power
①
Power Button: rotate the knob to the ON position until a “di” sound, the LED digital display
will indicate “LOD” , it means the amplifier is turned on and enter into the amplifying
status, continue rotating the knod to the left, the more, the louder. Conversely, the smaller
the sound is until it turns off
②
AUX IN Input Socket: connect DVD / MP3 music signal with the Ø3.5mm connecting cable
to the amplifier, used as an active speaker
③
MIC IN Input Socket: plug the headset microphone into this port for amplifying
④
Previous Song Button : short press this button under MP3 play mode for the previous
song. Long press for fast backward the current playing song. Short press for the previous
channel under the FM broadcasting mode. Long press this button for automatic station
searching
⑤
Play/Pause Button : short press this button to control the MP3, FM, recording's play
and pause. Long press this button for fast playing the audio file under MP3 play mode;
when FM is broadcasted, long press this button for automatic station searching
⑥
Next Song Button : short press this button for the next song under MP3 play mode. Long
press for fast forward the current playing song. Short press for the next channel under the
FM broadcasting mode. Long press for semi-automatic station searching
⑦
Music Cycle Button: press this button to confirm or cancel the current music cycle play
mode
⑧
Function Switch Button: short press this button for MP3, FM or “Lod” (amplifying) mode
switchover. Long press this button to enter the recording mode, repeat the operation to
save the recording and exit recording mode. REC: long press this button to record the
current FM broadcasting content under FM mode. Long press this button for MIC voice
recording under MP3 mode. ( Recording function can only be operated under FM and
MP3 mode)
⑨
LED Display: display the current working status and the battery level. When the battery
sign is glittering, it means battery level is low and should be recharged in time to
ensure the amplifier is working properly
⑩
Power Input Socket: connect DC 5V power to this socket for recharging
⑪
TF Card Slot: slot a TF memory card according to the indicated direction, the card is fixed
properly and locked till a “da” sound. To take out the card, press down the card till a “da”
sound , the TF memory card will pop up automatically
⑫
USB Socket: support large capacity U disk
⑬
Antenna
⑭
Hanging Buckle
⑮
Hook: when installed, put the hook align with the housing buckle, press and clockwise
rotate the hook to fasten it on the housing. Conversely, counterclockwise rotate it to
unfasten
1.
2. Plug the Ø3.5mm microphone plug into the microphone input port
3. Turn on the amplifier, LED display shows “LOD” , adjust the volume to an appropriate level
4. If the “BAT” sign on the LED display glitters during use, it means the battery power is low,
please recharge in time
Wear the headset microphone on the head correctly, adjust the micro phone pickup angle
∙
∙ Rated Output Power: 6W
∙ Max. Output Power: 10W
∙ Output Impedance: 4
Ω
∙ Operating Voltage: 3.7V
∙ Battery Specification: 3.7V lithium-ion battery
∙ Power Adaptor Specification: DC 5V 600-750mA
∙ Playtime: 8-12hrs
∙ Recharging Time: Approx. 5hrs
∙ USB/TF Card: Max.16G
∙ Media Format: MP3, WAV, WMA
Frequency Response: 80Hz-12kHz
Teaching, tour guiding, morning exercise. promotion
The device and its accessories can
only be used safely in the areas
below an altitude of 2000 meters
2000
m
The device and its accessories
can only be used safely in
non-tropical regions
Amplifier (Digital Player)


