background image

1

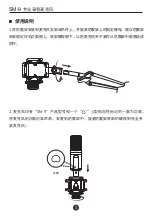
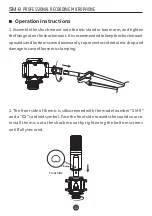
. Assemble the shock mount onto the mic stand or boom arm, and tighten 

the fixing nut on the shock mount. It is recommended to keep the shock mount 

upwards and bottom screw downwards, to prevent accidental mic drop and 

damage in case of loose mic clamping.

Operation Instructions

2

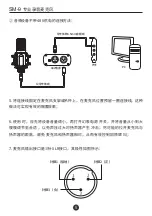
. The front side of the mic is silkscreened with the model number SM-9


"

"

and a  

cardioid symbol. Face the front side towards the sound 


"


"


source.

Install the mic onto the shock mount by tightening the bottom 


screws

until fully secured.

11

Front Side

SM-9

PROFESSIONAL RECORDING MICROPHONE

Summary of Contents for SM-9

Page 1: ...Professional Recording Microphone SM 9...

Page 2: ...SM 9 4006828333 34mm 1 SM 9 1 1 2 1 1 1...

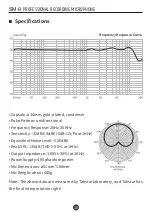
Page 3: ...34mm 20Hz 20kHz 32dB 3dB 0dB 1V Pa at 1KHz 20dBA 135dB THD 0 5 at 1KHz 110 30 at 1kHz 48V 51mm 184mm 440g 2 SM 9...

Page 4: ...1 2 SM 9 3 SM 9...

Page 5: ...3 4 48V 48V 48V DC 48V 4V 2 8mA 20 48V 4 PC USB SM 9...

Page 6: ...48V 5 6 7 XLR 5 3 1 2 48V 3 5mm PC SM 9...

Page 7: ...1 2 3 4 5 6 7 6 2000 2000m SM 9...

Page 8: ...https www takstar com 7 RL2004 108 EG European Low Voltage Directive RL2006 95 EG FCC 15 WEEE 2012 19 EU 1 2 WEEE SM 9...

Page 9: ...8 SM 9...

Page 10: ...ophone Shock Mount Elastic Band 1 pc 1 pc 2 pcs Pop Screen 1 pc Windscreen 1 pc User Manual 1 pc 34mm gold plated condenser capsule with wide frequency response high dynamics and rich timbre High sens...

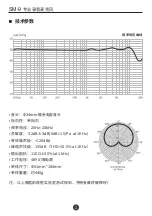
Page 11: ...Noise Level 20dBA Peak SPL 135dB THD 0 5 at 1KHz Output Impedance 110 30 at 1KHz Power Supply 48V phantom power Mic Dimensions 51mm 184mm Mic Weight about 440g Specifications 10 Frequency Response Cu...

Page 12: ...ds to prevent accidental mic drop and damage in case of loose mic clamping Operation Instructions 2 The front side of the mic is silkscreened with the model number SM 9 and a cardioid symbol Face the...

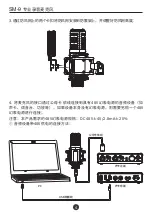
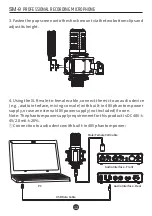
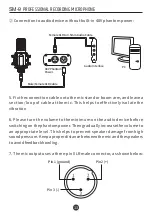
Page 13: ...ace mixing console with built in 48V phantom power supply or use an external 48V power supply not included if none Note The phantom power supply requirement for this product is DC 48V 4V 2 8mA 20 Conn...

Page 14: ...ice before switching on the phantom power Then gradually increase the volume to an appropriate level This helps to prevent speaker damage from high sound pressure Keep a proper distance between the mi...

Page 15: ...store in a humid or dusty area for extended time Keep away from fire rain liquid intrusion bumping throwing vibrating or from blocking any ventilation openings to prevent malfunction 4 The product mus...

Page 16: ...nterference will not occur in a particular installation Ifthisequipmentdoescauseharmfulinterferencetoradioortelevisionreception which can be determined by turning the equipment off and on the user is...

Page 17: ...s product will contribute to the effective usage of natural resources For more information about where you can drop off your waste equipment for recycling please contact your local city office waste a...

Page 18: ...17 SM 9 PROFESSIONAL RECORDING MICROPHONE...

Page 19: ......

Page 20: ......

Reviews: