产绍
Wireless Microphone Operation
09
1.Power switch
Assemble two 1.5V/AA batteries. Press this switch shortly to turn on the microphone. Keep pressing
the switch to turn off (caution: do not assemble the batteries reversely).
2.Switching frequency
If noise appears, the system may receive the signal interference from other wireless microphone.
You can switch frequency to avoid the interference. Operation: in turning on status, press the code
matching button to select the frequency you want (totally 16 channels). The speaker cabinet will
change frequency channel automatically. If you
need more channels, repeat the operation above
(if changing frequency channel can not solve the
interference problem, refer to step 3).
3.ID code locking/matching operation
Turn off the speaker cabinet first. Keep pressing the
code matching button when the wireless microphone
is turned off, and keep pressing the microphone
power switch till the screen flashes for 2 seconds,
and then release the code matching button and
power switch. Turn on the speaker cabinet power
switch. After 3 seconds, press the code matching
button of wireless microphone to exit the code
matching. The LED of speaker cabinet wireless
microphone keeps lighting up means the code
matching is successful. One microphone can match
with multiple speaker cabinets. If you want to cancel
the code matching of one speaker cabinet, match
this speaker cabinet with the microphone once again.
If the microphone is broken, buy a new one from
factory, and refer to this step to match the code.
4. Return to the factory setting
Keep pressing code matching button when the battery is disassembled. Assemble the battery and
release the code matching button to return to the factory setting (after return to the factory setting,
match the code of microphone with that of the speaker cabinet, and then the system has sound).
5. Battery operation time
When the battery symbol on the screen flashes, this means low battery voltage. If the symbol turns
from bright to dark and then to bright or the whole screen flashes, this means the battery power
has been used up. Please replace the battery in time.
6. Caution
1) The microphone should be put in the place which is hard to reach by children.
2) Take out the battery when the microphone is unused.
3) Do not press the set button during normal operation.
4) Replace the battery when the microphone turns off automatically.
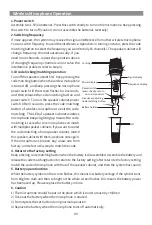
Cartridge
Power display
Signal display
Frequency display
Power switch
Frequency adjusting
Code matching button
Battery holder
Lid
(press shortly to turn
on and vice versa)
Summary of Contents for WDA-900
Page 1: ...WDA 900 Amplifier Mobile speaker User Manual...
Page 2: ......
Page 4: ...02 SD SD SD USB U USB USB SD USB SD USB SD A A A A B B B B 3 5 3 5mm DVD CD MP3 RCA DVD CD MP3...
Page 5: ...03 MP3 EQ 1 AAA...
Page 6: ...04 1 1 5V AA 2 16 3 3 ID 2 3 4 5 6 1 2 3 4...
Page 7: ...2000 2000m 05 1 2 3 4 5 6 7 8 9 60CM 10 11 12 13 14 15 16 17 2000...
Page 13: ...Pb Hg Cd CrVI PBB PBDE SJ T11363 2006 SJ 11363 2006 2006 2 28 SJ T11364 2006...
Page 14: ......
Page 15: ......
Page 16: ......


