
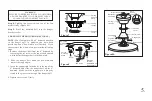
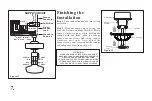
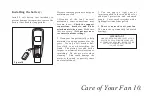

Finishing the
Installation
Step 1.
Tuck connections neatly into ceiling
outlet box.
Step 2.
Slide the canopy up to ceiling and
over the 2 screws on hanger bracket. Rotate
canopy clockwise, next, while holding the
canopy with one hand, slide the canopy
cover over the screws and rotate counter
clockwise until tight. Note; adjust the
canopy screws as necessary until the canopy
and canopy cover are snug. (Fig. 12)
WARNING
MAKE SURE TAB AT BOTTOM OF HANGER
BRACKET IS HANGER PROPERLY SEATED IN
GROOVE OF HANGER BALL BEFORE
ATTACHING CANOPY TO BRACKET. FAILURE
TO PROPERLY SEAT TAB IN GROOVE COULD
CAUSE DAMAGE TO ELECTRICAL WIRING
7.
Figure 12
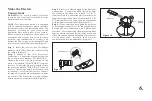
SUPPLY CIRCUIT
Ground
Conductor
Outlet Box
Green
Ground
Lead
Ground to
Downrod
B
L
A
C
K
W
H
IT
E
WHITE
WHITE
BLACK
BLACK
BLUE
GRAY
G
R
E
E
N
Figure 11
WHITE
GRAY
GRAY
WHITE
BLUE
BLACK
ON
PURPLE
PURPLE
PURPLE
Outlet box
Hanger
bracket
Canopy
Canopy
cover
Screws


