


Tally Dascom DT-210/230 User Guide V1.3
57
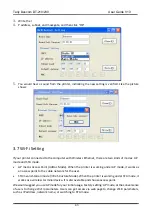
4.
Replace the DIP switch cover, and screw it in place.
New DIP switch settings are enabled after the printer is turned on!
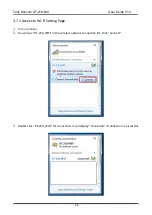
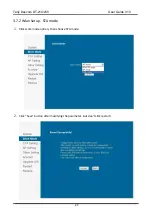
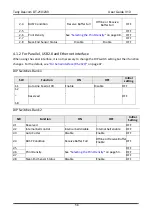
4.1.1
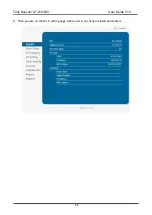
For Serial Interface (RS-232C)
When using the built-in USB interface, it is not necessary to change the DIP switch setting but their
function changes. For the details, see “
For Parallel and USB2.0 Interface
” .
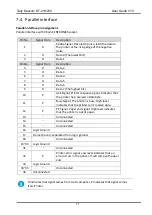
DIP Switches Bank 1
SW
Function
ON
OFF
Initial
setting
1-1
Auto Line Feed at CR
Enable
Disable
OFF
1-2
Handshaking
XON/XOFF
DTR/DSR
OFF
1-3
Data Length
7bits
8bits
OFF
1-4
Parity Check
Yes
No
OFF
1-5
Parity Selection
EVEN
ODD
OFF
1-6
Baud Rate Selection
(bps)
See the “
” table below
OFF
1-7
ON
1-8
OFF
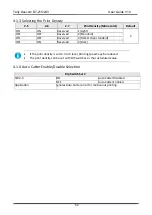
Transmission Speed
Transmission Speed (bps: bits per second)
1-6
1-7
1-8
2400
ON
OFF
OFF
4800
ON
9600
OFF
ON
OFF
19200 (default)
OFF
OFF
38400
OFF
ON
ON
57600
OFF
OFF
115200
ON
ON
Note:
Depending on print conditions, such as print duty, print head temperature, and data
transmission speed, print speed is automatically adjusted, which can cause white lines due to
intermittent print (the motor sometimes stops). To avoid this, set the transmission speed higher or
keep the print speed constant by setting it lower.
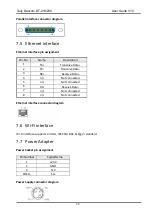
DIP Switches Bank 2
SW
Function
ON
OFF
Initial
setting
2-1
Reserved
-
-
OFF
2-2
Internal bell control
Internal bell disable
Internal bell enable
OFF
2-3
Auto Cutter
Disable
Enable
OFF
Summary of Contents for DT-210
Page 1: ...User Guide DT 210 230 Thermal Receipt Printer ...
Page 15: ...Tally Dascom DT 210 230 User Guide V1 3 DASCOM REPRESENTATIVES 96 ...
Page 45: ...Tally Dascom DT 210 230 User Guide V1 3 30 5 Click Install 6 Wait for a sec ...
Page 46: ...Tally Dascom DT 210 230 User Guide V1 3 31 7 Installation complete Click Finish ...
Page 48: ...Tally Dascom DT 210 230 User Guide V1 3 33 Enable the Black Mark ...


