Troubleshooting
Testmodes and Troubleshooting
4-8
4.2.2
Further Messages in the
LCD Display
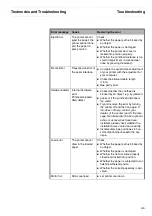
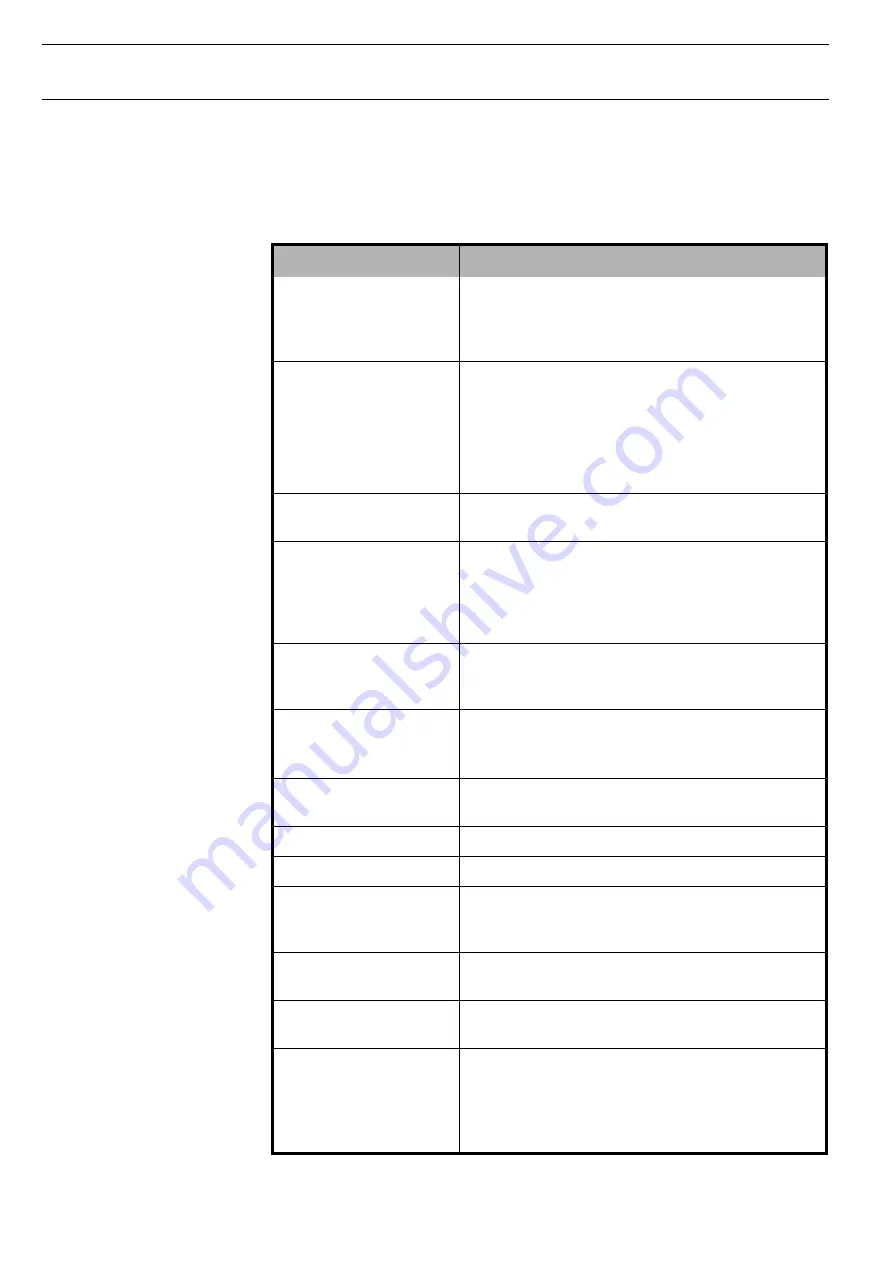
The messages in the table below are not error messages, but operating steps to be
mentioned.
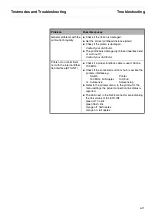
Message
Meaning
Head Hot
The printhead is hot.
The printer reports that the temperature of the print-
head is becoming too high and that print speed is
being reduced for this reason.
Head Hot (permanently
displayed)
Try to adjust head temperature (2380 only, see sec-
tion 6.3.1).
Check printhead; if damaged please replace print-
head (see section 5.2).
Replace printhead cables.
Replace main board.
Insert Paper Top (or Front) Paper is not available in selected paper way. Data is in
interface receive buffer.
Loading Default
Printer is loading default (factory) configuration. It is
possible to do this manually by pressing the four func-
tion and selection buttons when turning on the printer
(see also User Guide on CD-ROM). Default anyway is
loaded after installing different or new firmware.
Only Available in EPSON
Mode
Functions which are not meaningfull in this emulation
have been selected. To use the selected feature you
have to switch over the emulation to Epson.
Open Front Flap
If you have choosen “the single sheet feed” then you
must open the front flap.
Applies only to some printer models.
Park Position
You are informed when the fanfold paper is in park
position.
Please Wait
Your printer is occupied with internal proceedings.
Press any Key
You are requested to press any key.
Remove Paper in xxx
The paper way is changed (xxx indicates the paper
way). Remove the remaining paper in the printer
manually.
Tear Paper Off
Note for the operator to tear off the paper positioned
on the tear off edge before.
Adjust Tear or
Adjust Cut
Use this keys “
↑
”, “
↓
” or “>”, “<” to adjust the paper at
tear position (valid also for Cut feature).
Paperwidth Error
A print job exceeds the paper width with the automatic
paper width detection active.
Cancel the print job or load suitable paper, see also
User Guide on CD-ROM, section “Automatic paper
width detection (APW)”.
Summary of Contents for 2365
Page 1: ...Maintenance manual Matrix printer 2365 2380...
Page 2: ...This page intentionally left blank...
Page 8: ...This page intentionally left blank...
Page 10: ...This page intentionally left blank...
Page 20: ...This page intentionally left blank...
Page 32: ...Mechanical Functions Functional Description 3 12 right mark mark mark...
Page 35: ...Functional Description Electronic Functions 3 15 2365 2380 Electronic groups...
Page 128: ...This page intentionally left blank...
Page 134: ...Mechanical Adjustments Adjustments 6 6...
Page 136: ...Electrical Adjustments Adjustments 6 8...
Page 142: ...Housing Spare Parts and Schematics 7 2 7 1 Housing 7 1 1...
Page 144: ...Basic Printer Spare Parts and Schematics 7 4 7 2 1 Basic Printer 1 3 36...
Page 145: ...Spare Parts and Schematics Basic Printer 7 5 Basic Printer 2 3 462646...
Page 146: ...Basic Printer Spare Parts and Schematics 7 6 Basic Printer 3 3...
Page 151: ...This page intentionally left blank...
Page 164: ...Option Recognition Spare Parts and Schematics 7 24 7 10 Option Recognition...
Page 168: ...This page intentionally left blank...
Page 170: ...Tractor Complete Rear Tractor 2T Model 8 2 8 2 Tractor Complete 4 1...
Page 172: ...This page intentionally left blank...
Page 174: ...Cutting Device Option Specifications 9 2 14 6 4 12 1 5 6 11 7 13 7 8 17 2 9 3 16 15 4...
Page 176: ...This page intentionally left blank...
Page 177: ...2nd Front Tractor option 10 1 10 2nd Front Tractor option...
Page 179: ...Printer Stand Overview 11 1 11 Printer Stand 11 1 Overview...
Page 180: ...Installing the Printer Stand Printer Stand 11 2 11 2 Installing the Printer Stand 1 2 3 4...
Page 181: ...Printer Stand Installing the Printer Stand 11 3 6 8 7 5...
Page 182: ...Installing the Printer Stand Printer Stand 11 4 9 10...


