background image

Advanced menu

User guide

98

Automatic paper motion 
sensor (PMS)

You can use this function to activate or deactivate the paper motion 
detection feature. When it is active, printing and paper movements 
stop in case of a paper jam and an error message is output in the 
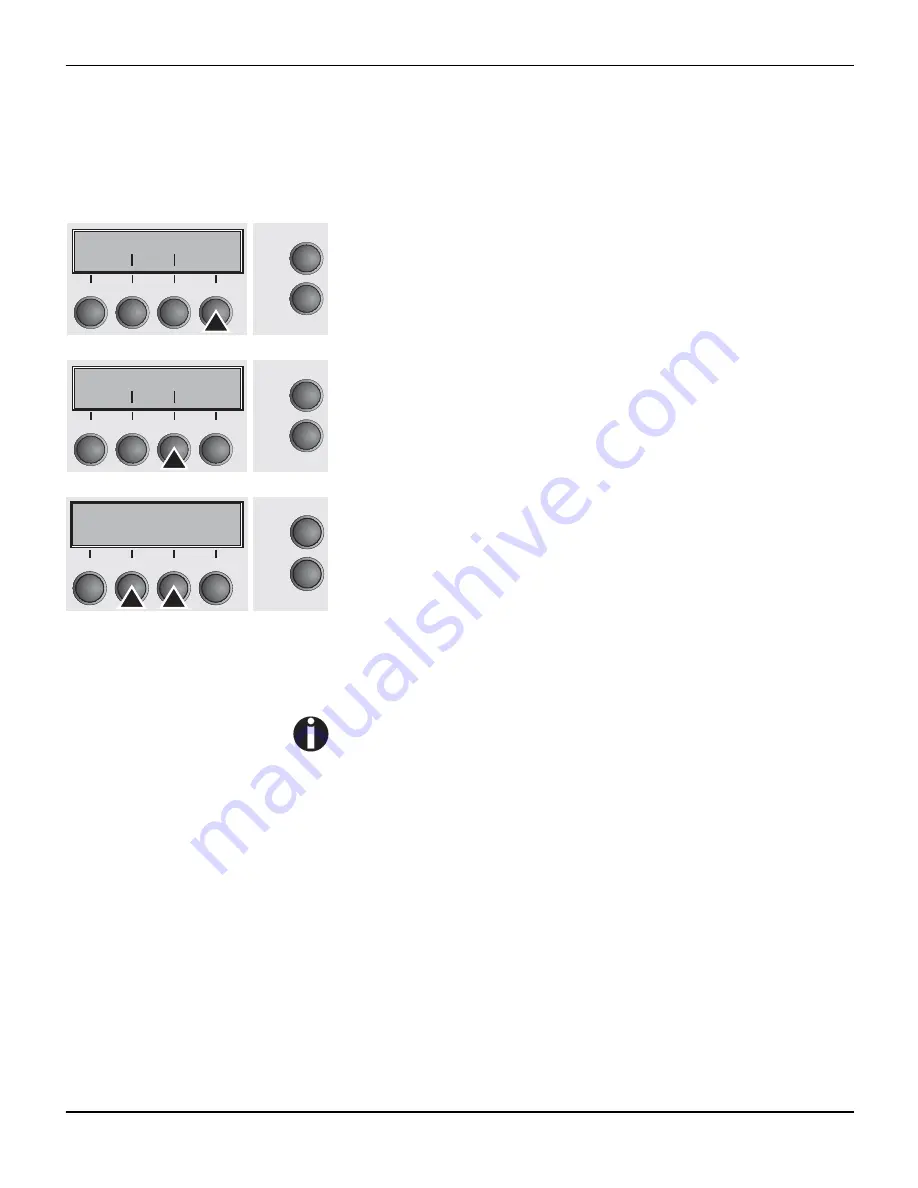
display. Set the printer to test mode by pressing the 

Online 

key 

while you switch on the printer. 

Press the 

Next 

key (4).

Select the 

PMS 

menu (3).

Setting options: 

Off

/

Low

/

Mid

/

High

Default setting: 

Low

PMS=Low

/

Mid

/

High

: The form movements of the active paper path 

are monitored. In case of a paper jam, printing and paper move-
ments stop and an error message (

paper jam

) is displayed.

Low

: Sensitivity 800/360"

Mid

: Sensitivity 600/360"

High

: Sensitivity 300/360"

PMS=Off

: A paper jam will not produce an error message. 

The Paper Motion Sensor (PMS) detects any paper jam or unin-
tended paper end condition and provides efficient protection 
against any paper transport problems together with the paper 
end sensor. This prevents the printer from printing on jammed 
paper or printing without paper. Disabling the PMS can affect 
the operational reliability of your printer and should therefore 
be avoided.

Confirm the setting by pressing the 

Set 

(1) key. Change to the next 

parameter group with the 

Next 

key (4).

ASCII80 ASCII136

Online

Setup

Back

Next

2

1

3

4

H-Dump

PMS

Online

Setup

Back

Next

2

1

3

4

PMS=On

*

Online

Setup

Set

<

>

Exit

2

1

3

4

Summary of Contents for 2365

Page 1: ...User guide Matrix printer 2365 2380 ...

Page 2: ......

Page 3: ...ng the ribbon cassette 11 Installing the ribbon cassette the first time 11 Changing the ribbon cassette 17 Printer drivers 23 Installing a printer driver in Windows 95 98 ME 23 Installing a printer driver in Windows 2000 2003 XP 24 Other operating systems 25 Changing printer settings 26 Form settings Windows 2000 2003 XP 26 Loading optional firmware 27 Troubleshooting 27 The control panel 29 The L...

Page 4: ...rear tractor 48 Paper guiding bracket 50 Selecting the rear tractor 50 The Menu 53 Programming via the control panel 53 Enabling access to menu mode 53 Calling up the menu 53 Menu configurations 54 Menu handling 55 Save settings 55 Selecting the LC display language 56 Terminating Setup mode 57 Menu structure 58 Menu parameters 59 Printing out menu configurations Print 59 Loading menu configuration...

Page 5: ...lecting interface Interf 70 Interface buffer Buffer 70 Ethernet interface ETH INT 71 Setting IP address IP Addr 71 Setting Gateway address Gateway 71 Setting Subnet mask Subnet 72 IP address administration IP Get M 73 Banner page Banner 73 Ethernet speed EthSpeed 74 Selecting character set CG Tab 75 IBM character set CharSet 75 National character set Country 76 Slashed zero Sl Zero 76 Automatic ca...

Page 6: ...ex Dump 94 Printout in Hex Dump 94 Terminating Hex Dump 95 Advanced settings 96 Automatic paper motion sensor PMS 98 Form length Forml 99 Automatic gap adjustment AGA 99 Paper handling Paphand 100 Increasing the printhead gap Head up 100 Paper width Pagewid 101 Left hand area Leftzon 101 Right hand area Rightzo 102 Physical left margin Physlm 102 Bidirectional parallel interface CX bid 103 Line wr...

Page 7: ...ot completely printed out at the top 113 Dots within characters are missing 113 Error messages via the display 114 Additional display messages 118 Care and maintenance 119 Replacing the fuse 119 Cleaning the housing 120 Cleaning the interior 120 Cleaning the platen 121 Ribbon 121 Cleaning the upper friction 122 Carriage shafts 122 Specifications 123 Printer specifications 123 Interface specificati...

Page 8: ...es 152 US Postnet barcode 153 Royal Mail Customer barcode 153 KIX barcode 154 USPS Intelligent Mail barcode 154 Large character printing 155 List of additional control codes 156 Interfaces 157 Parallel interface 158 Connector assignment 158 Ethernet interface 159 Hardware 159 Supported operating systems 159 Supported protocols 159 Designation of IP address 159 Configuration 159 Status 159 Manageme...

Page 9: ...XOFF 163 Memory mode Robust XON XOFF 163 Extended menu functions with the ENQ STX and ETX ACK protocols selected 163 ENQ STX protocol 164 ETX ACK protocol 164 Options and accessories 165 Options 165 Tractor 2 front 165 Autocut facility 165 Printer pedestal 165 ESD brush 165 Cable cover 165 Interface modules 166 Optional firmware 166 Accessories 167 Ribbon cassettes 167 Programming manuals 167 Inde...

Page 10: ......

Page 11: ...t withstands dusty dirty and hostile environements For all these reasons it is a professional solution for many industrial sectors Symbols used Important information is highlighted in this manual by two symbols CAUTION highlights information which must be observed in order to prevent injuries to the user and damage to the printer NOTE highlights general or additional information about a specific t...

Page 12: ...hapter 8 2T model describes how to handle the rear tractor which is only available and permanently installed in the 2T printer model Chapter 9 The Menu contains all the information necessary for control ling the printer via the control panel Chapter 10 Advanced menu describes the possible test settings and other technical adjustments of the printer Chapter 11 Troubleshooting provides instructions ...

Page 13: ...User guide Printer at a glance 3 Printer at a glance 1 Rear cover Front cover Power switch Control panel Top cover Power cord connector and fuse Interface connectors Bottom cover ...

Page 14: ...Printer at a glance User guide 4 Printer in tractor mode Tractors ...

Page 15: ...guide Printer at a glance 5 Paperway Tractor 1 Tractor 2 Tractor 3 Standard printer Tractor 1 Options Tractor 2 Tractor 3 only for 2T model integrated For additional paper options please contact your dealer ...

Page 16: ......

Page 17: ...ke out the accessory cassette and unpack it Pull the printer out of the cardboard box towards you and remove the remaining packaging material Check the printer for any visible transport damage and completeness Apart from this CD ROM c the Quick start guide d the power cable e and the ribbon f must be included If you find any transport damage or if any accessories are missing please contact your de...

Page 18: ...en selecting the printer location observe the following additional instructions Never place the printer in the vicinity of inflammable gas or explosive sub stances Do not expose the printer to direct sunlight If you cannot avoid plac ing the printer near a window protect it from the sunlight with a cur tain When connecting the computer with the printer make sure not to ex ceed the permitted cable ...

Page 19: ... printer to the correct position using a pointed object e g screwdriver ball pen or tweezers Make sure that the printer is switched off before setting the correct voltage otherwise severe damage may be caused Connecting the printer Connect the power cable c to the power inlet of the printer Connect the power cable plug to a mains socket Make sure that the printer and the computer are switched off ...

Page 20: ...After switching on the printer passes through a memory test during the initialization phase In the display appears temporary the mes sage SDRAMTEST XXXXX XX ok If the memory test is successful finished the firmware number ap pears in the display After finishing the initialization the printer switches to online mode see Online mode page 31 SDRAMTEST 20000 55AA ok Online Setup 2 1 3 4 ...

Page 21: ...ter checks if a ribbon cassette is installed It also checks during the execution of a print job the operativeness of the rib bon cassette These functions mandatory require the use of the manufacturers original ribbon cassettes see Accessories page 167 If other ribbon cassettes were used the message Check Ribbon appears in the display it is impossible to print Before opening the cover make sure tha...

Page 22: ...er guide 12 Cautiously slide the print head carriage to the left stop viewed from the printer front Move the coloured friction tabs to the left and right direction of the arrows as shown in the figure and raise the friction mechanism ...

Page 23: ...loured insertion tongue A Pull out and remove the coloured strip A Insert the coloured ribbon tension knob into the right hand front location of the new ribbon cas sette Turn the knob in the direction of the arrow in order to take up slack of the ribbon A A ...

Page 24: ...rt transparent plastic plate Align and insert the cassette into the guides on the left and right then press down until it clicks into place Insert the coloured tension knob into one of the two locations Turn the tension knob in the direction of the arrow to take up slack in the ribbon until it is seated cor rectly at the bottom in the ribbon support Remove the knob STOP ...

Page 25: ...print head carriage back and forth sev eral times If the ribbon is correctly seated there must be no perceptible resistance The ribbon should be transported dur ing the travel from left to right If this is not the case you should check that the ribbon cassette is correctly inserted on the right A ...

Page 26: ...Inserting the ribbon cassette User guide 16 Press the friction mechanism down until it clicks into place Close the top cover ...

Page 27: ...e the use of the manufacturers original ribbon cassettes see Accessories page 167 If other ribbon cassettes were used the message Check Ribbon appears in the display it is impossible to print Before opening the cover make sure that the printer is switched on so that it can execute automatic preparations for ribbon changing widening the print head gap Move the paper to the park position Open the pr...

Page 28: ...Inserting the ribbon cassette User guide 18 Move the coloured friction tabs to the left and right direction of the arrows as shown in the figure and raise the friction mechanism Remove the used cassette ...

Page 29: ...loured insertion tongue A Pull out and remove the coloured strip A Insert the coloured ribbon tension knob into the right hand front location of the new ribbon cas sette Turn the knob in the direction of the arrow in order to take up slack of the ribbon A A ...

Page 30: ...rt transparent plastic plate Align and insert the cassette into the guides on the left and right then press down until it clicks into place Insert the coloured tension knob into one of the two locations Turn the tension knob in the direction of the arrow to take up slack in the ribbon until it is seated cor rectly at the bottom in the ribbon support Remove the knob STOP ...

Page 31: ...print head carriage back and forth sev eral times If the ribbon is correctly seated there must be no perceptible resistance The ribbon should be transported dur ing the travel from left to right If this is not the case you should check that the ribbon cassette is correctly inserted on the right A ...

Page 32: ...Inserting the ribbon cassette User guide 22 Press the friction mechanism down until it clicks into place Close the top cover ...

Page 33: ...rinter as a Local Printer or Network Printer by clicking on the relevant option then press Next For instructions on installing the printer as a network printer please consult the documentation supplied with your network operating system and or printer server or contact the network administrator 7 Click on Disk then on Browse 8 Select the CD ROM drive and open the directory n english driv ers print...

Page 34: ...ator To install a network printer you will need Administrator rights If you are using the printer locally you can continue installing the driver in one of two possible ways Manual installation of printer driver in this case continue with Step 7 Automatic installation of printer driver via Plug Play function in this case continue with Step 12 once the printer installation wizard has determined the ...

Page 35: ...Specify whether you wish to print out a test page recommended by selecting the relevant option and click on Finish The printer driver will now be installed Other operating systems The printer can also be used with other operating systems such as Linux or Unix In this case set the printer to one of the Epson emu lations LQ 2550 LQ 2170 or IBM emulations Proprinter XL 24e Proprinter XL 24e AGM for w...

Page 36: ...e former may overwrite the latter Form settings Windows 2000 2003 XP In contrast to Windows versions 95 98 ME in which forms are de fined in the printer driver itself Windows versions 2000 2003 XP have a central facility for managing form properties and assign one paper feed only If you want to set up a form not included in the Windows default set tings proceed as follows You will need Administrat...

Page 37: ... X path stands for the drive and the directory in which the file is lo cated A progress indicator bar and DOWNLOAD FIRMWARE appears on the display during the download alternatively an error message is displayed PRG Firmware GEN Character set or font character generator P G Firmware and character set BOO Firmware character set and boot block The number of the currently transferred data block frame ...

Page 38: ......

Page 39: ...printer and computer is inter rupted i e no data can be received and printed In the Setup mode you can either select the printer menu or carry out the so called quick switch function The quick switch option was included so that you can change the most important parameters for example adjustments character density font paper path adjust ments i e head gap directly without having to enter them via t...

Page 40: ... assigned to which keys The upper line informs you that the printer is either in online or offline mode in the example below the printer is in the Online mode and the selected paperpath below Trac1 Tractor 1 tractor mode key 4 is currently activating the manual tear Example Online Trac1 Tear Online Setup 2 1 3 4 Printer status Key functions Paper path ...

Page 41: ... possible to perform step line or form feeds from the control panel see Paper transport page 40 however data cannot be received Park key 1 Clears the paper path with paper loaded and acti vates paper path quick selection Key 2 Short keypress Microstep forward Long keypress Continuous paper feed Key 3 Short keypress Microstep reverse Long keypress Continuous paper reverse feed up to the park positi...

Page 42: ...r path Char key 4 Sets the font and the number of characters per inch Access to the other menu settings Menu may be disabled by the manufacturer Proceed as follows to release this lock temporarily Hold depressed the Setup key or the Menu key 1 for five seconds Or 1 Switch off the printer for approx 5 seconds 2 Switch the printer on again keeping the Setup key pressed For information on how to enab...

Page 43: ...sage appears during the printer s initializing phase after switch ing on the printer Load error The printer cannot draw in the loaded paper Load paper from The printer has detected paper end during operation printer was switched on with no paper loaded Loading default Factory defined parameters will be reloaded in all available menus after switching on the printer Out of paper The printer has dete...

Page 44: ... User guide 34 Tear Paper off The user is requested to tear off paper which has been advanced to the tear edge AED Error AED sensor cannot locate paper trans port holes only if a cut device is installed Message Meaning ...

Page 45: ... section Advanced menu page 91 of this manual If you keep the Setup key depressed while turning on the printer you regain access to the printer menu if you had locked it before with the help of the MenLock function The MenLock function is de scribed in the section Menu lock MenLock page 78 If the four function and select keys keys 1 to 4 are depressed si multaneously while turning on the power all...

Page 46: ......

Page 47: ...can process fanfold paper For informations on allow able paper formats refer to the section Paper specifications page 128 Only use dust free or low dust paper Many paper qualities are suitable for this printer For more information please refer to the section Paper specifications page 128 Open the front cover Remove the bottom cover A Open the right and left tractor flaps 6 A ...

Page 48: ...ever of the right hand tractor and align it to the paper width Insert the fanfold paper into the right hand trac tor Make sure that it is inserted by the same length as on the left hand tractor in order to avoid any paper jam Close the tractor flap and lock the tractor by turning the tractor lever to the rear Do not tension the paper excessively to avoid tearing the perforation holes do not allow ...

Page 49: ... Switch the printer on The active paper source Tractor1 appears in the display The display alternates between and The paper is automatically loaded when the printer is in online mode and receives data from the computer Press the Load 4 key only to load paper before starting the printout However it is recommended to let the receiving data load the paper 90 ...

Page 50: ... to the park position or the tear position Key 2 Short keypress Paper is transported upwards step by step Long keypress Continuous transport upwards Key 3 Short keypress Paper is transported downwards step by step Long keypress Continuous transport downwards LF FF key 4 Short keypress Line Feed LF is executed Long keypress Form Feed FF is executed The maximum value of the paper return feed is 22 i...

Page 51: ...r edge is located at the front side of the paper output opening see below The display alternates between and Tear off paper at the tear edge A Make sure you tear the paper off straight otherwise a paper jam may occur After having torn off the paper press the Exit 4 key The printer re turns the paper to the first printing position If a print job is active the printer returns the paper automatically...

Page 52: ...hanical components may be damaged Make sure that the printer is in offline mode press the Online key if necessary Press the Park 1 key If fanfold paper is loaded in the printer it is fed to the tear position The text Tear paper off appears in the dis play Now remove the paper from the tractor Then press any key STOP ...

Page 53: ...to setup mode Press the Adjust 2 key Press the Head 1 key Use the 2 or 3 key to set the range within which the automatic gap adjustment is to be corrected You can select values in the range from 10 to 10 Confirm the input by pressing the Set 1 key Press the Setup key The printer returns to the initial status Negative values decrease the print head gap positive values increase it Changing the autom...

Page 54: ...the perforation to the desired position Confirm the input by pressing the Set 1 key Confirm the input again by pressing the Setup key The printer is reset to the ini tial status The correction made a maximum of approx 1 2 5 cm in each direction will be retained after switching the printer off It can be set separately for each paper path Make sure that the set form length corresponds to the actual ...

Page 55: ...e first printing line A is aligned with the tear edge B of the printer The factory setting for the first printing position TOF is 12 72 4 23 mm 1 6 inch This is equivalent to the second line from the top Press the 2 or 3 key to move the first printing line to the de sired position You can set values from 0 to 220 72 for fanfold pa per Confirm the input by pressing the Set 1 key Press the Setup key...

Page 56: ...to select the desired font Confirm the selection by pressing the Set 1 key You can cancel the selection and leave the setting unchanged by pressing the Exit 4 key Press the Setup key The printer returns to the initial status It is also possible to press the Online key The printer then changes directly to online mode The selection made will not be retained after switching off the printer For more d...

Page 57: ... menu Trac2 in the menu refers to the optional tractor which can be installed both on the standard printer and the 2T model The optional tractor 2 can be installed by the user Rear tractor paper path For information on the printable length and width of the forms and other specifications refer to Paper specifications page 128 The 2T model cannot accommodate an additional automatic single sheet feed...

Page 58: ...r vertically and remove it Open both the right hand and left hand tractor flaps Release the coloured latch lever of the left hand tractor and align the tractor in such a way that the first printing position on the paper matches the X mark on the printer housing Then fix the coloured lever again Insert fanfold paper into the left hand tractor ...

Page 59: ...llel with the printer and that the paper flow is unob structed Reinsert the rear cover vertically and lower it to wards the rear Slide the cover towards the rear to the stop this will leave a slot for the paper Switch the printer on It will perform a self test and then go to online mode Paper may remain inserted in the front and rear tractors at the same time This is made possible by moving the pa...

Page 60: ...plication program the paper path quick selection or via the setup menu This chapter describes the paper path quick selection for information on how to make the setting in the Setup menu refer to Setup mode Make sure that the printer is in offline mode press the Online key if necessary Press the Park key 1 If fanfold paper is loaded in the printer it is transported to the tear position Tear paper w...

Page 61: ... paper path The printer will move it automatically to the park position Note that the Tractor paper path settings can be selected sepa rately for each tractor in the Paperway parameter group of the setup menu Settings Form length First printing line Print head gap setting only for printers with the AGA automatic gap adjustment deactivated If there is any problem with paper loading or paper transpo...

Page 62: ......

Page 63: ...programming via the interface is lost after you turn off the printer whereas the programming carried out using the control panel is saved and stored even after you turn off the printer Enabling access to menu mode The menu can be locked by default to protect it from accidental or unauthorised access Proceed as follows to release this lock temporarily Hold the Setup key or the Menu key 1 depressed ...

Page 64: ...sed last When you switch on the printer for the very first time menu no 1 is loaded Menu no 1 only remains active until you load another menu The last active menu is stored even after the printer is switched off and is reloaded automatically when the printer is switched on again For example to change from menu no 1 to menu no 3 Press Setup key Press Menu 1 key Press Menu 3 key Now the following me...

Page 65: ...y to access the two previous parameter groups in the menu If you want to change a setting e g the line density then press the LPI key LPI lines per inch to access the actual parameter level The currently valid setting is marked by a in the example below the current setting is 6 lpi With the and keys you can view the other parameters available for this setting Example Save settings Once the desired...

Page 66: ...d Hold down the Setup key while switching on the printer to enable menu mode If you want to enable access to this mode permanently you need to change the appropriate setting in the menu see Menu lock MenLock page 78 Press the Next key 4 several times until the display indicates Lan guage Press the Language key 3 The display now changes to Parameter mode and indicates English in the top line The lo...

Page 67: ...ey 4 the old setting is retained After saving your setting Set the display in our example indicates the following text This setting is retained even after switching off your printer Terminating Setup mode Press either the Setup key to change into Offline mode or the On line key to change to Online mode German Online Setup Set Exit 2 1 3 4 Ges Men Sprache Online Setup Rück Vor 2 1 3 4 ...

Page 68: ...PI Bidir I O ESCChar Emulate CPI Font Reset Menu Print Protocol 1 Interf Buffer Baud 1 Format 1 DTR 1 Serial 1 Width Trac2 3 Special 1 6 ETH INT Back Next FFmode PapOpt 7 7 Single 5 1 only with optional serial interface 2 only 2T model 3 only with optional tractor 4 only with optional ASF automatic single sheet feeder which is available for some printer models 5 The Single menu option does not app...

Page 69: ...rations using the active paper feed see Menu settings example page 90 Press Print 2 key to start the printout Loading menu configurations Menu A menu is loaded you can choose between five menus see Menu handling page 55 Press Menu 3 key Use the 2 or 3 key to select the desired setting Setting Options Load Menu 1 2 3 4 5 Default Setting Load Menu 1 Confirm the setting by pressing the Set key 1 Pres...

Page 70: ...all printing modes the print out is made with the bidirectional method in quiet mode printing In the first step the first row of pins is activated during the second step the second row is used Press Quietm 3 key Use the 2 or 3 key to select the desired setting Setting Options Quietm On Off Default Setting Off Please note that the activation of Quietmode decreases the throughput Confirm the setting...

Page 71: ...with a slightly lower resolu tion LQ stands for Letter Quality which means that the resolution is higher at the expense of a slightly slower speed scalable fonts LQ2170 emulation Confirm the setting by pressing the Set key 1 Font CPI Online Setup 2 1 3 4 Back Next Draft Online Setup Set Exit 2 1 3 4 Available fonts HIGH SPEED DRAFT DRAFT COPY ROMAN NLQ ROMAN LQ ROMAN PS NLQ ROMAN PS LQ SANS SERIF ...

Page 72: ...Set key 1 Press the Next key 4 to access the next group of parameters Setting line spacing LPI Sets the lines per inch line density The higher the parameter the smaller the line spacing random LPI can be selected via the ESC sequences Press LPI 2 key Use the 2 or 3 key to select the desired setting Setting Options 2 LPI 3 LPI 4 LPI 6 LPI 8 LPI 12 LPI Default Setting 6 LPI Confirm the setting by pr...

Page 73: ... for escape sequence ESCChar Selects the start signal for control sequences Setting ESC Only character Escape can be used Setting ESC Character Escape or alternatively two characters can be used For more infor mation see the section The procedure page 138 Press ESCChar 2 key Use the 2 or 3 key to select the desired setting Setting Options ESC ESC Default Setting ESC Confirm the setting by pressing...

Page 74: ... the loaded firmware If the printer is switched to online mode after changing the emula tion it performs a reset Confirm the setting by pressing the Set key 1 Press the Next key 4 to access the next group of parameters Bidirectional printing Bidir Setting On Printer prints in both directions bidirectional Setting Off Printer prints only in one direction from left to right Press Bidir 2 key Use the...

Page 75: ...epending on your printer model the serial interface is already installed or it is available as an option Press Serial 2 key Data transmssion rate Baud Selects the data transmission rate baud rate baud bit per second Press Baud 2 key Use the 2 or 3 key to select the desired setting Setting Options 600 1200 2400 4800 9600 19200 Default Setting 9600 Printer and computer must have the same baud rate C...

Page 76: ...odd parity The selection of MARK or SPACE causes a data byte transmission with parity bit but without checking the received da ta Transmission data with parity bit is always marked with 1 MARK or 0 SPACE 3 Selects one or two stop bits per data byte Confirm the setting by pressing the Set key 1 Press the Next key 4 to access the next group of parameters Baud Format Online Setup 2 1 3 4 Back Next 8b...

Page 77: ...f Confirm the setting by pressing the Set key 1 Block end character Blockend End of block character definition On LF FF CR VT ETX DEL Off ETX DEL Press Blockend 3 key Use the 2 or 3 key to select the desired setting Setting Options On Off Default Setting Off Confirm the setting by pressing the Set key 1 Press the Next key 4 to access the next group of parameters Special Protocol Online Setup 2 1 3...

Page 78: ... the transparence of control sequences and block acknowl edgement depending on the selected protocol Press Handthr 3 key Use the 2 or 3 key to select the desired setting Setting Options On Off Default Setting Off Confirm the setting by pressing the Set key 1 Press the Next key 4 to leave the parameter subgroup Special Remote Handthr Online Setup 2 1 3 4 Back Next Remote Off Online Setup Set Exit 2...

Page 79: ...ameters Signal Processing DTR Defines the conductor to which the DTR signal is connected DTR Data Terminal Ready Press DTR 2 key Use the 2 or 3 key to select the desired setting Setting Options DTR READY Default Setting DTR DTR DTR DTR signal is assigned to DTR line DTR READY READY signal is assigned to DTR line DTR Pin 20 on 25 pin female RS232 connector DTR Pin 4 on 9 pin female RS232 connector ...

Page 80: ...ace only Confirm the setting by pressing the Set key 1 Press the Next key 4 to access the next group of parameters Interface buffer Buffer Selects the size of the interface buffer Press Buffer 2 key Use the 2 or 3 key to select the desired setting Setting Options 0 128 KB Default Setting 128 KB If buffer 0 KB and the serial interface is selected or if the setting Share is active the actual buffer ...

Page 81: ...nto four digit groups octet 1 to 4 You can activate octet 3 and 4 by pressing the Next 2 key Press OCTET 1 1 key Use the 2 or 3 key to select the desired digit Setting Options 0 to 255 Default Setting 0 Confirm the setting by pressing the Set key 1 Set the remaining three digit groups in the same way Setting Gateway address Gateway Input of the Gateway address of the printer Press Gateway 3 key ET...

Page 82: ...mask Subnet Input of the Subnet mask address of the printer Press Subnet 2 key This menu level offers the possibility to set the IP address which is divided into four digit groups octet 1 to 4 You can activate octet 3 and 4 by pressing the Next 2 key Press OCTET 1 1 key Use the 2 or 3 key to select the desired digit Setting Options 0 to 255 Default Setting 0 Confirm the setting by pressing the Set...

Page 83: ...el Manual on the Online CD ROM Press the Next key 4 to access the next group of parameters Banner page Banner Specifies whether a banner page is to be printed out when using the LPD LPR protocol Press Banner 2 key Use the 2 or 3 key to select the desired setting Setting Options Yes No Default Setting No Yes When using the LPD LPR protocol a banner page will be prin ted out in front of every print ...

Page 84: ...ssion speed to 10 MBit full duplex per second 100Mbit Half Sets the transmission speed to 100 MBit half duplex per second 100Mbit Full Sets the transmission speed to 100 MBit full duplex per second It is recommended that the ethernet interface transmission speed setting of the printer and the connected transmission device coincide The printout of the current menu settings contains the ethernet lin...

Page 85: ... Italic Default Setting Graphic Confirm the setting by pressing the Set key 1 IBM character set CharSet Selects the IBM standard characters or the extended IBM charac ters Press CharSet 3 key Use the 2 or 3 key to select the desired setting Setting Options Standard Extended Default Setting Extended Confirm the setting by pressing the Set key 1 Press the Next key 4 to access the next group of param...

Page 86: ...racter sets and fonts page 134 Default Setting E US ASCII Confirm the setting by pressing the Set key 1 Slashed zero Sl Zero Selects if normal zero 0 or the slashed zero Ø is printed Press Sl Zero 3 key Use the 2 or 3 key to select the desired setting Setting Options Off On Default Setting Off Confirm the setting by pressing the Set key 1 Press the Next key 4 to access the next group of parameters...

Page 87: ...atic line feed Auto LF Switches the automatic line feed LF on or off after receiving the signal CR carriage return Press Auto LF 3 key Use the 2 or 3 key to select the desired setting Setting Options Off On Default Setting Off Confirm the setting by pressing the Set key 1 Press the Next key 4 to access the next group of parameters Auto CR Auto LF Online Setup Back Next 2 1 3 4 Auto CR On Online Se...

Page 88: ...unctions in Online and Offline mode while Setup mode is disabled In this case the Setup menu can only be called up by holding the key Setup while switching on the printer Press MenLock 2 key Use the 2 or 3 key to select the desired setting Setting Options Off Menu All Default Setting Menu Confirm the setting by pressing the Set key 1 Language Language The menu can be shown in five languages on the...

Page 89: ...ractor 2 front option The Single menu option does not apply to this printer The single sheet feeders front ASF F and rear ASF 1 2 with two bins are available as options for some printer models only Select the desired paperway in our example Trac1 2 Press Next 4 key to proceed to the installed optional paperways Form length Forml You can define the form length in one of two ways via the number of l...

Page 90: ...irm the setting by pressing the Set key 1 If you wish to define the form length via standard formats press Standard 3 key Use the 2 or 3 key to select the desired setting Setting Options Fanfold 12 DIN A3 DIN A4 DIN A5 DIN B5 DIN B6 Exective 10 5 Letter 11 Legal 14 No Format Default Setting Fanfold 12 Selects the form length by standard formats Using Standard differ ent paper formats can be select...

Page 91: ...of the printable area Press FormAdj 3 key Use the 2 or 3 key to select the desired setting Setting Options 0 72 to 220 72 Default Setting 12 72 Confirm the setting by pressing the Set key 1 Press the Next key 4 to access the next group of parameters An alternative notation for FormAdj is TOF Top Of Form Forml FormAdj Online Setup 2 1 3 4 Back Next FormAdj 12 72 Online Setup Set Exit 2 1 3 4 ...

Page 92: ...tions 0 to 100 Default Setting 18 Select the Head 18 parameter for normal paper Use a greater dis tance for thicker paper Recommended values for the print head gap If you change this value this may affect the print quality If the printout shows signs of smudging we recommend that you increase the print head gap Confirm the setting by pressing the Set key 1 Press the Next key 4 to access the next g...

Page 93: ...per then this can be cor rected Press AutoTear 3 key Use the 2 or 3 key to select the desired setting Setting Options ViewTear Off View 1s 3s 6s Tear 1s 3s 6s Tear at TOF Default Setting ViewTear Off If the parameter View Tear Off is set the paper can still be brought into a View or Tear position via a specific sequence see page 145 or the Tear key If the parameter Tear at TOF is set the paper per...

Page 94: ...he 2 or 3 key to select the desired setting Setting Options On Off Default Setting Off The definition and activation is performed by special sequences through the interface Since this selection is possible for all emula tions it must be noted that conflicts in sequence conformity with the selected emulation may occur For this reason the barcode function can also be switched on and off by MTPL sequ...

Page 95: ...quired paper transport for printing barcodes and LCP is carried out automatically it is not possible to print more than one line of normal characters in the barcode line All characters in the mixed line are printed such that their bottom edges are in a straight line This function may be switched on and off by sequences This function can be activated deactivated by sequences Confirm the setting by ...

Page 96: ...al position of characters with stan dard height which follow oversized characters This function is only effective in Genicom ANSI emulation Press LCPtop 3 key Use the 2 or 3 key to select the desired setting Setting Options Off On Default Setting Off If this option is disabled Off then the printer advances paper 1 8 inch when exiting oversized characters This characteristic is re tained for compat...

Page 97: ... 2 or 3 key to select the desired setting Setting Options On Off Default Setting Off FFmode On If the paper is positioned in the first printing line TOF form feeds will be ignored FFmode Off Form feed will be performed in all cases Confirm the setting by pressing the Set key 1 FFmode PapOpt Online Setup 2 1 3 4 Back Next FFmode Off Online Setup Set Exit 2 1 3 4 ...

Page 98: ...ptional tractor is installed and the Off parameter is acti vated only the selected tractor is supported either via the menu or an ESC sequence If the selected tractor is out of paper printing stops If an optional tractor is installed and you select T1 T2 standard printer or T1 T2 T3 2T model the printer will load paper from the other tractor if the selected one is empty For the 2T model the select...

Page 99: ...ly Press AutoASF 3 key Use the 2 or 3 key to select the desired setting Setting Options Off On Default Setting Off If an ASF is installed and the Off parameter is activated only the se lected source is supported either via the menu or an ESC se quence If the selected paper source is empty printing stops If an ASF is installed and you select On the printer will load paper from the other source if t...

Page 100: ...The Menu User guide 90 Menu settings example ...

Page 101: ...hanics as well as ef ficient data transmission from the computer to the printer The extended menu contains three test functions ASCII 80 ASCII 136 H Dump Enter advanced menu mode by pressing the key Online while switching on the printer The display shows Test mode for approx 1 second and then auto matically changes to display ASCII 80 ASCII 136 10 ASCII80 ASCII136 Back Next H Dump PMS Back Next W ...

Page 102: ...ration for the test print out To do this press the key Setup The printer then changes to Setup mode and the first of the main levels is then displayed Program your printer in the usual way for the test printout to change the parameters See section Programming via the control panel page 53 Some changes in menu mode may cause the printer to reinitialize in this case the Rolling ASCII test is aborted...

Page 103: ...used to determine and set the optimal printhead gap see the section Setting the print head gap page 43 Exiting Rolling ASCII test mode The self Rolling ASCII test mode test mode can only be terminated by switching off your printer For this operation the printer must be Offline If you want to stop the test printout before switching off the printer press the key Online ...

Page 104: ...prox 1 second and then auto matically changes to display ASCII 80 ASCII 136 Press the key Next 4 the display shows the next menu level If you press the key H Dump 2 you select the H Dump mode and Offline H Dump is shown on the display Put the printer into Online H Dump mode by pressing the key On line The printer is now ready to receive data from the computer and to print it out in hexadecimal for...

Page 105: ... menu 95 Terminating Hex Dump Hex Dump mode can only be terminated by switching off the printer If you want to stop the Hex Dump printout before switching off the printer press the key Online and then the key LF FF 4 once ...

Page 106: ...beep at paper end The Single menu option does not apply to this printer The function Pap back allows printing on paper with a dark back You can use the HvyForm function to set the print head to print the same line twice at double strike force in order to ensure that copy paper produces optimum results even if it has a faint copying effect The APW function can be used to activate the automatic pape...

Page 107: ... and activating the paper motion sensor W Setting default form length and the Automatic Gap Adjustment for the print head W Setting line wrap and sound when paper empty W To print copy paper W Automatic paper width detection and preci se positioning of the paper at the tear edge after cutting action and subsequent chan ge of the paper path W Settings to facilitate handling paper of poor quality an...

Page 108: ... stop and an error message paper jam is displayed Low Sensitivity 800 360 Mid Sensitivity 600 360 High Sensitivity 300 360 PMS Off A paper jam will not produce an error message The Paper Motion Sensor PMS detects any paper jam or unin tended paper end condition and provides efficient protection against any paper transport problems together with the paper end sensor This prevents the printer from p...

Page 109: ...rm the setting by pressing the Set 1 key Automatic gap adjustment AGA This function allows you to switch the Automatic Gap Adjustment AGA off or on Select the AGA menu 3 Setting options Off On Default setting On AGA On printer checks paper thickness and changes gap adjust ment if necessary default Measurements take place after power on whenever changing the paper path when loading paper AGA Off se...

Page 110: ...ore and af ter the perforation of the form Setting options On Off Default setting Off If the parameter is set to On the printhead gap increases during form feed and line feed four lines before and after the perforation on the form protected zone The printhead gap is always increased during form feeding past the perforation even when feeding takes place outside the protected zone Printing is possib...

Page 111: ...transported Set the printing width rather than the actual paper width Confirm your settings with the Set key 1 and press the Next key 4 to access the next group of parameters Left hand area Leftzon If the parameter is On the printhead moves out of the perforation zone area on the left as long as the paper is being transported The Pagewid setting has no influence see above Select the Leftzon menu 2...

Page 112: ...slm Select the Physlm menu 2 Setting options 0 to 30 in 1 10 inch steps Default setting 0 10 Inch Permanent physical setting of the left margin This parameter can not be changed by emulation dependent margin settings Margin setting values entered by ESC sequences are added to the Physlm Note that this value is subtracted from the maximum printing width of 13 6 inches Confirm the setting by pressin...

Page 113: ...e next parameter group with the Next key 4 Line wrap Wrap Select the Wrap menu 2 Setting options On Off Default setting On Wrap On If more characters than can be printed are transmitted per line the characters which cannot be printed on this line are print ed at the beginning of next line Wrap Off If more characters than can be printed are transmitted per line the characters which cannot be printe...

Page 114: ...anfold paper and for single sheet feeder operation To prevent erroneous selection of the single sheet paper source all sequences referring to the single sheet feed er can be deactivated by setting the Single menu option to Off Select the Single menu 2 Setting options On Off Default setting Off Single On is the default setting for printer models with single sheet function Single Off must be selecte...

Page 115: ...g the Set 1 key Change to the next parameter group with the Next key 4 Setting for printing copy paper HvyForm If you set HvyForm ON the printer prints the same line twice at double strike This setting ensures that copy paper produces opti mum results Select the HvyForm menu 3 Setting options On Off Default setting Off With the Copy Draft NLQ and LQ print qualities the line is printed twice howeve...

Page 116: ...t head module The print head carriage moves once across the maximum possible printable area of the paper and stores the width measured in this process The measuring process varies depending on the paper source selected The measurement is made after power on and before the first print job after paper end and before the subsequent print job after changing the paper source e g from Tractor 1 to Tract...

Page 117: ...ctivate the APW function APW Off since otherwise the printout will be too narrow or there will be no printout at all In this case contact your service technician Confirm the setting by pressing the Set 1 key Automatic detection of the top paper margin AED This menu option only appears if a cut device is installed It corrects possible inaccuracies of the paper positioning at the cut edge if the pap...

Page 118: ...d digits leave the menu by press ing the Exit 4 key This setting is not reset by loading the default factory settings Asset number AssetN With the AssetN function you have the possibility to change the 10 digit asset number of the printer The number can be written with any ASCII character between hex 20 and hex 7E Select the AssetN 3 menu Setting options 10 digits of all ASCII characters hex 20 to...

Page 119: ...n a simple operat ing error and a major malfunction This chapter provides information on the rectification of faults with out the assistance of specially trained personnel Follow the advice and tips in this chapter if your printer is not working correctly Important notes on the care and maintenance of your printer can be found at the end of this chapter Repairs should only be performed by authoris...

Page 120: ...mpt to open the printer You might suffer an electric shock The display is lit but the printer does not print 1 Check that the printer is Online If the displays shows Offline then press the key Online Try to print again 2 Check the connection from the printer to the computer inter face cable Check that the interface cable is properly connected to the computer and to the printer Check that it is the...

Page 121: ...it off at the tear off edge the tear off edge is located at the outfeed for the fanfold paper 2 Press the key to transport the paper backwards 3 You may support the paper return feed by cautiously pulling the paper in the correct direction Before you replace the fanfold paper refer to the instructions in the section Loading paper page 37 You should pay special attention to the following points Ins...

Page 122: ... set like the printers in terface e g Switch Printer 100 MHz Full duplex 100 Full or Autosense Autosensing 3 Refer to the printers menu In the printout of the menu settings the actual connection link status is reported 4 The LED next to the RJ45 connector are indicating the link sta tus of the ETH INT green off no link green flash link orange off half duplex orange on full duplex Problem Correctiv...

Page 123: ...ctly connected to the com puter and to the printer 2 Check that the proper emulation and the correct character set country CG table or character set is selected in the Setup menu 3 Check the length of the interface cable see section Interface specifications page 127 4 Set CX bid in the advanced menu to Off see section Bidirectional parallel interface CX bid page 103 5 Check that the printer is pro...

Page 124: ...is blocked by a foreign object Whether the paper is damaged Whether the tractors are closed and locked Whether the paper is too tight or loose Whether the paper is within the specified range Details see section Loading paper page 37 alternating with The paper has run out during operation 1 Printer is switched on but no pa per is loaded in the displayed active paper compartment 2 The paper is not f...

Page 125: ... via the optional serial interface Compare the interface configu ration of your printer with the settings of your computer pro tocol see Interfaces page 157 Check the cable if necessary replace it The cable exceeds the maxi mum allowed length see Interface specifications page 127 Transmission error serial inter face Compare the format setting of your printer with the setting of your computer Check...

Page 126: ...ly to the left Check if the setted paper width in your driver and application If this message appears although the loaded paper is wide enough please contact your technical ser vice The printer prints at lower speed No action required When this message comes up even in a cold printer please contact your technical service Only if an automatic cutting device is installed No standard paper transport ...

Page 127: ...ce The ribbon misses is damaged and blocked or a non genuine rib bon is installed Only use genuine ribbon cas settes of the manufacturer During the process of ini tialization after powering on the printer checks if a ribbon cassette is installed It also checks during the execution of a print job the operative ness of the ribbon cas sette These functions mandatory require the use of the manufacture...

Page 128: ...quired Functions which have no meaning in this emulation have been selected For this function please switch to the appropriate emulation in the menu see Selecting emula tion Emulate page 64 You are informed when the fanfold paper is in the park position No action required Note for the operator to tear off the paper automatically positioned at the tear off edge Tear paper off Paper is not available...

Page 129: ...he printer especially the sliderails and shafts Replacing the fuse The printer is provided with a line fuse accessi ble from the exterior Press the fuse cover slightly inwards with a screwdriver and turn it until the cover tab comes out through the re cess in housing Then remove the fuse Install the fuse in reverse order of steps Only use the same type of fuse for replacement The fuse ratings are ...

Page 130: ...ning agent and a soft lint free cloth Do not use abrasive cleaners Never use solvents Cleaning the interior Remove paper and dust with a soft brush Check that any paper has been removed from the tractors For optimal function of the print head the interior of the printer has to be as dust free as possible Clean the interior with a vacuum cleaner if necessary ...

Page 131: ...ribbon and ink re mains carefully from the platen Avoid touching parts and compo nents in the printer interior Ribbon Check whether the ribbon is worn or damaged The ribbon must be replaced if it is frayed see Changing the ribbon cassette page 17 and Error messages via the display page 114 The service life of the ribbon is 20 million characters STOP ...

Page 132: ...ning the upper friction Clean the rollers of the upper friction as neces sary with a mild cleaning agent and a soft lint free cloth Carriage shafts Carriage shafts must not be oiled or greased otherwise dam age will occur on the printer STOP ...

Page 133: ... cpi 12 x 08 571 cps 17 1 cpi 12 x 12 667 cps 20 0 cpi 12 x 10 533 cps 10 0 cpi 12 x 12 720 cps 12 0 cpi 12 x 10 900 cps 15 0 cpi 08 x 08 900 cps 15 0 cpi 12 x 08 515 cps 17 1 cpi 12 x 12 600 cps 20 0 cpi 12 x 10 CPQ Copy Print Quality 300 cps 10 0 cpi 24 x 12 360 cps 12 0 cpi 24 x 10 450 cps 15 0 cpi 16 x 08 450 cps 15 0 cpi 24 x 08 260 cps 17 1 cpi 24 x 12 300 cps 20 0 cpi 24 x 10 333 cps 10 0 c...

Page 134: ...ze Height Width 3 32 mm incl descenders 2 19 mm max 2 43 mm Fonts Standard High Speed Draft DPQ Copy Draft Courier Roman Sans Serif OCR A B Gothic Prestige Orator Souvenir all resident in NLQ and LQ DLL is standard Barcodes Stan dard 23 Large Character Printing LCP see Barcode page 152 Emulations MTPL Genicom ANSII Epson LQ2550 LQ2170 IBM XL 24 others on request Resolution 60 to 360 dpi horizontal...

Page 135: ... Approvals ISO 60950 CE GOST VDE GS CB cULus FCC B CCC Energy Star Dimensions Width Height Depth 624 mm 280 mm 432 mm Weight 20 7 kg Paper feed Feed speed Feed first line View position Reverse motion 10 sec 6 lpi 35 ms 10 sec Up to max form length 22 inch Printhead gap Standard Automatic gap adjustment Paper transport Standard Tractor 1 with parking position Tractor 1 with parking position Tractor...

Page 136: ...mperature Rel humidity Climate Storage Temperature Rel humidity Climate Transport Temperature Rel humidity Climate 10 to 35 C 15 to 75 IEC EN 60721 3 3 class 3K2 5 to 45 C 5 to 95 IEC EN 60721 3 1 class 1K3 20 to 60 C 5 to 95 IEC EN 60721 3 2 class 2K2 2365 2380 2365MC ...

Page 137: ...cc IEEE Std 1284 1294 Voltage supply of external devices on pin 18 U 5 V 10 I 0 5 Amax Interface connections Printer side Amphenol 57 40360 36 pin or compatible Cable side Amphenol 57 30360 25 pin or compatible Ethernet interface Onboard 10 100BaseT Ethernet RJ45 with 2 LEDs Transmission rate 100 Mbps Full Duplex Supported protocoles TCP IP Network print protocoles LPR LPD RAW Port IP address desi...

Page 138: ... m2 0 28 mm 76 to 406 mm 76 to 459 mm Sets of forms Sets of forms may be used only if the top edge is bound The binding edge should be as soft as possible A wavy binding edge may hamper the smooth feeding of these sets Multi part forms must be loaded with the bound top edge down Multi part forms should be tested for suitability Paper quality Light pulp paper of medium fine quality paper bearing th...

Page 139: ...sequences Note that MTPL sequences are available in all emulation modes The following example shows you how to find the hexadecimal value for a character from the symbol set tables Informations about supported character sets can be found on our Internet site in the Support section B hex 0 1 2 3 4 dec 0 NUL SP 0 16 32 48 64 1 1 17 33 49 65 2 2 18 34 50 66 3 3 19 35 51 67 ASCII B hex 42 dez 66 ...

Page 140: ... 229 245 6 ACK 6 22 38 54 70 86 102 118 134 150 166 182 298 214 230 246 7 BEL 7 23 39 55 71 87 103 119 135 151 167 183 199 215 231 247 8 BS HTS 8 24 40 56 72 88 104 120 136 152 168 184 200 216 232 248 9 HT 9 25 41 57 73 89 105 121 137 153 169 185 201 217 233 249 A LF VTS 10 26 42 58 74 90 106 122 138 154 170 186 202 218 234 250 B VT ESC PLD CSI 11 27 43 59 75 91 107 123 139 155 171 187 203 219 235...

Page 141: ...cter sets 131 MTPL international substitution characters dec 35 36 64 91 92 93 94 96 123 124 125 126 hex 23 24 40 5B 5C 5D 5E 60 7B 7C 7D 7E US ASCII UK ASCII Swedish German Portuguese French Italian Spanish Norwegian ...

Page 142: ...1 67 83 99 115 4 4 20 36 52 68 84 100 116 5 ENQ NAK 5 21 37 53 69 85 101 117 6 ACK 6 22 38 54 70 86 102 118 7 BEL 7 23 39 55 71 87 103 119 8 BS 8 24 40 56 72 88 104 120 9 HT 9 25 41 57 73 89 105 121 A LF 10 26 42 58 74 90 106 122 B VT ESC 11 27 43 59 75 91 107 123 C FF 12 28 44 60 76 92 108 124 D CR 13 29 45 61 77 93 109 125 E SO 14 30 46 62 78 94 110 126 F SI 15 31 47 63 79 95 111 127 ...

Page 143: ...1 67 83 99 115 4 4 20 36 52 68 84 100 116 5 ENQ NAK 5 21 37 53 69 85 101 117 6 ACK 6 22 38 54 70 86 102 118 7 BEL 7 23 39 55 71 87 103 119 8 BS 8 24 40 56 72 88 104 120 9 HT 9 25 41 57 73 89 105 121 A LF 10 26 42 58 74 90 106 122 B VT ESC 11 27 43 59 75 91 107 123 C FF 12 28 44 60 76 92 108 124 D CR 13 29 45 61 77 93 109 125 E SO 14 30 46 62 78 94 110 126 F SI 15 31 47 63 79 95 111 127 ...

Page 144: ... X X X X X X X Spanish 5A X X X X X X X X X X X X X Portuguese 4C X X X X X X X X X X X X X E US ASCII 00 X X X X X X X X X X X X X E France 01 X X X X X X X X X X X X X E German 02 X X X X X X X X X X X X X E UK 03 X X X X X X X X X X X X X E Denmark I 04 X X X X X X X X X X X X X E Sweden 05 X X X X X X X X X X X X X E Italy 06 X X X X X X X X X X X X X E Spain I 07 X X X X X X X X X X X X X E J...

Page 145: ...e 866 8E X X X X X 866 Bulgaria 9D X X X X X Siemens Turk 9B X X X X X DEC Turkish 9C X X X X X Table 125 70 X X X X X Table 1251 71 X X X X X Table 1252 72 X X X X X X X X Table 1253 73 X X X X Table 1254 74 X X X X X ISO 8859 1 25 X X X X X X X X X X X X X ISO 8859 1 SAP 2B X X X X X X X X X X ISO 8859 2 26 X X X X X ISO 8859 5 2A X X X X X ISO 8859 7 2D X X X X ISO 8859 9 2E X X X X X ISO 8859 ...

Page 146: ...9 X X X X X 2 3 4 865 Hebrew 9A X X X X X 2 3 4 CP775 Baltic A6 X X X X X CP1257 Baltic 77 X X X X X Mazovia Poland 92 X X X X X Kamenicky Czech 91 X X X X X CP866 Ukraine 8F X X X X X CP 866 Kazakh stan 90 X X X X X ID1 High Speed Draft Draft Copy Roman Sans Serif Courier OCR B OCR A Prestige Script Orator Gothic Sou venir 1 for ESC RESC 1 only in 10 and 12 cpi 1 as with Sans Serif 2 as with Roma...

Page 147: ...ing transmitted code is a printer command and not a printable character They allow the selection of printer functions or the changing of print er parameters from the computer By transmitting an escape se quence you are able to change the previously set configuration of the printer e g character set This chapter contains an introduction into the sequences and control codes which are used by your pr...

Page 148: ...ction Unlike escape sequences control codes do not begin with the ESC control code Instead they consist of special single charac ter non printing commands e g LF FF DC2 The procedure Most of the printer functions can be selected with control sequences ESC sequences For this purpose the signal character ESC fol lowed by the specific sequence must be transmitted from the com puter to the printer The...

Page 149: ...n must correspond to the printer driver of your application program Settings caused by ESC sequences remain valid until they are switched off by another control code All settings are reset to the original menu when the printer is switched off MTPL As the emulations do not cover the entire scope of your printer a new printer language which is adapted to this printer model has been created Using MTP...

Page 150: ...C2 Condensed printing OFF set by Sl or ESC Sl DC3 Deselecting the printer DC4 Double wide printing OFF set by SO or ESC SO DEL Delete line Epson Delete last character ESC Start character for programming sequence ESC n Print mode selection ESC Bit 8 unchanged ESC n1 n2 Perform absolute horizontal step ESC 0 0 Select ROM character generator ESC 1 0 Select download generator ESC 1 n1 n2 Graphics prin...

Page 151: ...g the page length ESC MI F Assign character set G0 ESC G Selecting graphics mode ESC H Character set Swedish Finnish ESC K Character set German ESC L Character set Portuguese ESC R Character set French ESC U Setting positioning units in n 3600 inch ESC V Absolute vertical printing position ESC Y Character set Italian ESC Z Character set Spanish ESC MI F Assign character set G1 ESC 0 n1 n2 Set grap...

Page 152: ...tering OFF ESC A n1 n2 Fast graphic print 90 dpi vertical ESC B n1 n2 Fast graphic print 180 dpi vertical ESC z Bold ON ESC z Bold OFF ESC 1 MTPL command set ESC 10 Barcode interpretation OFF ESC 11 Start barcode interpretation ESC 4 MTPL IBM Proprinter 24 command set ESC 50h Selecting character sets with 256 characters ESC 50l Selecting character sets with 94 characters ESC 51h Proportional fonts...

Page 153: ...or HS printing quality ESC 0z Superscript ON ESC 10m Font 0 Default Draft or HS Roman ESC 10y Right and centre adjustment OFF ESC 10z Microscript ON ESC 11e Set PUM absolute measuring unit to OFF ESC 11h Set PUM absolute measuring unit to ON ESC 11m Font 1 Default HS Courier ESC 11w Set 20 cpi ESC 11y Select print quality Draft or HS ESC 12m Font 2 Default HQ Courier ESC 12 SP K Set horizontal pit...

Page 154: ...1m Double underlining ESC 23m Italics OFF ESC 24m Underline OFF ESC 26m Proportional font ON ESC 2g Clear all horizontal tabs in the current line ESC 2J Print page ESC 2 SP l Measuring unit decipoint ESC 2 SP k Printout in Kix barcode ESC 2 SP L Set vertical spacing to 3 lpi ESC 2 SP X Print quality low HS ESC 2w Set 7 5 cpi ESC 2y Proportional font ON ESC 2z Double height OFF ESC 2z Superscript s...

Page 155: ...ESC 5n Request status report ESC 5w Set 12 cpi ESC 5y NLQ or HS with 12 cpi ESC 5z Graphics normal ESC 6 Initialize the printer ESC 6 SP K Set horizontal pitch to 6 cpi ESC 6w Set 15 cpi ESC 6z Graphics inverted ESC 7w Set 17 1 cpi ESC 7y Proportional font OFF ESC 7z Bit 8 unchanged ESC 8w Reset double stroke ESC 8y Right justification ON ESC 8z Set bit 8 0 ESC 9 SP L Set vertical spacing to 2 lpi...

Page 156: ...character size ESC n1 n2 SP D Select font ESC n1 n2 SP G Set character line spacing ESC n1 n2 r Set top and bottom margin ESC n1 n2 s Set left and right margin ESC n a Set relative horizontal position ESC n d Set absolute vertical position ESC n e Set relative vertical position ESC n j Relative horizontal position back to the left ESC n k Relative vertical position back to the top ESC n p Set HMI ...

Page 157: ...haracter set 2 expanded ESC 7 Suppress ASCII codes 129 to 159 ESC 7 PC character set 1 standard ESC a n Select orientation ESC A n Line spacing n 60 inch ESC A n Prepare line spacing n 72 inch ESC b m 0 Clear all tabs ESC b m n 0 Set vertical tabs in channels ESC B 0 Clear all vertical tabs ESC B n1 n16 0 Set vertical tabs ESC B n1 n64 0 Set vertical tabs ESC c Reset to initialisation status ESC c...

Page 158: ...h ESC J n Single line feed n 216 inch ESC k n Select font ESC K n1 n2 Set graphics print to 60 dpi ESC l n Set left margin ESC l n Select print mode ESC L n1 n2 Set graphics print to 120 dpi ESC M Set character pitch to 12 cpi Elite ESC n Character generator LS2 ESC N n Set perforation skip ESC o Character generator LS3 ESC O Reset perforation skip ESC p n Proportional font ON OFF ESC P Set charac...

Page 159: ...t left and right margin ESC Y n1 n2 Set graphics print to 120 dpi ESC Z n1 n2 Set graphics print to 240 dpi ESC F Assign character set G3 ESC Character generator LS3R ESC Character generator LS2R ESC Character generator LS1R FF Form feed HT Horizontal tab jump HTS Set tab stop at actual horizontal position IND Line feed without CR LF Line feed NEL Line feed with CR PLD Half step line feed PLU Half...

Page 160: ...U Partial Line Up ESC M or RI Reverse Index ESC P data or DCS Enter Dot Graphics Mode Device Control String ESC p1 pn Sets bar code parameters GENBC ESC p1 pn m Select Graphics Rendition SGR Character Pitch Print Modes and Color Ribbon color ESC p1 p2 SP B Graphic Size Modification GSM ESC p1 p2 s Left Right Margin Set GENSLR ESC p1 pn u Sets horizontal tab stops at specified positions Multiple Ho...

Page 161: ... Select Graphics Mode Density GENGRM ESC p1 t Special Print Mode Oversize Expanded Bar code Mode GENSPM ESC p1 p2 f Horizontal and Vertical Position Absolute HVP ESC p1 e Vertical Position Relative VPR ESC p1 pn p Assign Source for Forms GENASF ESC p1 x Selects National character set Select National Characters GENSNC ESC p1 p2 SP Cut paper at current position ETX End of transmission FF Form Feed H...

Page 162: ... control sequence Header defines the parameters of the used barcode once e g type ratio etc If no header is defined the in formation in the bracket will be printed in Code 2 5 Matrix Please note that within the Barcode environment the barcode commands have priority in case of conflicts with the emula tion Additional information is provided in the Barcode Program mer s Applcaton Manual on this CD R...

Page 163: ... Royal Mail Customer barcode is a special Mail type barcode It is printed in character size Numeric values from 0 to 9 and alpha numeric values from A to Z are printable After activating this barcode type numeric characters from 0 hex 30 to 9 hex 39 and alphanumeric values from A hex 41 to Z hex 5A are interpreted as barcode figures Lower cases from a hex 61 to z hex 7a are automatically converted...

Page 164: ...rints barcode in LQ The character e g CR carriage return hex 0D which termi nates the barcode is not printed or carried out KIX barcode does not require a barcode bracket Example ASCII ESC 2 k SO36XY1A CR HEX 1b 5b 32 6b 53 4f 33 36 58 59 31 41 0D The characters SO36XY1A are printed as KIX stripes USPS Intelligent Mail barcode The USPS Intelligent Mail barcode is a 4 state barcode which works in M...

Page 165: ...nal characters are available The character sets are selected via the following LCP sequence ESC P L S n ESC The value of n may range between 01 and 02 as ASCII characters see ID column in the above table To select e g the german character set you must use the following data set The printout of LCP characters can be selected in all of the emulations Prerequisite Printer must be in Barcode mode Note...

Page 166: ... LCP character set ESC n SP s Sends a character as ASCII character n 0 255 decimal ESC 20 SP s DC4 Barcode bracket ESC 16 SP s DLE Start code LCP Header ESC 25 SP s EM Termination code Header ESC 15 SP s SI LCP bracket ESC 26 SP s SUB Start code Barcode Header ESC 1 SP p US Postnet Barcode ESC 1 SP k Royal Mail Customer Bar code ESC 2 SP k Kix Barcode ESC 9 SP k USPS Intelligent Mail Bar code Head...

Page 167: ...is monitored by the printer If the printer is con figured to use all interfaces simultaneously it monitors all interfaces for incoming data As soon as the printer recognizes a signal it switches to the respective interface and sends the BUSY signal to the other interfaces After finishing the data transmission the printer remains switched to this interface for a certain period of time 30 seconds Wh...

Page 168: ... data input is blocked until the data buffer is empty This guarantees data transmission in blocks of 1 KB Connector assignment Transmission length max 2 0 m Connector no Direction Printer PC Signal 1 STROBE active low 2 DATA 1 3 DATA 2 4 DATA 3 5 DATA 4 6 DATA 5 7 DATA 6 8 DATA 7 9 DATA 8 10 ACK active low 11 BUSY 12 PAPER EMPTY PE 13 SELECT 14 AUTO FEED active low 15 not used 16 SIGNAL GROUND 17 ...

Page 169: ...Duplex Supported operating systems Windows XP Windows Server 2003 Windows 2000 Windows NT Linux Unix Sun Solaris Supported protocols SNMP SMTP TCP IP lpr lpd Port 9100 Designation of IP address DHCP BOOTP Static manually via the printer s control panel Configuration HTTP TCP IP Status SNMP TCP IP SMTP PING Management Web Panel HP Web Jet Admin E Mail notification with SMTP TGNet Admin Pre string P...

Page 170: ...nd or make any changes The assumed address space corresponds to the TCP IP adress class C 192 168 1 xxx The subnet mask to be used is 255 255 255 0 The address of the router or gateway is 0 0 0 0 if not available Example of a printer connected to a computer in an Ethernet Example of several devices in an Ethernet You will find more information on our internet page STOP Caution Twisted pair cable r...

Page 171: ...grounding Connector assignment Transmission length max 15 m Type RS232C interface Synchronization Asynchronous Transmission rate 600 Baud to 19 200 Baud Signal status OFF log 1 3 V to 15 V ON log 0 3 V to 15 V Connection cable up to 15 m length Interface connections ITT Cannon connector series DB 9 S Transmission protocol XON XOFF ENQ STX READY BUSY Robust XON XOFF ETX ACK Capacity of data buffer ...

Page 172: ...RDY is active at pin 4 Input signals Output signals PC AT 9 pin Printer 9 pin RxD 2 3 TxD TxD 3 2 RxD CTS 8 4 DTR RDY SG 5 5 SG DSR 6 DTR 4 PC AT 25 pin Printer 9 pin FG 1 FG TxD 2 2 RxD RxD 3 3 TxD CTS 8 4 DTR RDY SG 5 5 SG DSR 6 DTR 4 Signal Function CTS Clear to Send DSR Data Set Ready RxD Receive Data Signal Function DTR Data Terminal Ready RTS Request to Send READY Ready to receive data TxD T...

Page 173: ...n can be continued In addition the READY signal is influenced by the status of the print er On Off Line If the printer assumes an undefined state the inter face also signals NOT READY and XOFF Memory mode Robust XON XOFF Robust XON XOFF is similar to XON XOFF However the state of the printer XON or XOFF is also periodically transmitted via the TxD line in the case of Robust XON XOFF Extended menu ...

Page 174: ...tream and control the interface in ad dition HandThr OFF The STX and ENQ are filtered out of the data stream and handled immediately by the interface ETX ACK protocol ETX hex03 Block end character ACK hex06 Acknowledgement informing the host that further data may be transmitted XON XOFF This protocol is used in addition to data flow con trol and printer status handling HandThr ON An ETX is not ack...

Page 175: ...ou can set any intermediate format Part no 061 052 Autocut facility An additional module for automatic cutting cannot be used in con junction with the automatic cut sheet feeder ASF R Part no 061 907 Printer pedestal A cabinet to be used as a printer stand and for storing fanfold paper stacks Part no 061 910 ESD brush ESD brush to be installed on top friction contact your service technician Part n...

Page 176: ...ace module RS 422 048 956 Serial interface module TTY 20 mA line current 048 957 Adapter cable from 9 pin to 25 pin connector for RS 232 interface 047 995 Serial interface module RS 232C Sub D 9 pin f connector 070 228 Ethernet interface module 10 100 Mb s compatible to TallyCom Pocket I F multi protocol 048 959 Ethernet interface module 10 100 IPDS 043 790 ...

Page 177: ...ng manuals are available You can down load the manuals from our internet page Name Part no Ribbon cassette black 062 471 Name Part no Programmer s application manual MTPL in English 379 298 Programmer s application manual Barcode in English 379 300 Programmer s application manual Epson in English 379 302 Programmer s application manual Genicom ANSI in English GEK 1064 ...

Page 178: ......

Page 179: ... gap 100 Line wrap 103 Paper handling 100 Serial number 108 Setting for printing copy paper 105 Settings for paper with dark back 105 AED 107 AGA 99 APW 106 Asset number 108 AssetN 108 AutoASF 89 Auto CR 77 Autocut facility 165 Auto LF 77 Automatic carriage return Auto CR 77 Automatic detection of the top paper margin AED 107 Automatic gap adjustment AGA 99 Automatic line feed Auto LF 77 Automatic...

Page 180: ... codes 138 140 Control panel 29 Programming via 53 Country 76 CPI 62 CX bid 103 D Data format Format 66 Data transmission rate Baud 65 Deactivate single sheet feeder Single 104 Display 30 Display messages 118 DTR 69 E Emulate 64 Emulations 137 Escape sequences 137 General 137 ENQ STX 164 ErrMode 67 Error handling ErrMode 67 Error messages via the display 114 Escape sequences 137 139 MTPL 138 ESCCh...

Page 181: ...nistration 73 IP Get M 73 K Key functions when turning on the printer 35 KIX barcode 154 L Language 78 Selecting 56 LC display 30 33 LC printing 155 Line length 84 Line wrap Wrap 103 Loading menu configurations Menu 59 Loading optional firmware 27 Loading paper 37 Loading paper into the rear tractor 48 LPI 62 M Maintenance 119 Ribbon 121 MenLock 78 Menu 53 59 Advanced 91 Calling up 53 Enabling acc...

Page 182: ... interfaces 65 Signal feedback 68 Signal processing 69 Skipping perforation 63 Slashed zero 76 Tear position 83 Transparence 68 View position 83 Menu settings Example 90 Menu structure 58 Messages in the LC display 33 MTPL sequences 138 MTPL standard character set 130 MTPL international substitution characters 131 N National character set Country 76 Normal characters and barcode Barmode 85 O OCR A...

Page 183: ...NQ STX 164 Robust XON XOFF 163 XON XOFF 163 Q Quietm 60 Quietmode 60 R Rear tractor loading paper 48 selecting 50 Rear tractor paper path 47 Remote 68 Removing paper 42 Replacing the fuse 119 Reset 60 Reset to default values Reset 60 Ribbon Service life 121 Ribbon cassette 11 changing 17 Installing 11 Ribbon cassettes 167 Robust XON XOFF 163 Rolling ASCII 92 Royal Mail Customer barcode 153 S Save ...

Page 184: ... Remote 68 Signal processing DTR 69 Single 104 Skip 63 Skipping perforation Skip 63 Sl Zero 76 Slashed Zero Sl Zero 76 Sound 104 Special 67 Specifications 123 Interface specifications 127 Subnet 72 Switching on the printer 10 T Tear position 41 Tear position AutoTear 83 Terminating Setup mode 57 Test functions 91 Interface test 94 Printer self test 92 TOF Setting the first printing line 45 Tractor...

Page 185: ...erent form requires our explicit approval We reserve the right to make changes to this manual without notice All care has been taken to en sure accuracy of information contained in this manual However we cannot accept responsibility for any errors or damages resul ting from errors or inaccuracies of information herein ...

Page 186: ... Road Basingstoke Hampshire RG24 8PD England U K Phone 44 870 872 2888 Fax 44 870 872 2889 http www tallygenicom co uk CANADA TallyGenicom 125 Traders Boulevard 9 Missisauga Ontario L4Z 2E5 Canada Phone 1 905 8904646 Fax 1 905 8904567 http www tallygenicom com MALAYSIA TallyGenicom Sdn Bhd Wisma KT Suite 3 02 No 14 Jalan 19 1 46300 Petaling Jaya Selangor Darul Ehsan Malaysia Phone 3 7625 1988 Fax ...

Reviews: