background image

USB Cable Connection


The  Aeolus-Sense  PRO  comes with a USB connector at the front panel of the device, which 
connects it to the smart mobile device that is used as display. USB cable connection confirms 
secure communication under  any conditions and also facilitates charging of the smart mobile 
device. 


Please note that in USB Cable connection, the smart mobile device is charged by the 
AEOLUS-SENSE PRO; accordingly, battery-life of the latter will be reduced if not 
connected to an external power source (e.g. cigarette lighter)

 
After connection of AEOLUS-SENSE PRO to the smart mobile device has been established, 
please follow the same steps as when connecting the latter device to a computer. You must 
permit the device to  connect to unknown sources and press allow when asked, if you trust the 
connection to the AEOLUS-SENSE PRO. 
 
Please note that due to limitations of the GDL90 communication protocol, ADSB works only 
with the wifi connection. 
 

IMPORTANT: before connecting the smart mobile device with the cable-adaptor, you 
must turn off the WiFi connection to the AEOLUS-SENSE PRO. 
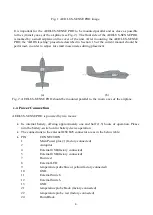


Wifi Connection


AEOLUS-SENSE PRO  creates  a  wifi  network  that is used  to  connect  a smart  mobile  device.  The 
SSID of AEOLUS-SENSE PRO wifi  network  is  “AEOLUS  XXXXXXXXX”  where  X  is  a  unique 
alphanumeric  string. Up to ten (10) smart mobile devices can be simultaneously connected via wifi to 
an AEOLUS-SENSE PRO. 
 

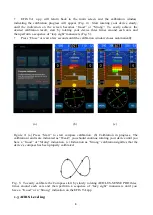
  1.4 Compass Calibration


Before  start  using  your  AEOLUS-SENSE PRO,  the device’s  compass should be calibrated. 
This  only  needs  to  be  done  once.  For  that,  the  AEOLUS-SENSE PRO  has  to  be  powered  up 
and  the  EFIS  TA  app  must  be  running  on  a connected (see above) smart  mobile  device. Please 
note that compass calibration must be performed with the  aircraft in a parking position on the 
ground, and never during a flight. Moreover, this calibration procedure must be performed with 
the AEOLUS-SENSE PRO as close as possible to the final installation position in order to 
compensate for parasitic magnetic  fields.  The exact steps for compass calibration are outlined 
below: 


• 

Power up your device  

• 

Connect  your  smart  mobile  device  (iOS  or  Android)  to  the  AEOLUS-SENSE PRO  wifi 

Network (no password needed). 

• 

Start the EFIS TA  app on the smart mobile device. 

• 

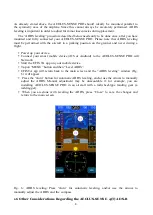
 Tap on “MENU” button and then “Compass Calib”.  

• 

A notification window will pop up, informing you that the calibration procedure is about 

to  start.  Press  “Start”  to  continue. 

Summary of Contents for AEOLUS-SENSE PRO

Page 1: ...operation Please read the current manual prior to using AEOLUS SENSE PRO and keep it for future reference Correct operation of the AEOLUS SENSE PRO requires that one or more mobile smart device s iOS or Android are connected to the device ΑTTENTION We update the application EFIS TA and the firmware of our units when necessary to ensure the best performance of our devices This procedure is automati...

Page 2: ...US SENSE PRO 3 1 2 Power Connection 4 1 3 Software EFIS TA app 5 1 4 Compass Calibration 7 1 5 AHRS Leveling 8 1 6 Other Considerations Regarding the AEOLUS SENSE 4 T ADS B 9 2 AEOLUS SENSE PRO Maintenance 10 3 Use Limitations and Abnormal Operation 10 Support 10 ...

Page 3: ...ig 1 should be mounted in a convenient dry place as far away as possible from heat sources A suitable mounting location is the top of the instrument panel You can mount the unit by means of double sided adhesive tape or Velcro Please ensure that the unit doesn t move during flight Must be connected to the native pitot static using two 1 8in BSP to your hoses adaptors The AEOLUS SENSE PRO comes tog...

Page 4: ...ounted parallel to the main axes of the airplane 1 2 Power Connection AEOLUS SENSE PRO is powered by two means Its internal battery offering approximately one and half 1 5 hours of operation Please turn the battery switch on for battery device operation The connections to the external DSUB25 connector are as in the below table PIN CONNECTION 1 Main Power plus factory connected 2 Autopilot 4 Extern...

Page 5: ...O will continue its operation after a short reboot please make sure you reconnect to the AEOLUS SENSE PRO WiFi network Please note that in the latter case i e power failure and operation on the internal battery tethered connection see below section 1 3 paragraph USB Cable Connection to the smart mobile device smartphone or tablet will not work and you must enable the wifi connection Important Note...

Page 6: ...o power failure battery switch in off position EFIS TA app switches automatically to standalone mode and the message reappears Accordingly the pilot may continue using EFIS TA app with the internal sensors of the smart mobile device as a backup even in case of power failure From the main screen of the EFIS TA app interface you can tap on MENU button and navigate to sensor status window and check t...

Page 7: ...nection AEOLUS SENSE PRO creates a wifi network that is used to connect a smart mobile device The SSID of AEOLUS SENSE PRO wifi network is AEOLUS XXXXXXXXX where X is a unique alphanumeric string Up to ten 10 smart mobile devices can be simultaneously connected via wifi to an AEOLUS SENSE PRO 1 4 Compass Calibration Before start using your AEOLUS SENSE PRO the device s compass should be calibrated...

Page 8: ... seconds until the calibration window closes automatically a b c Figure 4 a Press Start to start compass calibration b Calibration in progress The calibration results are indicated as Weak you should continue rotating your device until you have a Good or Strong indication c Indication as Strong calibration signifies that the device s compass has been properly calibrated Fig 5 To easily calibrate t...

Page 9: ...ice iOS or Android to the AEOLUS SENSE PRO wifi Network Start the EFIS TA app on your mobile device Tap on MENU button and then Level AHRS EFIS TA app will return back to the main screen and the AHRS leveling window Fig 6 will appear Press the Auto button for automatic AHRS leveling and or use the arrows to manually adjust the AHRS Manual adjustment may be unavoidable if for example you are instal...

Page 10: ...llows Temperature range 20C to 65C or 4F to 149F Operation Voltage 10 32Vdc Operation Current for model 4 ADS b 0 5A for model 4T ADS B max 4A during tablet charging Please use a fuse of 10A Inflight power reset in case of inflight power reset or if you turn on the unit during the flight after losing your main systems please note that there is no limitation or constraint of attitude for correct op...

Page 11: ... For support via email please contact support talosavionics com For voice support please call USA 1 309 874 4227 Europe 30 2815 304480 For general questions feedback please contact info talosavionics com ...

Reviews: