NAMES AND FUNCTIONS
OF PARTS
a
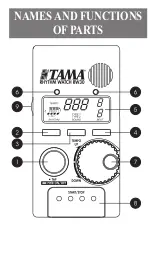
POWER/TAP key
This key is assigned power-on/off and tap
tempo function. When you turn the power
on/off, press this key for approximately 2
seconds. TAP function starts working and
measuring tempo automatically when this
key is pressed at least 5 times.
b
RHYTHM key
RW30 has 6 kinds of rhythm. Rhythm
selection is shown on LCD.
c
SOUND key
This selects a sound, TYPE 1 or TYPE 2.
d
BEAT key
The beat can be set within a range from 0
to 9 beats. The number of beats shift by an
increment of one each time the BEAT key
is pressed.
e
LCD (liquid crystal display)
This displays the values set for the
“RHYTHM,” “SOUND,” “BEAT,” and
“TEMPO” parameters.
f
TEMPO LEDs
The left LED flashes red in time with the
initial beat. The right LED flashes green
in time with the second and after beats. If
the beat setting is 0, the right LED flashes
green also in time with the initial beat.
If the beat setting is 1, only the left LED
flashes red.
g
TEMPO dial
This is used to control the tempo between
=30 ~ 250/minute.
h
START/STOP key
This key starts and stops the metronome.
i
VOLUME control
This is used to control the overall volume.
j
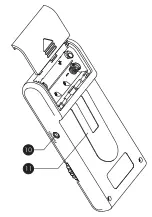
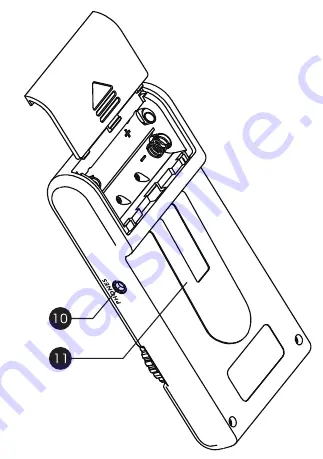
PHONES jack
This is the stereo mini jack for headphones.
When connected, no sound is produced
from the RW30’s speaker.
k
Belt Clip
This offers you to clip RW30 to belt. Also
can set it on music stand etc.
OPERATION
Metronome Operation
1.
Press the RHYTHM key and select a
rhythm.
2.
Press the SOUND key and select either
TYPE 1 or TYPE 2. The TYPE 1 and
TYPE 2 have different voicings, so se
-
lect whichever mode is appropriate for
the usage conditions.
3.
Set the tempo using the TEMPO dial,
and the beat using the BEAT key.
4.
Pressing the START/STOP key starts
the metronome. Sound is produced
from the speaker, and the LEDs begin
flashing.
5.
While listening to the sound produced,
adjust the overall volume by using side
VOLUME control.
6.
Pressing the START/STOP key again to
stops the metronome.
Operating the tap function
The tap function lets you measure any
desired tapped tempo and applies to the
tempo of metronome.
1.
Enter the tempo by pressing the TAP
key with following rhythm. At the
moment you tap 5 times, the measured
tempo is displayed.
2.
When you tap 6 times or more, it dis
-
plays average tempo of the last 4 taps.
3.
If you don’t push the TAP key for
approximately 2.5 seconds, tempo mea-
surement will finish and tempo value
on the LCD display flashes.
4.
If the measured tempo exceeds the
range of
= 30 ~ 250/minute, error
messages are displayed. If the tempo
is lower than 30, message “Lo” will be
displayed and tempo is set 30 automat-
ically. If the tempo is higher than 250,
message “Hi” will be displayed and
tempo is set 250 automatically.
各部の名称
a
POWER/TAP スイッチ
電源のオン / オフと、TAP ボタンとし
て機能します。電源をオン / オフする際
は、約2秒間長押ししてください。
b
RHYTHM スイッチ
発音させたいリズム ( 音符 ) を、6種類
搭載しています。画面に表示される音符
から 1 つを選んでください。
c
SOUND スイッチ
TYPE1 もしくは TYPE2 のどちらかの
音色を選択します。
d
BEAT スイッチ
0拍子から9拍子の範囲で拍子を設定し
ます。BEAT スイッチを押すと、ビート
(拍子)が1つずつ増えます。
e
LCD (液晶ディスプレイ)
RHYTHM/SOUND/ BEAT/TEMPO
の設定値を表示します。
f
テンポ LED
左側は常に1拍目のみで赤色に、右側は
2拍目以降に合わせて緑色に点滅しま
す。(0 拍子に設定すると、1拍目も右
側が緑色に点滅します。1 拍子に設定す
ると、左側のみが赤色に点滅します)
g
TEMPO ダイヤル
テンポの速さを = 30 ~ 250/ 分の
範囲でコントロールします。
h
START/STOP スイッチ
メトロノームをスタート / ストップさせ
ます。
i
VOLUME コントロール
音量をコントロールします。
j
PHONES ジャック
ヘッドフォンを接続するステレオミニ
ジャックです。
(接続時、RW30 のスピー
カから音は出ません。)
k
ベルトクリップ
ベルトなどへの取り付けに便利なベルト
クリップが付いています。譜面台にセッ
トすることも可能です。
操作方法
メトロノームの操作方法
1. RHYTHM スイッチで、リズムを選択し
ます。
2. SOUND スイッチで TYPE1 または
TYPE2 を選択します。使用する状況
に適した音を選択してください。
3. TEMPO ダイヤルでテンポを設定し、
BEAT スイッチでビート(拍子)を設定
します。
4. START/STOP スイッチを押すとメト
ロノームがスタートし、音が出力され
LED が点滅を始めます。
5. 音を聞きながら側面の VOLUME コン
トロールで音量を調節して下さい。
6. 再度、START/STOP スイッチを押す
とメトロノームが止まります。
タップ機能の操作方法
タップされたテンポを計測し、自動的に
メトロノームのテンポに適用する機能で
す。
1. 任意のテンポでリズムを取りながら、
TAP スイッチを続けて押します。5 回
押した時点で、ディスプレイに計測した
テンポを表示します。
2. 6 回以上押すと、最後の4回の平均テ
ンポを表示します。
3. 約 2.5 秒間 TAP TEMPO スイッチを
押さないと、ディスプレイ上のテンポ値
が点滅し、テンポの計測を終了します。
4. 計測したテンポが =30 ~ 250/ 分
の範囲を超えた場合はエラーメッセー
ジが表示されます。29 以下の場合
“Lo”
と表示された後、自動的に 30 になり
ます。251 以上の場合“Hi”と表示さ
れた後、自動的に 250 になります。
DESCRIPTION DES
FONCTIONS
a
Touche POWER/TAP
Cette touche est associée à la mise sous
ou hors tension et à la fonction TAP. Pour
allumer ou éteindre l’appareil, appuyer sur
cette touche pendant environ 2 secondes.
La fonction TAP commence la mesure du
tempo automatique lorsque l’utilisateur
appuie sur cette touche au moins 5 fois.
b
Touche RHYTHM
Le RW30 comporte 6 rythmes différents.
La sélection du rythme est indiquée sur
l’affichage à cristaux liquides.
c
Touche SOUND
Cette touche permet de sélectionner le son
TYPE 1 ou TYPE 2.
d
Touche BEAT
Le battement de la mesure peut être dé
-
fini dans une plage comprise entre 0 et 9
temps. Le nombre de battements augmente
par palier de un temps à chaque pression
de la touche BEAT.”
e
Affichage à cristaux liquide
Cet affichage indique les valeurs sélection
-
nées pour les paramètres “RHYTHM,”,
“SOUND,”, “BEAT,”, et “TEMPO”.
f
Témoins DEL de tempo
Le témoin DEL gauche émet un clignote
-
ment rouge sur le temps initial. Le témoin
DEL droit émet un clignotement vert sur le
deuxième temps et les suivants. Si la valeur
sélectionnée pour le temps correspond à 0,
le témoin DEL droit émet un clignotement
vert sur le temps initial également. Si la
valeur sélectionnée correspond à 1, seul le
témoin DEL gauche émet un clignotement
rouge.
g
Commande de tempo TEMPO
Cette commande permet de sélectionner
une valeur de tempo entre =30 ~ 250/
minute.
h
Touche START/STOP
Cette touche allume et éteint le métro
-
nome.
This is used to control the overall volume.
i
Commande VOLUME
Cette commande permet de régler le vo-
lume général.
j
Borne pour casque d’écoute
PHONES
Cette borne stéréo permet de connecter un
casque d’écoute. Lorsqu’un un casque y
est connecté, aucun son n’est produit par le
haut-parleur intégré du RW30.
k
Pince de ceinture
Cette pince permet de fixer le RW30 à une
ceinture. Elle permet également de fixer
l’appareil, par exemple à un pupitre.
FONCTIONNEMENT
Fonctionnement du métronome
1.
Appuyer sur le touche RHYTHM et
sélectionner un rythme.
2.
Appuyer sur la touche SOUND et
sélectionner TYPE 1 ou TYPE 2. Les
modes TYPE 1 et TYPE 2 diffèrent par
le son ; il convient donc de sélectionner
le mode adapté à l’utilisation.
3.
Définir le tempo à l’aide de la com
-
mande TEMPO et la mesure à l’aide de
la touche BEAT.
4.
Appuyer sur la touche START/STOP
pour activer le métronome. Le son
sera reproduit via le haut-parleur et les
témoins DELs’illumineront alternative
-
ment.”
5. Tout en écoutant le son produit, régler
le volume général au moyen de la com-
mande VOLUME, située sur le côté.
6.
Appuyer à nouveau sur la touche
START/STOP pour désactiver le métro-
nome.
Utilisation de la fonction TAP
La fonction TAP permet d’entrer un tempo
manuellement, et s’applique au tempo du
métronome.
1.
Définir le tempo en appuyant sur la
touche TAP selon le rythme suivant.
Taper 5 fois pour afficher le tempo me
-
suré.
2.
Si l’utilisateur tape 6 fois ou plus,
l’appareil affiche le tempo moyen des
4 dernières pressions.
3.
Si l’utilisateur n’appuie pas sur la
touche TAP pendant environ 2,5 se
-
condes, la mesure du tempo s’arrête et
la valeur du tempo clignote sur l’affi
-
chage à cristaux liquides.
4. Si le tempo mesuré dépasse la limite
de = 30 ~ 250/minute, plusieurs mes-
sages d’erreur s’affichent. Si le tempo
est inférieur à 30, l’appareil affichera le
message « Lo » et le tempo se définit
automatiquement sur 30. Si le tempo
est supérieur à 250, l’appareil affiche
le message « Hi » et le tempo se définit
automatiquement sur 250.
DIE
BEDIENUNGSELEMENTE
a
Taste POWER/TAP
Diese Taste ist mit der Funktion Ein-/Aus
-
schalten und Tap-Tempo belegt. Wenn Sie
ein- oder ausschalten möchten, drücken
Sie diese Taste etwa 2 Sekunden lang. Die
TAP-Funktion nimmt ihren Betrieb auf
und misst das Tempo automatisch, sobald
Sie diese Taste mindestens 5 Mal drücken.
b
Taste RHYTHM
Die RW30 verfügt über 6 unterschiedliche
Rhythmen. Die Auswahl der Rhythmen
wird am LCD eingeblendet.
c
Taste SOUND
Mit dieser Taste wählen Sie einen Ton aus,
TYPE 1 oder TYPE 2.
d
Taste BEAT
Der Takt kann in einem Bereich von 0 bis
9 Taktschlägen festgelegt werden. Die An
-
zahl der Taktschläge wechselt mit jedem
Druck auf die Taste BEAT anhand einer
Schrittgröße von eins.
e
LCD (Flüssigkristallanzeige)
Auf dieser Anzeige können Sie die Werte
der ParameterRHYTHM,, SOUND,,
“BEAT,, und TEMPO ablesen.
f
LED-Anzeigen TEMPO
Die linke LED blinkt rot im Takt mit dem
ersten Taktschlag. Die rechte LED blinkt
grün im Takt mit dem zweiten und dem
darauffolgenden Taktschlag. Wenn die
Einstellung des Taktschlages 0 ist, dannn
blinkt die rechte LED ebenfalls grün im
Takt mit dem ersten Taktschlag. Beträgt
die Einstellung des Taktschlages 1, blinkt
nur die linke LED rot.
g
Datenrad TEMPO
Hier kann das Tempo zwischen
=
30 und
250 BPM eingestellt werden.
h
Taste START/STOP
Diese Taste startet und stoppt das Metro-
nom.
i
Regler VOLUME
Hier wird die Gesamtlautstärke eingestellt.
j
Buchse PHONES
Das ist die Stereo-Minibuchse für die
Kopfhörer. Wenn diese in die Buchse
eingesteckt sind, ist der Lautsprecher der
RW30 abgeschaltet.
k
Gürtelclip
Damit können Sie die RW30 am Gürtel
befestigen. Sie können Sie ebenfalls am
Notenständer usw. befestigen.
BEDIENUNG
Bedienung des Metronoms
1.
Drücken Sie die Taste RHYTHM, und
wählen Sie einen Rhythmus aus.
2.
Drücken Sie die Taste SOUND, und
wählen Sie entweder TYPE 1 oder
TYPE 2 aus. Die Modi TYPE 1 und
TYPE 2 unterscheiden sich durch un
-
terschiedlichen Sound, wählen Sie also
die Betriebsart, die Ihrem Geschmack
oder Ihren Erfordernissen am besten
entspricht.
3. Stellen Sie das Tempo mit dem Daten-
rad TEMPO und das Taktmaß mit der
Taste BEAT ein.
4.
Mit der Taste START/STOP wird das
Metronom gestartet. Sie hören den
Klang aus dem Lautsprecher, und die
LEDs blinken.
5.
Stellen Sie, während Sie auf den Klang
hören, die Gesamtlautstärke mithilfe
des Reglers VOLUME ein.
6.
Durch erneutes Drücken der Taste
START/STOP stoppt das Metronom.
Bedienung der Tap-Funktion
Mit der Tap-Funktion können Sie jedes be
-
liebig gewünschte Tempo messen und dem
Tempo des Metronoms anpassen.
1. Geben Sie das Tempo ein, indem Sie
die Taste TAP anhand des folgenden
Rhythmus drücken. Das gemessene
Tempo wird in dem Moment angezeigt,
wenn Sie 5 Mal schlagen.
2.
Wenn Sie mehr als 6 Mal schlagen,
wird das durchschnittliche Tempo der
letzten 4 Schläge angezeigt.
3.
Wenn Sie die Taste TAP etwa 2,5 Se
-
kunden lang nicht drücken, wird die
Tempomessung beendet. Der Tempow
-
ert an der LCD-Anzeige blinkt.
4.
Falls das gemessene Tempo den Be
-
reich von
= 30-250 BPM unter- oder
überschreitet, wird eine Fehlermeldung
angezeigt. Wenn das Tempo unter 30
ist, wird die Meldung “Lo” angezeigt,
und das Tempo wird automatisch auf 30
festgelegt. Wenn das Tempo über 250
ist, wird die Meldung “Hi” angezeigt,
und das Tempo wird automatisch auf
250 festgelegt.
NOMI E FUNZIONI DEI
COMPONENTI
a
Tasto POWER/TAP
Questo tasto ha funzione di accensione/
spegnimento e funzione di tap tempo. Al
momento dell’accensione/spegnimento,
premete questo tasto per circa 2 secondi.
La funzione TAP inizia a funzionare e
misura automaticamente il tempo quando
questo tasto viene premuto almeno 5 volte.
b
Tasto RHYTHM
L’RW30 ha 6 tipi di ritmo. Il ritmo scelto
viene mostrato sul display LCD.
c
Tasto SOUND
Consente di scegliere un suono fra TYPE 1
e TYPE 2.
d
Tasto BEAT
Il beat può essere impostato in un interval-
lo da 0 a 9. Il numero di beat aumenta di
uno ogni volta che viene premuto il tasto
BEAT.
e
Display LCD (a cristalli liquidi)
Serve a mostrare i valori impostati per
i parametri “RHYTHM,”, “SOUND,”,
“BEAT,” e “TEMPO”.
f
LED del TEMPO
Il LED sinistro lampeggia in rosso a tempo
con il beat iniziale. Il LED destro lampeg-
gia in verde a tempo con il secondo beat
e i successivi. Se il beat è impostato su 0,
anche il LED destro lampeggia a tempo
con il beat iniziale, in verde. Se il beat è
impostato su 1, lampeggia solo il LED
sinistro, in rosso.
g
Controllo rotativo TEMPO
Viene usato per controllare la velocità del
tempo fra
= 30~250/minuto
h
Tasto START/STOP
Consente di avviare e arrestare il metrono-
mo.
i
Controllo VOLUME
Viene usato per controllare il volume gene
-
rale.
j
Presa PHONES
È la presa mini stereo per la cuffia. Quan
-
do la cuffia è inserita, dall’altoparlante
dell’RW30 non viene emesso alcun suono.
k
Clip per cintura
Consente di fissare l’RW30 a una cintura, a
un leggio, ecc.
FUNZIONAMENTO
Funzionamento del metronomo
1. Premete il tasto RHYTHM e seleziona-
te un ritmo.
2. Premete il tasto SOUND e selezionate
TYPE 1 o TYPE 2. I modi TYPE 1 e
TYPE 2 hanno suoni differenti, pertanto
selezionate quello più appropriato alle
condizioni di impiego che prevedete.
3. Impostate la velocità del tempo usando
il controllo rotativo TEMPO, e il movi-
mento utilizzando il tasto BEAT.
4. Premendo il tasto START/STOP si met-
te in funzione il metronomo. Il suono
viene prodotto dall’altoparlante e i LED
cominciano a lampeggiare.
5. Ascoltando il suono prodotto, regolate
il volume generale usando il controllo
laterale VOLUME.
6. Ripremendo il tasto START/STOP, il
metronomo si ferma.
Per usare la funzione Tap
La funzione Tap vi permette di misurare
qualsiasi tap tempo e si applica al tempo
del metronomo.
1. Premete il tasto TAP a tempo con il
beat. Una volta premuto il tasto 5 volte,
il tempo misurato verrà visualizzato.
2.
Premendo il tasto 6 o più volte, viene
mostrato il tempo medio degli ultimi 4
tap.
3. Se il tasto TAP non viene premuto per
circa 2,5 secondi, la misurazione del
tempo si conclude e il valore del tempo
lampeggia sul display LCD.
4. Se il tempo misurato eccede la gamma-
di nota di = 30 ~ 250/minuto, verrà
visualizzato un messaggio di errore. Se
il tempo è impostato su un valore infe
-
riore a 30, apparirà il messaggio “Lo”
e il tempo verrà automaticamente im-
postato su 30. Se il tempo è impostato
su un valore superiore a 250, apparirà il
messaggio “Hi” e il tempo verrà auto
-
maticamente impostato su 250.
NOMBRES Y DESCRIPCIÓN
DE LOS COMPONENTES
a
Tecla POWER/TAP
Con esta tecla se apaga/enciende el aparato
y se controla la función de marcado del
tempo. Al encender/apagar el aparato,
pulse esta tecla durante 2 segundos apro-
ximadamente. La función TAP se activa y
empieza a medir el tempo automáticamen
-
te cuando se pulsa esta tecla cinco veces
como mínimo.
b
Tecla RHYTHM
El RW30 tiene 6 tipos de ritmos. La selec-
ción de ritmo aparece en el LCD.
c
Tecla SOUND
Con esta tecla se selecciona un sonido,
TYPE 1 o TYPE 2.
d
Tecla BEAT
Se puede ajustar el compás entre 0 y 9
tiempos. El número de tiempos aumenta
uno cada vez que se pulsa la tecla BEAT.
e
LCD (pantalla de cristal líquido)
En este visualizador se muestran los va-
lores especificados para los parámetros
“RHYTHM,”, “SOUND,”, “BEAT,” y
“TEMPO”.
f
Indicadores LED del TEMPO
El LED izquierdo parpadea en color rojo
a la vez que el tiempo inicial. El LED de
-
recho parpadea en color verde a la vez que
el segundo tiempo y siguientes. Si el ajuste
del compás es 0, el LED derecho parpa
-
dea en color verde a la vez que el tiempo
inicial. Si el ajuste del compás es 1, solo el
LED izquierdo parpadea en color rojo.
g
Cuadrante TEMPO
Se utiliza para controlar el tempo entre =
30 ~ 250/minuto.
h
Tecla START/STOP
Esta tecla pone en marcha y detiene el me
-
trónomo.
i
Control VOLUME
Se utiliza para modificar el volumen gene
-
ral.
j
Toma PHONES
Es la toma mini estéreo para auriculares.
Cuando se utiliza esta toma, el altavoz del
RW30 no emite sonidos.
k
Pinza
Con esta pinza puede colocarse y sujetar el
RW30 al cinturón. También puede sujetar
-
lo a un atril, etc.
FUNCIONAMIENTO
Funcionamiento del metrónomo
1.
Pulse la tecla RHYTHM y elija un rit
-
mo.
2.
Pulse la tecla SOUND y elija entre
TYPE 1 o TYPE 2. TYPE 1 y TYPE 2
ofrecen armonías distintas. Elija el modo
más adecuado según las circunstancias.
3.
Ajuste el tempo con el cuadrante TEM
-
PO y el compás con la tecla BEAT.
4.
Ponga en marcha el metrónomo pul
-
sando la tecla START/STOP. El sonido
sale del altavoz y los indicadores LED
empiezan a parpadear.
5.
Mientras escucha el sonido producido y
ajuste el volumen general con el control
VOLUME lateral.
6.
Detenga el metrónomo pulsando otra
vez la tecla START/STOP.
Funcionamiento de la función
TAP
La función tap le permite medir cualquier
tempo marcado y aplicarlo al tempo del
metrónomo
1. Introduzca el tempo pulsando la tecla
TAP seguido del ritmo. Cuando haya
marcado cinco veces, se mostrará el
tempo medido.
2.
Al marcar 6 veces o más, se muestra
una media del tempo de los últimos
cuatro.
3. Si no pulsa la tecla TAP durante unos
2,5 segundos, terminará la medición del
tempo y el valor de tempo en el LCD
parpadeará.
4.
Si el tempo medido está fuera del inter
-
valo
= 30 ~ 250/minuto, aparecerán
mensajes de error. Si el tempo es infe
-
rior a 30, aparecerá el mensaje “Lo” y
el tempo se establecerá en 30 automáti
-
camente. Si el tempo es superior a 250,
aparecerá el mensaje “Hi” y el tempo se
establecerá en 250 automáticamente.
各部件的名称和功能
a
POWER/TAP 键
该键用于打开 / 关闭电源及打拍定速。
当您需要打开 / 关闭电源时,请按住此
键约 2 秒钟。当按下此键至少 5 次后,
将开启打拍定速功能并自动测量拍速。
b
RHYTHM 键
RW30 具有 6 种节奏。选择的节奏将
显示在 LCD 显示屏上。
c
SOUND 键
该键用于选择声音,声音可为 TYPE 1
或 TYPE 2。
d
BEAT 键
该键可在 0 到 9 拍的范围内设置节拍。
每按一次 BEAT 键就将增加一拍。
e
LCD 显示屏(液晶显示屏)
显示屏将显示所设置的“RHYTHM”、
“SOUND”、“BEAT” 以及“TEMPO”
参数。
f
TEMPO LED 指示灯
左侧 LED 指示灯将在首个节拍时闪烁
红色。从第二个节拍起,右侧 LED 指
示灯将闪烁绿色。如果节拍设置为 0,
则右侧 LED 指示灯也将在首个节拍时
闪烁绿色。如果节拍设置为 1,则只有
左侧 LED 指示灯闪烁红色。
g
TEMPO 拨盘
该 拨 盘 用 于 将 拍 速 控 制 在
=30 ~
250/ 分钟。
h
START/STOP 键
该键用于启动和停止节拍器。
i
VOLUME 控键
该控键用于控制整体音量。
j
PHONES 插孔
此为立体声迷你耳机插孔。当连接耳
机时,RW30 的扬声器将不会发出声
音。
k
背夹
您可以使用背夹将 RW30 夹在腰带
上,也可以夹在乐谱架等其他物品上。
操作
节拍器操作
1. 按下 RHYTHM 键,选择一种节奏。
2. 按下 SOUND 键,然后选择 TYPE 1
或 TYPE 2。TYPE 1 与 TYPE 2
具有不同的声音,因此请根据使用
环境来选择合适的模式。
3. 使用 TEMPO 拨盘设置拍速,以及
使用 BEAT 键设置节拍。
4. 按下START/STOP键,启动节拍器。
启动后扬声器会传出声音,LED 指
示灯开始闪烁。
5. 听到扬声器传出的声音后,可通过
侧面的 VOLUME 控键来调节整体
音量。
6. 再次按下 START/STOP 键,停止节
拍器。
打拍定速功能的操作
打拍定速功能够测量任何所需的拍速,
并将此拍速应用到节拍器。
1. 使用以下节奏按下 TAP 键,输入拍
速。在拍打了 5 次时,将显示测量
出的拍速。
2. 当您拍打 6 次及以上次数时,设备
将显示最后 4 次拍打的平均拍速。
3. 如果您持续约 2.5 秒未按下 TAP
键,则将结束拍速测量,拍速值将
在 LCD 显示屏上闪烁。
4. 果 测 量 出 的 拍 速 超 出 了
=30 ~
250/ 分钟的范围,则将显示错误消
息。如果拍速低于 30,则将显示消
息 "Lo",且拍速会自动设置为 30。
如果拍速高于 250,则将显示消息
"Hi",且拍速会自动设置为 250。
FEDERAL COMMUNICATIONS COMMISSIONRADIO FREQUENCY INTERFERENCE
STATEMENT
This equipment has been tested and found to comply with the limits for a Class B digital
device, pursuant to part 15 of the FCC Rules. These limits are designed to provide reasonable
protection against harmful interference in a residential installation. This equipment generates,
uses and can radiate radio frequency energy and, if not installed and used in accordance with
the instructions, may cause harmful interference to radio communications. However, there is
no guarantee that interference will not occur in a particular installation. If this equipment does
cause harmful interference to radio or television reception, which can be determined by turn
-
ing the equipment off and on, the user is encouraged to try to correct the interference by one or
more of the following measures:
• Reorient or relocate the receiving antenna.
• Increase the separation between the equipment and receiver.
• Connect the equipment into an outlet on a circuit different from that to which the receiver is
connected.
• Consult the dealer or an experienced radio/TV technician for help.
This device complies with Part 15 of the FCC Rules. Operation is subject to the following two
conditions:
(1) This device may not cause harmful interference, and
(2) This device must accept any interference received, including interference that may cause
undesired operation.
Unauthorized changes or modification to this system can void the users authority to operate
this equipment.
This equipment requires shielded interface cables in order to meet FCC class B Limit.


