10
Underneath all the sliders are 2 buttons,
Play
and
Sample
. To test your settings for a Ball, touch Sam-
ple. It will change to Stop sample and the robot will throw samples of the Current Ball repeatedly at the
rate determined by the Ball/min setting. When you are finished sampling the Current Ball, touch Stop
sample and ball delivery will stop. Keep repeating this process until the Current Ball is to your liking.
Use Sample to have the robot throw only the Current Ball.
When you touch Play, you will be switched to the Exercise Screen, and the Play Exercise Button changes
to a red Stop Exercise Button. Balls will be thrown out in order from Ball 1 to however many Balls are
programmed for that Exercise (unless Place Random is selected.) Use Play to have the robot throw all
Balls in an Exercise.
Best Practices:
We highly recommend that you do
not
save any changes to the Default game Exercise.
This Exercise is handy to use whenever you want to Calibrate your robot. So when exiting the Exercise
Screen, if you get a Save Exercise alert, choose Close Without Save (more about saving exercises on).
Furthermore, if you are editing the settings for any pre-programmed Exercise, be certain you want to
permanently change that Exercise. If you want to keep the pre-programmed Exercises as programmed
at the factory, always select Close Without Save, or alternatively, save it under an alternate name by
tapping Save at the top right, then Save As. Save As allows you to create a new name for your modified
Exercise and keeps the original Exercise unchanged.
When changing settings, large adjustments are most easily accomplished by moving the slider control
with your finger. For fine adjustments, touch the + or – symbol at either end of the slider. Doing so will
increase/decrease the settings by 1 unit for every touch.
Exercise Screens
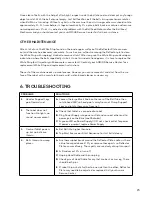
After learning the controls in the Ball Screen, return to the Exer-
cise List by tapping Exercises ( ) at bottom left of the screen. All
saved Exercises will appear in this list. By looking at the diagram for
each Exercise, you can quickly determine the number of balls in the
Exercise, the order of balls and their placements, the speed of the
balls, and the spin on each ball (see Photo 10).
Scroll this screen by lightly touching it and moving your finger up
or down. Notice that this list includes Exercises named Default
game and then 20 Exercises named Exercise 79 to Exercise 99
These are all of the pre-programmed Exercises that come with your
Amicus Prime. These Exercises were created by well-known Butter-
fly Coach Richard Prause. Coach Prause recommends these drills
for any player learning table tennis as a base upon which to develop
more advanced skills.
As noted in the previous section, we recommend you don’t over-
write these pre-programmed Exercises by using the Save command (use Save As instead). However,
modifying these Exercises is permitted. If you choose to do so, please write down the settings for each
Ball in that Exercise so you can reprogram the settings if you ever decide to return to factory settings.
For purposes of learning about the settings available in the Exercise Screens, touch Exercise 79. The
Play Exercise Screen appears (see Photo 11). At the top of this screen are a top view and a side view
Photo 10


