TRIPOD SOCKET
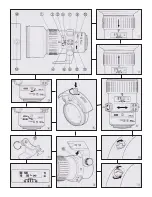
The tripod socket can be rotated freely around the lens by loosening the tripod socket fixing
screws. Then, it can be fixed at any position by tightening the screws. The tripod socket is posi-
tioned exactly 90° from the center when the circle mark on the tripod socket is aligned with the
circle mark on the lens. (6)
Mounting and Removing the Tripod Socket
The tripod socket can be removed from the lens by loosening the two socket mounting/removing
screws. When mounting the tripod socket, insert the positioning boss on the tripod socket into the
positioning hole in the lens, confirm the position, and then securely tighten the tripod socket
mounting/removal screws. (7, 9)
NOTE:
When mounting or removing the tripod socket, be sure to set the lens on a stable table or other
surface and check that the lens does not move. The lens may fall or tip over if the tripod socket is
mounted or removed in an unstable place, resulting in injury or damage to the lens and/or cam-
era.
FILTERS
The filter is the rear insertion type. The filter frame can be inserted in the slot directly behind the
tripod socket. A 43mm normal filter is set in the filter frame of the lens as a standard accessory. The
flange back distance (the standard distance from the surface of the lens mount to the film plane) is
set with one normal filter inserted at the rear of the lens. Therefore, if the rear filter is removed or if
a filter other than the normal filter is inserted, the actual focus position may differ from the indica-
tion on the focus distance. Also, we recommend keeping a 112mm normal front filter installed, to
protect the front element of the lens.
Inserting and Removing the Filter Frame
The filter frame can be removed from the lens by pressing the filter frame lock knob and fully turn-
ing it clockwise until it stops. Then the frame can be released from the lens. (Set the index line on
the top of the lock knob so that it points sideways with respect to the lens.) To insert the filter
frame, check that the index line on the top of the lock knob is facing sideways, and confirm if the
arrow mark on the frame is facing the front of the lens, then insert the filter frame into the slot of
the lens. Then, while pressing the lock knob, turn it clockwise until it stops. (3, 4, 5)
After inserting, to prevent accidental fall-off of the filter frame, check if the filter frame is securely
locked in the position.
Filter Rotating Dial
The filter frame is equipped with a filter-rotating dial so that the filter installed can be rotated from
outside of the lens. When using the 43mm circular polarizing filter (standard accessory), turn this
dial to adjust its filter effect. (4)
Summary of Contents for 360EE
Page 2: ......

