background image


10 

20/03/2015 

Tanco Autowrap 404  

Operators manual  

4.0 

SETTING UP / MOUNTING OF THE MACHINE. 

 
4.1 

Mounting the Drawbar. 
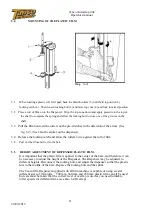
The Drawbar should be positioned such that the machine is parallel with the ground when it is 
connected to the tractor.   
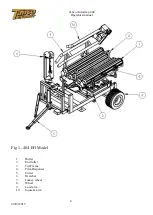
If it is a 404 M or S machine, mount the 3 point linkage pins (attached to the chassis)  

 
4.2 

Mount the loading arm and adjust the width on the lift arm in accordance with the bales diameter. 
Adjust the loading arms end stopper so that the bale will be placed in the middle of the table 
when loading. 

 
4.3 

Mount the Film Dispenser. 

Adjust the height on the Dispenser so that the middle of the plastic meets with the bale’s center. 

 
4.4 

Mount the safety arm to the Chassis (404 M&S only). 

 
4.5 

Lubricate the machine. 

 
4.6 

Check that all the bolts and nuts are tightened, specially the wheel bolts. 

 
4.7 

Remove the safety bolts used under transportation from the loading arm, insert the safety bolts 
into the parking holes. 

 
4.8 

Connect the machine to the tractors rear trailer hitch. 

 
4.9 

HYDRAULIC CONNECTION. 
The hydraulic hoses between machine and tractor are equipped with 

1/2’ 

ISO male quick-

couplers. Discharge the oil pressure before you connect the oil hoses. Use the tractors’ hydraulic 
lever. Connect the hoses so that the turntable rotates counterclockwise. 

To make sure that the bale wrapper works properly, the tractors’ oil pressure has to be at least 
100 bar. If you are unsure of what oil pressure the tractor gives, or what oil pressure the bale 
wrapper receives, please contact your machinery dealer. 
 

NB!  When connected to a tractor with closed center (e.g. JOHN DEERE) a special, closed centers, 

plug must be fitted to the valve to prevent the oil over heating (consult your dealer and parts 
book). 

 
4.10  CHECK LIST. 

Before using the machine it is recommended to follow this check list: 


1. 

Make it a habit to discharge the oil-pressure before connection or disconnection of the 
hydraulic hoses. (Use the tractors hydraulic control lever). 


2. 

Hose with BLUE CAP 

RETURN OIL. 


3. 

Hose with RED CAP 

PRESSURE. 


4. 

Tie up loose hoses so that no squeeze damages occur. 


5. 

Start the tractor and try out the functions. (It shall rotate counterclockwise). 


6. 

Check all connections, hoses and couplings. If there is any oil-leakage, it should be 
rectified immediately. 


Your MINI WRAP


bale wrapper has been tested in practical operation in approx. 2 hours 

at the factory. 

Summary of Contents for 404

Page 1: ...TOWRAP 404 MINI BALE WRAPPER OPERATORS HANDBOOK WD03 404EH MODELS 404 EH Trailed with load arm and Automatic Control 404 M Linkage mounted with cut and start tipping facility and manual control 404 S...

Page 2: ...wer f Any goods that have been altered or repaired other that on instruction or with the written approval of the seller or to which any part not manufactured or having written approval by the sellers...

Page 3: ...E WRAPPING 8 9 4 0 SETTING UP MOUNTING OF THE MACHINE 10 5 0 MOUNTING OF PLASTIC FILM 11 6 0 ADJUSTMENTS I USE 12 7 0 OPERATION INSTRUCTION 13 8 0 INSTRUCTIONS CONTROL BOX 14 19 9 0 PERIODIC MAINTENAN...

Page 4: ...4 20 03 2015 Tanco Autowrap 404 Operators manual Fig 1 404 EH Model 1 Roller 2 End roller 3 Tilt Frame 4 Film Dispenser 5 Cutter 6 Drawbar 7 Jockey wheel 8 Wheel 9 Load arm 10 Squeeze arm...

Page 5: ...hey are a part of the machine Read carefully through this manual and specially chapter 2 0 safety instructions before starting the machine and follow the instructions thoroughly If problems should occ...

Page 6: ...this manual See chapter 2 5 2 2 BECOME FAMILIAR WITH THE OPERATIONS OF THE MACHINE If you are unsure how to operate the machine properly either use of or maintenance to your Mini Wrap please contact...

Page 7: ...ain frame on both sides and in the back end of the machine Keep therefore fingers and feet in safe distance Fig 2 2 3 When tipping the turntable the bale will roll free off the machine Staying behind...

Page 8: ...age or when the grass is wet when it is wrapped the bale should have 90 1 00 p plastic 6 layers and the same amount of overlap If thinner plastic is used more layers should be applied if it is very ho...

Page 9: ...ut to 30 40 solid content If there is a danger of rain bale and wrap the grass anyway 3 Taking care not to mix any earth in with the grass 4 Using a baler which produces even firm bales 5 Wrapping the...

Page 10: ...equipped with 1 2 ISO male quick couplers Discharge the oil pressure before you connect the oil hoses Use the tractors hydraulic lever Connect the hoses so that the turntable rotates counterclockwise...

Page 11: ...ase the locking catch and allow the rollers to lie against the roll of film 5 4 Pull out the film and tie it to the bale 5 5 HEIGHT ADJUSTMENT OF DISPENSER PLASTIC FILM It is important that the plasti...

Page 12: ...lever Adjust this until the turntable speed is approx 22 revolutions per minute Just below 3 seconds per revolution The machine can also be equipped with a control valve that makes it easier to adjust...

Page 13: ...packed bale will give the best result when wrapping 7 4 START Remember that the plastic film end must be tied to the bale This is normally only necessary on the first bale Operate the hydraulic lever...

Page 14: ...p 404 Operators manual 8 0 404EH CONTROL BOX 8 1 1 Functions Battery cable Rotate man Rotate auto Add Menu Reset MENU EXIT SET Fuse 10 Amp Display Table up down Load arm up down Connection cable Knife...

Page 15: ...Yes Raise load arm above sensor duration 5 0 Load arm up to down delay 0 0 Press SET to change settings 404 w arm Auto load bale with load arm NO 4 404 EH with loading arm 404 Without loadingarm 700...

Page 16: ...stk funktion switches Relays 0 off AMP nbr 0 0000 000 00 Test relayoutputs AMP sprocket 1 16 Nbr 10 11 12 13 14 15 16 are indicated with A B C D E F G Sensor input TEST Press SET to enter Rotate load...

Page 17: ...ith adjusted speed unntil setted nbr of revolutions Stop Table goes to stop from 1 1 to 1 2 speed an stops on sensor c Unloading Table starts raising Table stops and the cutter is closing Table goes f...

Page 18: ...perators manual Lastearm down sensor below Un load sensor 2 Sensors Auto wrap 404EH Position loading Signals to counter during w rapping Magnetic givers placed on the center axle Magnet placed on load...

Page 19: ...MITTER SET The receiver is connected directly to the machine junction box The transition radius is stated at 30 meter The actual radius may be as high as 60 meters depending on the battery condition S...

Page 20: ...adjustment DO NOT TIGHT TOO MUCH CAUSE THIS WILL INCREASE THE WEARING OF THE BEARINGS The chains on the square rollers also have to be adjusted There is one chain tensioners on each side 9 4 GEAR The...

Page 21: ...example on the quick coupler If the pressure is less than 180 bar there will be less power for the functions OIL AMOUNT The oil amount that the tractor delivers must be minimum 15 liters minute Max al...

Page 22: ...working Ask your dealer for advice BEFORE you make the error larger and more difficult to repair 11 3 LOAD ARM TILT TABLE OR CUTTER DOS NOT FUNCTION The cables have become warped and must be replaced...

Page 23: ...23 20 03 2015 Tanco Autowrap 404 Operators manual There are 3 basics which must ALWAYS be followed if the machine is to function correctly...

Page 24: ...REAK SENSOR PIN 16 LOAD ARM DOWN PIN 13 TIP SENSOR PIN 14 ROTATE SENSOR OUT PUTS IM PUTS CONNECTION No CABEL No 4 10 15 16 17 18 1 2 3 5 6 7 8 9 FS LD LU FR RR CO CC TU TD JD FB LDD CUT RO 15bar 0 35L...

Page 25: ...eans of a 2 port solenoid valve this is fitted in line in the pressure supply pipe to the main control valve When fitted the solenoid is connected electrically to the cable marked JD and the operator...

Reviews: