2
Tanis Technologies 24VT Series Filtration Unit
Revised 07.01.2020
Operation
Once installed using the above instructions, your AF
-
24XXVT air cleaner(s) can be operated with the flip of a switch.
Because the AF
-
24XXVT series is designed as an
“
Air quality Maintenance
”
system, it is important that the units are
turned on in the beginning of the shift and left on until the end of the shift. The reason the units need to remain on is
because Air Cleaners train the air current throughout the entire area in order to ensure that all of the air is cycling
through the filters. The process of training the air can take a while, but is usually about 30 minutes.
Maintenance
Follow these precautions when performing maintenance on the motor or blower.
Turn off motor, and LOCK OUT electrical service to the unit.
LOCK OUT even when changing filters.
Change filters regularly to maintain optimum performance. If the performance of your air cleaners appears to be
declining, try replacing the filters.
Be sure that replacement filters are always rated for the correct CFM and air flow.
NOTE FOR INSTALLING BAG FILTERS:
When installing fiberglass bag filters, MAKE SURE THAT NO FABRIC IS PINCHED BETWEEN THE HEADER
AND FILTER FRAME.
Performance will decrease dramatically if bag filters are not properly installed. To ensure no
fabric is pinched, place your fingers inside each cell, and gently move each bag cell side to side, freeing any fabric
sandwiched between the header and filter frame.
If the system requires maintenance exceeding filter change, read below
…
Take the unit down and place it on a level surface that allows access to the access panels on each side of the Main
Housing.
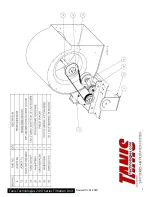
To access the motor, pulleys and belt:
Remove the door panel by removing (16) ¼
-
20x1
-
1/4
”
bolts with a
3/8 socket.
Troubleshooting Chart
Symptom
Possible Cause(s)
Corrective Action
Excessive belt noise
1. Belt is misaligned.
1. Remove back panel. Relieve belt tension by pushing down on
rotary tensioner. Adjust belt placement, and release rotary
tensioner. Test run for alignment.
2. Belt is worn out, broken, or defective.
1. Remove back panel. Relieve belt tension by pushing down on
rotary tensioner. Remove and replace worn belt. Replace with
new belt. Release rotary tensioner. Test run for alignment.
Air cleaner has poor perfor-
mance.
1. It
’
s possible that the air cleaner may
have been wired backwards upon instal-
lation. Air will blow out the exhaust
either way, but if wired correctly it
should blow at about 58 mph.
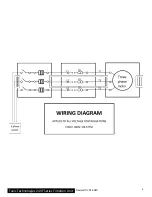
1. If the motor is wired to run the wrong direction, disconnect
power supply, & switch the necessary wires around to reverse
the motors rotation with the voltage you are using.
2. The bag filter may not be seated
properly
2. Reach in each pocket to make sure fabric is not between
filter stop and filter frame.
Air is not staying as clear as
usual
1. Prefilters may be loaded with debris
1. Turn unit off, lock out power to unit, then replace the prefil-
ter by pushing clips out of the way and then sliding it out and
sliding a new one in.
2. Bag filter(s) may be spent
2. Follow step (1) to remove the prefilter, then if unit is
equipped with clips, push them out and away from the bag
filter, slide out the old bag filter and slide in new one until clips
snap around it.

