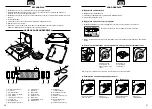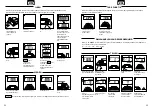
background image

52

53

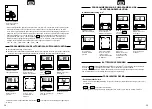
PROGRAMACIÓN DEL BRILLO DE LA ILUMINACIÓN DE FONDO

Pulse el botón CAL 
para mostrar 

.

Cuando la unidad 

está apagada

Pulse el botón MODE 

para confirmar.

Mientras presiona el 

botón MODE, pulse 

el botón ON/OFF.

3

4

2

1

0

Cando haya hecho 

su elección, pulse el 

botón MODE para 

confirmar. 

Los valores

numéricos se

muestran en

pantalla.

La configuración ha 

terminado.

Pulse el botón 

TARE para recorrer 

las opciones de 

iluminación de fondo.

REEMPLAZO DE PILAS

Cuando las pilas están bajas, aparece en pantalla 

. Cuando las pilas se han descargado, 

aparece en pantalla 

 y la unidad se apaga automáticamente.

Reemplace inmediatamente por pilas nuevas (todas las 4 pilas). No aplique una fuerza excesiva 
en la sección de medición cuando reemplace las pilas. 

El ajuste predeterminado es “2”.

1

2

3

4

5

6

7

8

LOCALIZACIÓN Y RESOLUCIÓN DE PROBLEMAS

 La unidad no se enciende.

Inserte cuatro pilas nuevas tamaño AA (LR6). Asegúrese de situar correctamente la polaridad de 
las pilas.


 o 

 aparece en la pantalla.

La báscula necesita ser reparada. Contáctese con su vendedor minorista. 

Pulse el botón ON/

OFF para apagar.

*  Cuando el peso registrado es insuficiente, aparece en pantalla “PC-25”. En este caso, aumente 

el número de muestras a 25 unidades. Cuando aparece en pantalla la marca estable, pulse 
el botón CAL. Si el registro es aún insuficiente, la pantalla cambia para mostrar el número de 
muestras a incrementarse. Por lo tanto, aumente el número de muestras y pulse el botón CAL 
nuevamente. Esta operación se repite hasta que el peso registrado llegue a ser 1 g o más. 


se mostrará en la pantalla cuando pulse el botón CAL, si el peso registrado es demasiado bajo 
para poder medirse. Los valores numéricos cambian como sigue (pulse el botón TARE para 
aumentar el número de muestras). 
10 

 25 

 50 

 100 

 150 

 200 

 250 

 500

11

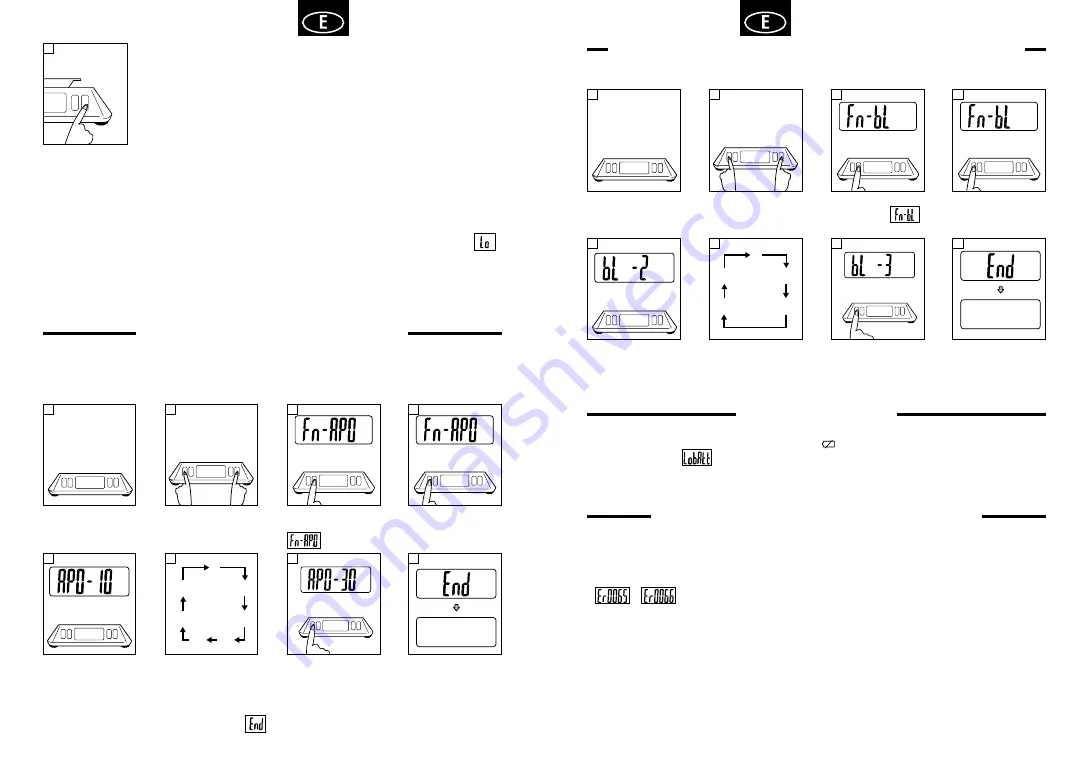
PROGRAMACIÓN DE LA DESCONEXIÓN 

AUTOMÁTICA DE ALIMENTACIÓN

La configuración predeterminada es de 10 minutos.
El tiempo de apagado automático puede ser programado entre 0 (= sin apagado automático) y 
60 minutos, en intervalos de 10 minutos, según la preferencia.


Pulse el botón 

CAL para mostrar 

.

Cuando la unidad 

está apagada

Pulse el botón MODE 

para confirmar

Mientras presiona el 

botón MODE, pulse 

el botón ON/OFF.

50

60

20

10

0

40

30

Cuando haya hecho 

su elección, pulse el 

botón MODE para 

confirmar.

Los valores 

numéricos se 

muestran en pantalla.

La configuración ha 

terminado.

Pulse el botón TARE 

para recorrer las 

opciones de tiempo.

* Si la unidad se apaga antes que aparezca 

, la configuración no se ha guardado.

1

2

3

4

5

6

7

8

Summary of Contents for KP-601

Page 1: ...andleiding aandachtig en bewaar hem voor naslagdoeleinden Manuale d istruzione Leggere questo manuale d istruzione attentamente e conservarlo per riferimento futuro Manual de Instrucciones Lea este manual de instrucciones cuidadosamente y guárdelo para una futura referencia Manual de Instruções Leia este manual de instruções com atenção e o mantenha para referência futura Инструкция по эксплуатаци...

Page 2: ...ement Please observe the following when using this scale 1 Never disassemble the unit 2 Use in a vibration free location that is not exposed to direct sunlight 3 The scale will not measure accurately in an environment subject to large temperature changes The unit takes approximately two hours to adjust to such changes 4 Keep water and chemicals off the scale Wipe with a damp cloth from time to tim...

Page 3: ...tton u AC adaptor inlet i Adjustable feet o Battery compartment p USB port option a Level s AC adapter option d USB cable option V Q B J P R F S X U Z BEFORE USE When using with batteries 1 Open the battery cover 2 Remove the battery cover and insert 4 size AA LR6 batteries 3 Replace the battery cover When using with AC adaptor 1 Do not use any AC adaptor except those with the following specificat...

Page 4: ...being weighed exceeds the maximum capacity TARE FUNCTION If TARE is pressed in the middle of weighing zero 0 appears in the display enabling additional weighing Place the object to be measured on the scale When the stable mark is on press TARE SWITCHING UNIT When the weighing function is available press the MODE button and the display switches in the order below g ct oz ozt dwt grain 1 2 COUNTING ...

Page 5: ... press ON OFF 50 60 20 10 0 40 30 Wen you have made your selection press MODE to confirm The numeric values are displayed Setting is finished Press TARE to cycle through the time options If the power turns off before appears the setting is not saved 1 2 3 4 5 6 7 8 PROGRAMMING BACKLIT BRIGHTNESS Press CAL to display When the power is off Press MODE to confirm While pressing MODE press ON OFF 3 4 2...

Page 6: ...i B type 4 pin female is located on the side of the scale Caution If you want to use the USB output you must install the necessary driver onto your PC available to download from http www tanita com USB Port Output data Name of item Header Output data ASCII code Pattern Counting mode Weight mode Control data 0 Fix to 16 2 Bytes fixed Control data 0 Fix to 1 1 Bytes fixed Model MO KP 601 8 Bytes fix...

Page 7: ... oder Lagerung in der Nähe von Wärmequellen Öfen Heizung etc 6 Wenn Sie das Gerät längere Zeit nicht verwenden entfernen Sie die Batterien und lagern Sie das Gerät in trockener staubfreier Umgebung 7 Bevor Sie das Gerät zur Reparatur einsenden überprüfen und ersetzen Sie bitte die Batterien Wenn eine Reparatur notwendig ist verpacken Sie vor dem Versand das Gerät im Originalkarton und schützen Sie...

Page 8: ...g w Wiegemodi e ON OFF Taste r TARE Taste t CALIBRATION Taste y MODE Taste u Steckerbuchse für Netzteil i Verstellbare Füße o Batteriefach p USB Anschluss optional a Libelle s Netzteil optional d USB Kable optional VOR DER BENUTZUNG Wenn Sie Batterien benutzen 1 Öffnen Sie das Batteriefach 2 Entfernen Sie die Abdeckung und legen Sie 4 Mignonbatterien ein 3 Bringen Sie die Abdeckung wieder an Wenn ...

Page 9: ... die maximale Kapazität Die Waage ist nach der Justierung noch eingeschaltet TARE FUNKTION Wenn während des Wiegens die TARE Taste gedrückt wird zeigt das Display Null 0 an wonach zusätzliche Objekte gewogen werden können Legen Sie das zu wiegende Objekt auf die Waage Drücken Sie die TARE Taste EINHEIT UMSTELLEN Wenn die Wiegefunktion aktiviert ist drücken Sie die MODE Taste Das Display ändert sic...

Page 10: ...ährend Sie die MODE Taste drücken 50 60 20 10 0 40 30 Drücken Sie nach der Auswahl MODE zur Bestätigung Die Werte leuchten auf Die Einstellung ist beendet Drücken Sie TARE um zwischen den Werten zu wechseln Wenn sich die Waage ausschaltet bevor erscheint wurde die Einstellung nicht gespeichert 1 2 3 4 5 6 7 8 HELLIGKEIT DER HINTERGRUNDBELEUCHTUNG EINSTELLEN Drücken Sie die CAL Taste bis erscheint ...

Page 11: ...ge Achtung Wenn Sie die USB Datenübertragung nutzen wollen müssen Sie die notwendigen Treiber auf Ihrem PC installieren Diese können Sie auf http www tanita com herunterladen USB Anschluss Ausgabedaten Bezeichnung Dateikopf Ausgabedaten ASCII Code Muster Zählmodus Wiegemodus Kontrolldaten 0 Festgesetzt auf 16 2 Bytes fest Kontrolldaten 0 Festgesetzt auf 1 1 Byte fest Modus MO KP 601 8 Bytes fest A...

Page 12: ...d utilisation suivantes 1 Ne dèmontez jamais l unité 2 Utilisez la dans un endroit qui n est pas soumis à des vibrations ni exposè à la lumière directe du soleil 3 La balance ne fournira pas de mesures prècises dans un environnement soumis à de brusques changements de tempèratures ll faudra à peu près deux heures à l unitè pour s adapter à de tels changements 4 Èvitez de nettoyer la balance à l ea...

Page 13: ...ILISATION Utilisation avec piles 1 Ouvrez le couvercle du compartiment des piles 2 Retirez le couvercle du compartiment des piles et mettez en place les 4 piles AA LR6 3 Remettez en place le couvercle du compartiment des piles Utilisation avec adaptateur AC 1 Utiliser uniquement un adaptateur CA répondant aux spécifications suivantes Utilisez uniquement un adaptateur avec un marquage CE 2 Pour uti...

Page 14: ... Appuyez sur CAL pour afficher Lorsque l appareil est éteint Appuyez sur MODE pour confirmer Tout en appuyant sur MODE appuyez sur ON OFF 50 60 20 10 0 40 30 Après avoir fait votre sélection appuyez sur MODE pour confirmer Les valeurs numériques sont affichées Le réglage est terminé Appuyez sur TARE pour faire défiler les options de périodes Si l appareil s éteint avant qu apparaisse le réglage n ...

Page 15: ... sur le côté de la balance Attention SI vous souhaitez utiliser une sortie USB vous devez installer sur le PC le driver nécessaire que vous pouvez télécharger à partir de http www tanita com PROGRAMMATION DE LA LUMINOSITE DU RETROECLAIRAGE Appuyez sur CAL pour afficher Lorsque l appareil est éteint Appuyez sur MODE pour confirmer Tout en appuyant sur MODE appuyez sur ON OFF 3 4 2 1 0 Après avoir f...

Page 16: ...e verzendt 8 Geen voorwerpen op de weegschaal laten staan als u de weegschaal niet gebruikt 9 Om meetfouten te voorkomen tijdens het meten dient u het gebruik van apparaten die radiogolven genereren zoals mobiele telefoons te vermijden LET OP 1 Om een electrische schok te voorkomen de stekker niet insteken of loshalen met natte handen 2 Om een electrische schok te voorkomen het apparaat niet in de...

Page 17: ...t het oppervlak 1 2 3 4 1 2 1 2 BELANGRIJK 1 Gebruik het toestel in een plaats met zo weinig mogelijk trillingen 2 Bij temperatuurswisselingen van meer dan 5 C 10 F dient u ten minste 30 minuten te wachten voor u het toestel gaat gebruiken 3 Gebruik het toestel op een hard en vlak oppervlak controleer of het waterpas staat met behulp van een 4 luchtbelwaterpas 5 Sluit het deksel om te voorkomen da...

Page 18: ...t te tellen Verwijder de objecten nadat de meting klaar is 1 2 3 4 5 6 7 8 9 10 IJKEN Steeds het toestel ijken als u de stroom inschakelt of indien de stroom al verscheidene uren ingeschakeld staat Gebruik hiervoor het bijgeleverde testgewicht van 100g Schakel de stroom in Druk op de ontgrendelknop om het deksel te openen De weegeenheid die gebruikt werd wanneer de stroom de laatste keer uitgescha...

Page 19: ... is zal PC 25 verschijnen Verhoog in dat geval het aantal exemplaren tot 25 stuks Als het stabiel teken verschijnt druk dan op de CAL toets Als het geregistreerde gewicht nog steeds ontoereikend is zal het display veranderen en aangeven hoeveel exemplaren nog moeten toegevoegd worden Voeg daarom het aangegeven aantal exemplaren toe en druk opnieuw op de CAL toets Herhaal deze handeling tot het ger...

Page 20: ...P i P 6 0 1 TECHNISCHE GEGEVENS Testgewicht 100 g Capaciteit 100 000 g 500 00 ct 3 5270 oz 3 2150 ozt 64 300 dwt 1543 25 gr Schaalverdeling 0 002 g 0 01 c t 0 0001 oz 0 0001 ozt 0 002 dwt 0 05 gr Stroomvoorziening 6V gelijkstroom AA LR06 x 4 ingesloten Netstroomadapter DC 6V 200 mA ingesloten Stroomverbruik MAX Dubbel LCD 45 mA enkelvoudig LCD 40 mA Niet voor handelsdoeleinden UITVOER GEGEVENSOPMA...

Page 21: ...re la bilancia attenendosi alle seguenti istruzioni 1 Non smontare mai l unità 2 Collocare la bilancia in un area non esposta a vibrazioni e a raggi solari 3 La bilancia non effettua misurazioni precise in ambienti soggetti a forti escursioni termiche La bilancia impiega circa 2 ore per adattarsi a questi cambiamenti ambientali 4 Non versare acqua o altri liquidi sull unità Pulire l unità periodic...

Page 22: ...ovraccarico L oggetto pesato supera la capacità massima Ad unità accesa 1 PRIMA DELL USO Alimentazione a batterie 1 Aprire il coperchio del vano batteria 2 Rimuovere il coperchio e inserire 4 batterie stilo AA LR6 3 Riposizionare il coperchio del vano batteria Alimentazione mediante adattatore CA 1 Utilizzare esclusivamente adattatori CA con le seguenti specifiche Utilizzare solo adattatori CA rec...

Page 23: ...ondo preferenza Premere CAL per visualizzare Ad unità spenta Premere MODE per confermare Tenendo premuto MODE premere ON OFF 50 60 20 10 0 40 30 Effettuata la scelta premere MODE per confermare Si visualizzano i valori numerici L impostazione è terminata Premere TARE per alternare le opzioni di orario Se l unità si spegne prima che appaia l impostazione non sarà salvata 1 2 3 4 5 6 7 8 TARATURA Se...

Page 24: ...dini femmina è situato sul lato della bilancia Avviso SE si desidera utilizzare l uscita USB è necessario installare i driver necessari sul PC scaricabili dal sito web http www tanita com Porta USB REGOLAZIONE DELLA RETROILLUMINAZIONE Premere CAL per visualizzare Ad unità spenta Premere MODE per confermare Tenendo premuto MODE premere ON OFF 3 4 2 1 0 Effettuata la scelta premere MODE per conferma...

Page 25: ... No deje objetos sobre la bandeja si no está utilizando la balanza 9 Para evitar errores de medición ni realice mediciones mientras usa aparatos que generan ondas de radio como los teléfonos móviles MANTENIMIENTO 1 Para evitar descargas eléctricas no inserte o retire el enchufe con las manos húmedas 2 Para evitar descargas eléctricas no use este equipo cerca del agua ADVERTENCIA Dati di uscita Nom...

Page 26: ...RTANTE 1 Utilícela en un lugar donde haya pocas vibraciones 2 Si el cambio de temperatura supera los 5 C 10 F espere por los menos 30 minutos antes de usarla 3 Colóquela sobre una superficie plana y resistente y verifique que esté nivelada utilizando el nivel de burbuja 4 Para evitar que el viento afecte la medición mantenga la tapa cerrada 5 No desarme el aparato 6 Límpiela con un detergente suav...

Page 27: ...rminar la medición 1 2 3 4 5 6 7 8 9 10 CALIBRACIÓN Siempre haga la calibración cuando se conecta la potencia o cuando la potencia ha estado conectada por varias horas Utilice el peso de prueba de 100g que se ha suministrado Encienda la potencia Presione el botón de abrir para abrir la tapa En la pantalla aparecerá la unidad de peso que se utilizó cuando se apagó la potencia por última vez La opci...

Page 28: ...PC 25 En este caso aumente el número de muestras a 25 unidades Cuando aparece en pantalla la marca estable pulse el botón CAL Si el registro es aún insuficiente la pantalla cambia para mostrar el número de muestras a incrementarse Por lo tanto aumente el número de muestras y pulse el botón CAL nuevamente Esta operación se repite hasta que el peso registrado llegue a ser 1 g o más se mostrará en la...

Page 29: ...TÉCNICAS Peso de prueba 100 g Capacidad 100 000 g 500 00 ct 3 5270 oz 3 2150 ozt 64 300 dwt 1543 25 granos Graduación 0 002 g 0 01 ct 0 0001 oz 0 0001 ozt 0 002 dwt 0 05 granos Alimentación DC 6V AA LR06 x 4 incluidas Adaptador de Corriente Alterna DC 6V 200 mA incluido Consumo de potencia MÁX LCD dual 45 mA LCD simple 40 mA Comercialización no permitida FORMATO DE DATOS DE SALIDA Sólo versión USB...

Page 30: ...adas condições para garantir o rigor de pesagem Observar as seguintes medidas durante a utilização da balança 1 Nunca desmontar a unidade 2 Utilizar em local isento de vibrações que não esteja exposto à luz directa do sol 3 A balança não realizará uma pesagem precisa em ambientes sujeitos a grandes amplitudes térmicas A unidade demora cerca de duas horas a adaptar se a tais condições 4 Afastar a b...

Page 31: ... que está sendo pesado excede a capacidade máxima Quando a balança estiver ligada 1 ANTES DA UTILIZAÇÃO No caso de uso de pilhas 1 Abra a tampa do compartimento de pilhas 2 Remova a tampa do compartimento de pilhas e insira 4 pilhas tipo AA LR6 3 Recoloque a tampa do compartimento de pilhas No caso de uso de adaptador CA 1 Não use nenhum adaptador CA exceto aqueles com a seguinte especificação Use...

Page 32: ...ara exibir Quando a alimentação estiver desligada Pressione MODE para confirmar Enquanto pressiona MODE pressione ON OFF 50 60 20 10 0 40 30 Depois de selecionar pressione MODE para confirmar Os valores numéricos são exibidos A configuração está concluída Pressione TARE para passar pelas opções de tempo Se a alimentação for desligada antes de aparecer a configuração não será salva 1 2 3 4 5 6 7 8 ...

Page 33: ...lizado na lateral da balança Cuidado Se desejar utilizar a saída USB deve se instalar o driver necessário no seu PC disponível para download em http www tanita com Porta USB PROGRAMAÇÃO DO BRILHO DA ILUMINAÇÃO DE FUNDO Pressione CAL para exibir Quando a alimentação estiver desligada Pressione MODE para confirmar Enquanto pressiona MODE pressione ON OFF 3 4 2 1 0 Depois de selecionar pressione MODE...

Page 34: ...Nota Os dados são divididos com vírgulas para cada dado A terminação fim dos dados é CR código ASCII 0DH LF código ASCII 0AH Os dados de controlo para os itens 1 a 4 são para expansão Eles não são utilizados atualmente de forma que o lado receptor pode ignorá los Devido às suas especificações a balança gerará um sinal irrelevante quando for desligada Ignore este sinal e não o importe Os dados de p...

Page 35: ...начительной вибрацией 2 Если перепад температуры больше 5 C 10 F подождите по крайней мере 30 минут перед началом использования 3 Устанавливайте весы на твердую ровную поверхность и подтверждайте ровность установки с помощью пузырькового уровня 4 Чтобы предотвратить помехи измерениям со стороны воздушных потоков закрывайте крышку 5 Не разбирайте весы 6 Для очистки используйте нейтральные моющие ср...

Page 36: ... вы хотите подсчитать По окончании измерения снимите объекты с весов 1 2 3 4 5 6 7 8 9 10 КАЛИБРОВКА Калибровку следует выполнять при каждом включении питания или после нескольких часов с непрерывно включенным питанием Использовать контрольную гирю 100 г из комплекта поставки Включите питание Нажмите кнопку открывания чтобы открыть крышку Отображается единица веса выбранная на момент последнего от...

Page 37: ...ся отметка о состоянии стабильности нажать CAL Если зарегистрированное значение по прежнему недостаточно показания дисплея изменяются для отображения количества образцов которое следует добавить Необходимо соответствующим образом увеличить число образцов и заново нажать CAL Данная операция повторяется до момента когда зарегистрированный вес увеличится до 1 г или выше отображается при нажатии CAL в...

Page 38: ...ество штук Заключительный символ терминатор g P t P i P 6 0 1 ТЕХНИЧЕСКИЕ ХАРАКТЕРИСТИКИ Контрольная гиря 100 г Предельный вес 100 000 г 500 00 карат 3 5270 унций 3 2150 тройских унций 64 300 пеннивейт 1543 25 грана Цена деления 0 002 г 0 01 карата 0 0001 унции 0 0001 тройской унции 0 002 пеннивейта 0 05 грана Питание DC 6В AA LR06 x 4 входит в поставку AC адаптер 5 В постоянного тока 200 мА входи...

Page 39: ...度 請蓋上蓋子 5 請勿分解機件 6 使用中性清洗液清理 避免使用化學藥品 7 僅用專用寶石杯 部位名稱 1 遮風蓋 蓋 2 鉸鏈 3 寶石杯 4 LCD 顯示器 正面 5 LCD 顯示器 背面 可選擇 6 重量測試 7 開啟鍵 8 低電標示 9 數字穩定標示 0 負號 q 校準標記 w 重量顯示模式 e 開 關鍵 r TARE 鍵 t 校準鍵 y MODE 鍵 u 交流電源適配器插口 i 可調式活腳 o 電池放置處 p USB 端口 可選擇 a 水平儀 s 交流電源適配器 可選擇 d USB電線 可選擇 V Q B J P R F S X U Z s E ...

Page 40: ... 閃爍時 將砝碼輕輕放在寶 石杯中 秤重 關機 放置珠寶 拿掉珠寶 1 2 3 4 5 6 7 8 2 3 4 超重 檢重物重量超過最高重量 電子秤開啟時 1 使用前說明 使用電池時 1 打開電池蓋 2 打開電池蓋 放入4個AA LR6 電池 3 蓋上電池蓋 使用交流電源適配器時 1 請勿使用不附合以下規格的交流電源適配器 唯標有CE標誌的交流電源適配器才能使用 2 使用交流電源適配器時 請將直流電源插入入口 確定電子秤是處於水平狀態 調整可調式活腳 將氣泡調整到中央 圓形處 開關蓋子 打開 將鉸鏈推到一端 旋轉向上拉 裝上 插入鉸鏈的一端 旋轉向下拉 注意 電子秤的4個腳必須與桌面接觸 1 2 3 4 1 2 1 2 ...

Page 41: ...值是10分鐘 自動關機時間可設定0 60分鐘 根據喜好可以10分鐘為單位來增加時間 按CAL鍵顯示 電源關閉時 按MODE確認 同時按MODE鍵與電 源開關 50 60 20 10 0 40 30 選擇欲設定值時 按 MODE確認選擇 數值顯示 設定程序完成 按TARE來輪流顯示時 間的選擇 如果關機前 標誌沒有顯示 表示設定沒有成功 1 2 3 4 5 6 7 8 TARE 機能 秤重過程中使用TARE 可讓重量歸零 並增加重量容量 放置珠寶 當穩定標示顯示後 按 TARE鍵 開關單位 在秤重機能沒有問題的狀態下 按MODE鍵和顯示單位 如下列順序所示 g ct oz ozt dwt grain 1 2 計算 電子秤開啟時 按住 MODE 按 CAL 放置10個秤重標本 當穩定下來 將顯示 穩定標示 按 CAL 顯示標本的數量 放入欲秤重的珠寶 重量測定過後 拿 走珠寶 1 2 3 4 ...

Page 42: ...信號 將電子秤記憶的數據輸出到外部設備 電腦等 USB介面僅限於數據輸出 本秤無法從外部設備接收指示 規格 通訊標準 USB 通訊方式 非同期處理 信號速度 9600 波特 數據長度 8 位元 同位 無 停止位 1 位元 終結器 CR LF 註 USB連結器 mini B 4 針 凹 位於電子秤的側面 Caution 如欲使用USB進行數據輸出 請上http www tanita com下載所需的驅動器 USB端口 設定背光照明亮度 按CAL顯示 電源關閉時 按MODE確認 同時按MODE鍵與電 源開關 3 4 2 1 0 選擇欲設定值時 按 MODE確認選擇 數值閃爍 設定程序完成 按TARE來輪流顯示背 光亮度的選擇 替換電池 顯示時表示電池電量不足 表示電池將要沒電 並自動關機 請馬上換上新的電池 4個 替 換電池時不要太過用力 初步設定值是2 1 2 3 4 5 6 7 8 解決疑...

Page 43: ... 固定於 1 固定於1位元組 模式 MO KP 601 固定於8位元組 顯示重量 Wg x xxx xxx xxx 5 7 位元組 增加重量容量 Pt x xxx xxx xxx 5 7 位元組 個 Pi xxxx 1 5 位元組 註 數據間以 做區隔 終止符 數據後面 是CR ASCII code 0DH LF ASCII code 0AH 項目1 4是控制數據的擴充 目前還用不到 訊息接收方可以不予理會 因為它的說明 本機在關機時會發出一個不相關的信號 不要理會這個信號 也不要輸入 重量數據只以克表示 輸出例 K W g P t P i P 6 0 1 ...

Reviews: