background image

55

Electrical Wiring

DANGER:

 Shock Hazard – Before servicing 

the water heater, turn off the electrical power to the water 

heater at the main disconnect or circuit breaker. Failure to 

do so will result in death or serious personal injury.

WARNING:

 Field wiring connections and 

electrical grounding must comply with local codes or, 

in the absence of local codes, with the latest edition of 

the National Electrical Code, ANSI/NFPA 70, in the U.S., 

or Canadian Electrical Code, CAN/CSA C22.1, Part 1, in 

Canada.

CAUTION:

 Labeling all wires prior to 

disconnection is recommended. Wiring errors can cause 

personal injury, product damage, and/or dangerous 

operating conditions. Verify correct operation after 

servicing.

NOTICES: 

•  

DO NOT

 connect power until venting installation is 

complete (see Venting Installation pages 34–45).

•  Wait ninety (90) seconds after power is connected for 

the first time to initiate operation of the water heater.

•  Power consumption is up to 100 Watts during normal 

operation, 3-5 Watts during standby, waiting to run, and 

up to 200 Watts during the freeze protection operation. 

Power Cord

•  The electric power supply requirement for this water 

heater is 120 VAC/60 Hz, 2 Amps.

•  A dedicated circuit is recommended for the water heater. 

DO NOT

 connect to a GFCI or AFCI circuit. Multiple 

units may be connected to a single circuit up to the 

circuit rating. 

•  

DO NOT

 use 3-prong to 2-prong adapters. 

DO NOT


use power strips or multiple outlet adapters.

•  All direct-vent gas models come with a three-prong 

power cord. Only use this power cord and a matching 

grounded electrical outlet. 

•  All outdoor gas models do not come with a power cord. 

Only hard-wire to an appropriate power outlet with a 

ground terminal. 

•  Keep any excess length of the power supply cord on the 

outside of the water heater.

•  If local codes require hard-wiring, see instructions for 

“Hard-Wiring the Electrical Connections” below.

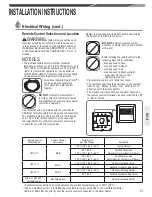
Hard-Wiring the electrical Connections

•  Wiring should be performed by a qualified electrician in 

accordance with local codes.

•  The water heater requires a properly grounded 120 

VAC/60 Hz power supply. Multiple water heaters may be 

connected to a single circuit up to that circuit’s rating.

•  DO NOT connect grounding wire to water pipes, gas 

pipes, telephone cables, lighting conductor circuits, or to 

any other grounding circuits that  

require a GFCI or AFCI (arc fault circuit interrupter). 

•  An ON/OFF switch must be provided and installed for 

the incoming 120 VAC power supply.

•  Wire the water heater exactly as shown in the wiring 

diagram. This wiring diagram can also be found inside 

the water heater cover panel.

•  The green screw is provided in the enclosure for a 

grounding connection.

•  Connect the live wire to the black wire and neutral wire 

to the white neutral wire.

High-Altitude Installation

The water heater is certified for installations up to 3,280 

ft. (1,000 m) above sea level. The input rating of this 

water heater is based on sea level operation. At higher 

elevations, the actual input rate may be lower than the 

value listed on the rating label.

NOTICE

•  For installations above 3,280 ft. (1,000 m) elevation, 

contact a qualified service technician to make the 

proper altitude adjustments. See pages 66 and 67 for 

additional information.

WARNING:

•  

DO NOT

 install this water heater at elevations above 

3,280 ft. (1,000 m) without the proper adjustments. 

Please contact your installer, local gas supplier, place 

of purchase, or the Rheem Customer Service phone 

number listed on page 26 in the “Call for Assistance” 

section. 

Gas Supply (cont.)

INSTALLATION INSTRUCTIONS

Gas Supply

Electrical

Summary of Contents for 199

Page 1: ...d service must be performed by a qualified installer service agency or the gas supplier What to Do If You Smell Gas Do not try to light any appliance Do not touch any electrical switch do not use any...

Page 2: ...Safety Information This symbol alerts you to potential hazards that can kill or hurt you and others All safety messages will follow the safety alert symbol and either the word DANGER WARNING CAUTION o...

Page 3: ...f a water heater or any other appliance Be sure to read and follow the labels on the water heater as well as the warnings printed in this manual Failure to do so can result in death bodily injury or p...

Page 4: ...heat tracing or equivalent to prevent freezing of the pipes DO NOT insulate or block the drain valve on the hot outlet fitting If the pipes are allowed to freeze the water heater and the pipes may ma...

Page 5: ...result in death or serious personal injury from fire and or explosion This water heater is not certified for any other fuel type Both natural gas and propane LP have an odorant added to aid in detecti...

Page 6: ...this label 2 Turn off all electric power to the appliance 3 Do not attempt to light the burner by hand 4 Turn the Gas Shutoff Valve located on the outside of the unit clockwise to the OFF position 5 W...

Page 7: ...ce personnel Make certain the power to the water heater is OFF before removing the unit cover panel Exposed electrical components and moving parts can cause personal injuries For your safety DO NOT at...

Page 8: ...ils to shut off Be sure your water heater is properly installed in accordance with local codes and the provided installation instructions DO NOT attempt to repair or replace any part of your water hea...

Page 9: ...31 mm 55 8 143 mm 55 8 143 mm 51 2 140 mm 43 16 106 mm 33 8 86 mm 35 8 92 mm 131 2 343 mm 63 4 172 mm 91 2 241 mm Specifications Direct Vent Models 1315 16 354 mm 2613 16 663 mm 233 4 603 mm 81 2 216...

Page 10: ...ter Type E Installation Type F Type of Gas G Max Inlet Gas Pressure H Min Inlet Gas Pressure J Recovery Rating K Max BTU Input Rating L Min BTU Input Rating M Manifold Gas Pressure N Certification Sta...

Page 11: ...ain Valve Water Filter Cold Water Supply Shut Off Valve Discharge Line To Suitable Drain Power Supply Cord Union Union Manual Gas Supply Line Shut Off Valve Manual Gas Shut Off Valve Cap Sediment Trap...

Page 12: ...Supply Line Shut Off Valve Flue Terminal Cap Relief Valve 6 150 mm Air Gap Manual Gas Shut Off Valve Union Power Supply Cord not supplied Hard Wire Sediment Trap in accordance with the local gas auth...

Page 13: ...scalds Children disabled and elderly are at highest risk of being scalded See instruction manual before setting temperature at water heater Feel water before bathing or showering Temperature limiting...

Page 14: ...ate with a small water flow Increase the water flow and recheck If it still does not operate with the hot water faucet completely open increase the temperature setting on the remote control Water Heat...

Page 15: ...lead to death personal injury and or product failure Check the air intake and vent outlet for blockage and or debris Condensate Trap Direct Vent Only CAUTION DO NOT operate without the condensate tra...

Page 16: ...n on a hot water faucet While the water heater is operating inspect the main burner flames through the burner sight glass The flames should be blue when the main burner is firing NOTICE If the flames...

Page 17: ...r turned off and the electrical power supply disconnected Vacuum around the water heater to remove any dust dirt and or lint buildup Clean the water heater and the remote control with a damp soft clot...

Page 18: ...ater filter under running water To remove severe sediment and dirt use a soft brush CAUTION DO NOT overtighten the water filter Overtightening can deform and or damage the filter Replace the filter in...

Page 19: ...drain After several gallons have drained release the lever handle to close the valve and stop draining NOTICE If the pressure relief valve on the hot water heater discharges periodically this may indi...

Page 20: ...reaker box Open all hot water faucets Run the water until it is COLD then shut off the faucet Close the water shut off valve Using a suitable container to catch the water remove the water filter from...

Page 21: ...To put the water heater back in service Disconnect drain hose Make sure the drain valve is closed Reinstall the water filter in the base of the cold water inlet line Open the water shut off valve Ope...

Page 22: ...r heater down to an ambient temperature of approximately 30 F 34 C These temperatures are all based on temperatures without wind The heater only protects the internal components of the water heater NO...

Page 23: ...ble Cause Solution Not enough or no hot water 1 Unit is not ON 1 Turn on the unit by pressing the POWER ON OFF button 2 Water shut off valve is not completely opened 2 Check shut off valve and open co...

Page 24: ...ixtures 4 Contact a dealer or a qualified service technician Water too hot 1 Temperature is set too high 1 Decrease the temperature setting at the remote control 2 Water shut off valve is not complete...

Page 25: ...pairs to a qualified service technician When an error code is displayed Turn off all the hot water faucets Turn off the water heater by pressing the POWER ON OFF button on the remote control Wait abou...

Page 26: ...oblem along with dates of service Error Code Possible Cause Solution 1L Water heater has buildup of lime deposits Contact a dealer or qualified service technician 05 Air intake or vent exhaust opening...

Page 27: ...INSTALLATION INSTRUCTIONS FOR THE CONTRACTOR Installation...

Page 28: ...solvents or removers Flammable vapors carry long distances from where they are used or stored The open flame of the water heater s main burner can ignite these vapors causing an explosion or fire NOT...

Page 29: ...llation DO NOT install the water heater where it is subject to vibrations DO NOT install the water heater in a recreational vehicle mobile home boat or other watercraft DO NOT install the water heater...

Page 30: ...wing locations beauty shops dry cleaning establishments photo processing labs and storage areas for liquid and powdered bleaches or swimming pool chemicals These locations often contain such halogenat...

Page 31: ...Heater Venting Required Relief Valve Service Valve Service Valve To Hot Water Faucet s Drain Valve Wall Plate Vent Termination With Protective Screen Water Filter Cold Water Supply Shut Off Valve Disc...

Page 32: ...t Water Service Valve Hot Water Service Valve Pressure Relief Valve Relief Valve Water Outlet Water Outlet Water Inlet Water Inlet Drain Drain Alternate Water Piping Arrangement With Preferred Valve K...

Page 33: ...oncrete wall use lag bolts designed for concrete Make sure the proper electrical outlet or supply 120 VAC 60 Hz is available and located near the unit Direct vent models come with a 6 ft 1 8 m power c...

Page 34: ...cturer approved Stainless Steel Venting Material e g 444 SS 316 L Outer casing can be galvanized aluminum or other material The specified vent termination must be used Refer to page 45 for an example...

Page 35: ...visions shall comply with NFPA 720 and be ANSI UL 2034 listed and IAS certified 3 SIGNAGE A metal or plastic identification plate shall be permanently mounted to the exterior of the building at a mini...

Page 36: ...e on the vent termination is not acceptable for horizontal venting without using the condensate collector Minimum Vent Length The venting may be as short as 12 in 30 cm provided one vent termination i...

Page 37: ...roper handling and discharge methods Condensate must be drained away from the water heater and should not be allowed to drain back into any part of the vent system The condensate collector must be use...

Page 38: ...ation Outside Walls Fixed Closed Fixed Closed Operable Operable V V V V V V X X V V Inside Wall Vent Terminal Air Supply Inlet Area Where Terminal is Not Permitted B B A J I B M M F C K H V V D E B L...

Page 39: ...in 30 cm for water heaters greater than 50 000 Btuh 15 kW 3 6 in 15 cm for water heaters less than or equal to 10 000 Btuh 3 kW 12 in 30 cm for water heaters greater than 10 000 Btuh 3 kW and less th...

Page 40: ...tance between vent terminations of 19 in 48 cm for two unit installation or 21 in 53 cm for installation of three or more units Vents cannot be stacked vertically DO NOT terminate vent directly on bri...

Page 41: ...ood screws For masonry walls use suitable masonry anchors long enough to pass through the wall Reinstall the decorative sheathing around the faceplate The decorative sheathing may be painted to match...

Page 42: ...page 29 A zero clearance of 0 in 0 cm is allowed between the air intake pipes and combustible material Use proper support for the vent and air intake pipes as described on page 34 Support method used...

Page 43: ...odate the vent pipe Complete the vent pipe installation to the water heater vent collar If required use high temperature silicone sealant where the vent connector joins the water heater Support vertic...

Page 44: ...ow level 12 in 30 5 cm above anticipated snow level C Maximum clearance above roof level without ad ditional vent support 24 in 61 cm above roof level 24 in 61 cm above roof level D Maximum clearance...

Page 45: ...ical Termination Adapter Air Intake Storm Collar Support Clamp Fire Stop To Drain Dispose of condensate in accordance to local codes Condensate Trap Fire Stop 3 to 5 Concentric Pipe Support Hanger 1 4...

Page 46: ...e adapter before fitting the adapter to the water connections on the water heater Any heat applied to the water supply fittings will permanently damage the internal components of the water heater NOTI...

Page 47: ...g To ensure proper operation of the water heater follow these water pressure guidelines Operation of the water heater requires a minimum water pressure of 14 psi 97 kPa and a minimum activation water...

Page 48: ...r to be disconnected easily for servicing Use the following guidelines when connecting the HOT WATER OUTLET Connections between the water heater and point s of use should be as short as possible Local...

Page 49: ...onnects to the HOT water outlet pipe as shown above The other end of the pipe should be routed to a suitable drain to eliminate potential water damage For safe operation of the water heater be sure th...

Page 50: ...ld result in death personal injury explosion or fire product damage and or poor operating conditions or performance NOTICES Gas piping shall be in accordance with local utility company requirements an...

Page 51: ...g Value of Gas BTU FT3 Determining the required pipe size The gas system is designed to operate at a certain maxi mum pressure drop A pressure drop greater than what is permissible can cause operation...

Page 52: ...chart obtained from NFPA 54 ANSI Z223 1 2012 Table 6 3 d Table 2 Pipe Sizing Natural Gas Schedule 40 Metallic Pipe Black Iron Inlet System Pressure Less than 2 PSI 55 inches W C Allowable Pressure Dr...

Page 53: ...s shut offs should all be T handle type Using the proper size piping fittings and components build the gas supply line to the water heater NOTICE The gas supply line should be a minimum of 3 4 in 1 9...

Page 54: ...vice technician Pressure Testing the Gas Supply System CAUTION If inlet gas pressure is out of allowable range 4 0 w c 1 0kPa 10 5 w c 2 6kPa for Natural Gas or 8 0 w c 2 0kPa 13 0 w c 3 2kPa for LP g...

Page 55: ...a ground terminal Keep any excess length of the power supply cord on the outside of the water heater If local codes require hard wiring see instructions for Hard Wiring the Electrical Connections belo...

Page 56: ...56 Electrical Electrical Wiring cont Wiring Diagram INSTALLATIONINSTRUCTIONS...
Page 57: ...here it can come in contact with water Avoid installing the remote control in the following areas and or conditions area exposed to heat area exposed to steam area exposed to oil area exposed to direc...

Page 58: ...he location of the remote control and the water heater Remove the remote control from the base plate Feed the remote control cable through the large center hole in the base plate Install the base plat...

Page 59: ...t the remote control extension cables from the remote control to the remote control connection terminals NOTICE The remote control wire connection terminals are not polarity sensitive Firmly tighten t...

Page 60: ...for such loss or injury resulting from the use of such unauthorized devices Installation Precautions Follow all installation instructions covered in this manual Check the inlet gas pressure to make su...

Page 61: ...ngth is observed Water supply has sufficient pressure Air has been purged from the water heater and the piping Water connections tight and free from leaks Water filter is clean and in place All piping...

Page 62: ...e suitable for use with drinking water If this water heater is installed in an application intended to supply domestic hot water needs and hot water for space heating purposes do not connect the heate...

Page 63: ...pt to light the burner by hand 4 Turn the Gas Shutoff Valve located on the outside of the unit clockwise to the OFF position 5 Wait five 5 minutes to clear out any gas If you then smell gas STOP Follo...

Page 64: ...e front cover of this manual Turn the gas shut off valve counterclockwise to the ON position Turn on all electric power to the water heater The water heater burner will automatically light when there...

Page 65: ...Turn on the remote control Turn off the gas and water to the water heater by closing the shut off valves Press the UP adjustment button repeatedly until 120 F 49 C shows in the LED display Hold the U...

Page 66: ...te control Turn off the gas and water to the water heater by closing the shut off valves Press the DOWN adjustment button repeatedly until 100 F 38 C or 85 F 29 C shows in the LED display Hold the DOW...

Page 67: ...117 and USC2 117 Residential water heater temperatures can be adjusted down to 85 F 29 C when required To change the temperature settings down to 85 F 29 C Turn on the remote control Turn off the gas...

Page 68: ...is above 6 560 ft 2 000 m and below 9 840 ft 3 000 m change the fourth switch to the ON position UP NOTICE DO NOT alter any other DIP switch settings The manifold pressure will be reduced accordingly...

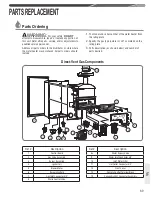
Page 69: ...the rating plate 2 Specify the gas type natural or LP as marked on the rating plate 3 Parts description as shown below and number of parts desired Direct Vent Gas Components 11 9 10 7 8 2 5 1 4 3 6 15...

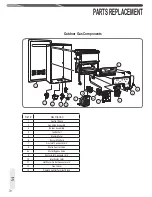
Page 70: ...s Valve Assembly 3 Burner Assembly 4 Igniter Coil 5 Blower Motor 6 Burner Manifold 7 Gas Inlet Connector 3 4 8 Water Control Valve 8a Water Bypass Valve 9 Water Inlet Connector 3 4 10 Inlet Water Filt...

Page 71: ...onent parts and one 1 year for certain labor as described under the heading LABOR SHIPPING AND PROCESSING COST if the water heater is installed in a system in which the water is re circulated using a...

Page 72: ...to have features not found in the defective water heater or the defective component part s you will be charged for the difference in price represented by those required features If you pay the price...

Reviews: