background image

Introduction

The Rio heater produces radiant heat like the sun, warming people and objects rather than the air in between.
It is mounted on an adjustable bracket that allows the heat to be directed exactly where it is required. Its
attractive, lightweight design means that it is effective yet unobtrusive. The Rio is primarily designed for indoor
use but can be used outside under an appropriate awning, umbrella canopy, etc.

Please read the following instructions carefully before use. The safety of this heater is guaranteed only by
its correct usage in accordance with these instructions, therefore it is recommended that they are
retained for future reference.

Caution

Before using this appliance:

Check that the voltage indicated on the type plate corresponds to the mains supply voltage.

Ensure that the heater has been securely fastened in its final mounting position.

Disconnect from the mains by removing the plug from its socket, during installation, cleaning and/or
replacing the emitter and always ensure that the emitter is cool.

Do not handle the halogen lamp with bare hands. If it is inadvertently touched, remove finger marks with
a soft cloth and methylated spirit or alcohol. Otherwise, the marks will burn into the quartz glass causing
premature heater failure.

Do not use an extension cable with this product.

Keep the mains cable away from the body of the heater which will get hot during use.

Do not cover or obstruct the heater while it is in use.

Ensure that children do not tamper with the heater.

Do not insert any object through any slot or opening in the heater.

Do not use if guard is not present.

Always install following the minimum mounting height.

Warning - This appliance must be earthed!

Risk of Fire

Keep combustible materials such as furniture, papers, clothes and curtains at least
1.8m (6 feet) from the front of the heater and away from the sides and rear. If the
lamp is to be used outside, we recommend that a waterproof or indoor socket is used.

Specification

TABLE 1. UK and European heaters

Part

Voltage

Total

Current

Min. height

Min. dist.

Min. dist.

Dimensions

Weight

No.

(V)

Power

(A)

from floor

from 

from side 

W x H x D

(kg)

(kW)

(m)

ceiling (m)

wall (m)

(mm)

*

Rio 010

*

230

1.0

4.3

2.4

0.3

1.5

390 x 100 x 108

1.65

*

Rio 015

*

230

1.5

6.5

2.4

0.3

1.5

390 x 100 x 108

1.65

*

Rio 020*

230

2.0

8.7

2.4

0.3

1.5

390 x 100 x 108

1.65

Use MCB Type 3.

*Horizontal mounting only.

TABLE 2. US heaters

Part

Voltage

Total

Current

Min. hgt

Min. dist.

Min. dist.

Dimensions

Weight

No.

(V)

Power

(A)

from 

from 

from side 

W x H x D

(lb)

(kW)

floor (ft)

ceiling (ft)

wall (in)

(in)

*

Rio 010 USA

*

120

1.0

8.3

7' 10

1

/

2

11

3

/

4

59

15

1

/

2

x 4 x 4

1

/

2

3lb 10oz

*

Rio 015 USA

*

120

1.5

12.5

7' 10

1

/

2

11

3

/

4

59

15

1

/

2

x 4 x 4

1

/

2

3lb 10oz

*

Rio 020 USA*

120

2.0

16.7

7' 10

1

/

2

11

3

/

4

59

15

1

/

2

x 4 x 4

1

/

2

3lb 10oz

Use MCB Type 3 or equivalent.

*Horizontal mounting only.

2

Summary of Contents for Rio 010

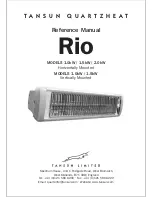
Page 1: ...Midlands B71 1BW England Tel 44 0 121 580 6200 Fax 44 0 121 580 6222 Email quartzinfo tansun com Website www tansun com Reference Manual Rio MODELS 1 0kW 1 5kW 2 0kW Horizontally Mounted MODELS 1 0kW 1 5kW Vertically Mounted T A N S U N Q U A R T Z H E A T ...

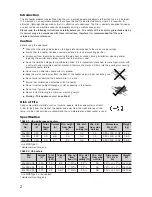
Page 2: ...ble with this product Keep the mains cable away from the body of the heater which will get hot during use Do not cover or obstruct the heater while it is in use Ensure that children do not tamper with the heater Do not insert any object through any slot or opening in the heater Do not use if guard is not present Always install following the minimum mounting height Warning This appliance must be ea...

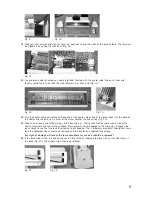
Page 3: ...cket Please refer to Table 1 or 2 for recommended positioning of the heater 2 Fix in the required angular position by tightening the fixing bolt on the bracket at the rear of the heater 3 The Rio bracket can be used to adjust the direction of the heater up and down see Fig 2 and side to side see Fig 3 This is done by loosening the bolts fixing the heater to the bracket and then retightening once t...

Page 4: ...in the lamp holder Fig 8 10 Repeat the removal of the end casing on the opposite end and remove the side reflector The lamp can be released form this side now and completely removed Fig 9 The heater should now be broken down in its part form as shown in Fig 10 4 Disconnect the lamp from the connector blocks by unscrewing the screws highlighted above in Fig 2 5 Unscrew the two self tapping screws s...

Page 5: ...n be applied to the two parts to engage the lugs enough to see that the lead is not going to get trapped This is extremely important Should you trap a lead the heatproof sleeve should be removed and the insulation inspected for damage Any signs of damage will render the lamp unsuitable for use and should be replaced 15 If the lamp lead is free the end casing can be fully fitted by tapping into pla...

Page 6: ...nd the locating lugs pushed in as shown in Fig 19 20 The end casing be aligned and providing the lead is not going to get trapped as step 15 push into place It is recommended that the heater is stood up on its fixed end and downward force applied to ensure everything goes back together correctly Fig 20 21 If the leads are free to move and the guard and side reflectors are in order the back plate s...

Page 7: ...oint the new lamp can be connected by doing the reverse of step 4 7 Follow steps 19 to 21 of terminal box models on previous pages 8 The heater can now be returned to its original mounting position and the mains power reconnected Following information is only for EU member states The use of this symbol indicates that this product may not be treated as household waste By ensuring this product is di...

Page 8: ...Unit 1 Ridgacre Road West Bromwich West Midlands B71 1BW England Tel 44 0 121 580 6200 Fax 44 0 121 580 6222 Email quartzinfo tansun com Website www tansun com Tansun Limited 2004 Part No 042216 Issue 2 September 2006 ...

Reviews: