6.
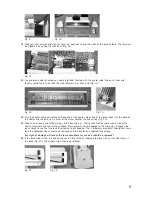
Gently pull the lamp wires through the body of the heater so the wires exit the terminal box (Fig 5).
7.
Staring at the left hand side, remove the end casing - this may require a few gentle taps to disengage
the locating lugs and allow the casing to become free. The back plate will also now be free from its
fixings (Fig 6).
8.
Slide out the side reflector and the guard completely through the open end to fully expose the lamp
holder (Fig 7).
9.
Release the lamp end by depressing the back of the
lamp holder. Gently lift the end of the lamp a few
millimetres so it is no longer being retained and ease
the lead though the hole in the lamp holder (Fig. 8).
10.
Repeat the removal of the end casing on the opposite
end and remove the side reflector. The lamp can be
released form this side now and completely removed
(Fig. 9). The heater should now be broken down in its
part form as shown in Fig. 10.
4.
Disconnect the lamp from the connector blocks by unscrewing the screws highlighted above in Fig. 2.
5.
Unscrew the two self-tapping screws (see Fig. 3) from each side of the casing and let the back pivot
down (Fig. 4).
Replacing the Lamp - Terminal Box Models
1.
Ensure the heater and lamp are cool and the power supply is disconnected by
removing the plug from the socket outlet.
2.
Remove the heater from its mounting and work on a safe, flat surface.
3.
Remove the two screws from the terminal box and lift off the lid.
4
Fig. 1
Fig. 2
Fig. 3
Fig. 4
Fig. 5
Fig. 6
Fig. 7
Fig. 8


